Plant Overview
Often called the "Green Strangler" or simply Japanese Hop, this vigorous vine is the rebellious, fast-growing cousin of the traditional brewing hop. While its lush, cascading foliage can look beautiful on a trellis, it is a master of mimicry and a fierce competitor in the wild, known for draping itself over entire trees like a heavy green blanket.
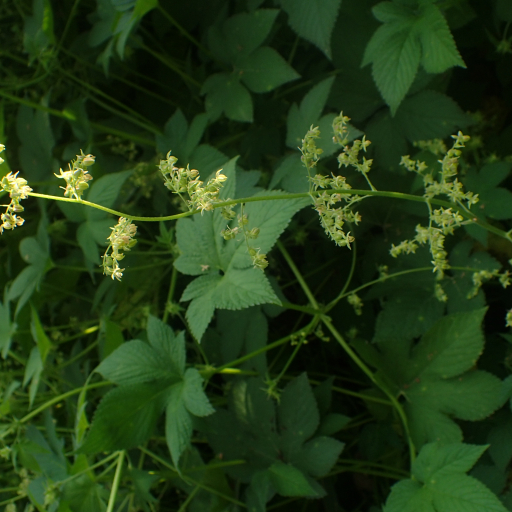
🔍 How to Identify
- 🍃 Lobed Leaves: The leaves are palm-shaped, usually featuring 5 to 9 deep, finger-like lobes with serrated (toothed) edges, giving them a sharp, star-like appearance.
- 🪝 Rough Texture: The stems and leaves are covered in tiny, downward-curving hooked hairs. If you run your hand along the vine, it feels remarkably like coarse sandpaper.
- 🎋 Twining Stems: Unlike plants with tendrils, this vine climbs by spiraling its main stem tightly around any vertical support, from fence posts to the trunks of unsuspecting saplings.
🏡 In Your Garden
- 🌿 Aggressive Growth: This is an annual plant that lives fast and dies young, but not before dropping thousands of seeds. It loves moisture and nitrogen-rich soil, often appearing suddenly near riverbanks or compost piles.
- ✂️ Management Needs: Because it grows several inches a day in peak summer, it can quickly "choke" other garden plants by blocking their sunlight. If you are trying to remove it, do so before the papery green flower cones appear in late summer to prevent a seed explosion the following year.
⚠️ Safety & Toxicity
- 🚫 Dermatitis Warning: The tiny hooked hairs on the stems are notorious for causing "Hop-picker's dermatitis." Contact with bare skin often results in itchy red welts or a painful rash.
- 🐾 Pet Caution: While it lacks the high concentrations of resins found in brewing hops (which are very toxic to dogs), the rough texture can cause mouth irritation, and ingestion may lead to upset stomachs in curious pets. Always wear gloves and long sleeves when handling.
✨ Fun Fact
Despite its name and family ties, the Japanese Hop is a "bitter disappointment" to brewers—it contains almost none of the lupulin oils required to flavor beer, making it purely ornamental and ecologically troublesome rather than a kit for homebrewing!

Detailed Care Instructions
To grow Humulus Japonicus (Japanese hop) plant, you can follow these steps:
- Decide on the planting location: Japanese hop plants prefer full sun to partial shade, so choose a spot in your garden where they can get at least 6 hours of direct sunlight per day.
- Prepare the soil: Japanese hop plants require well-draining soil. Improve the soil quality by incorporating organic matter like compost or well-rotted manure. This helps retain moisture while allowing excess water to drain away.
- Planting the rhizomes: Japanese hop plants are typically grown from rhizomes. Plant the rhizomes about 2 inches deep in the soil, spacing them 2 to 3 feet apart. Ensure the pointed side faces upwards.
- Watering: Water the plants regularly and ensure the soil remains consistently moist. Avoid overwatering, as it can lead to root rot. Mulching around the plants can help retain moisture and suppress weed growth.
- Support structure: Since Japanese hop plants are climbers, it is essential to provide a support structure like a trellis, fence, or pergola for them to grow on. Install the support system before the plants get too long to prevent damage.
- Fertilization: Apply a balanced, slow-release fertilizer during the growing season to supply essential nutrients. Follow the package instructions for appropriate amounts and timing.
- Pruning: Prune the plants in early spring to remove any dead or damaged growth. Additionally, you may need to trim back excessive growth during the growing season to manage their spread.
- Pest and disease control: Japanese hop plants are generally resistant to pests and diseases. However, occasional inspection for pests like aphids or spider mites is recommended. Treat any infestations with insecticidal soap or other appropriate methods.
- Harvesting: The hop flowers, known as cones, are typically harvested in late summer or early fall when they are dry and papery to the touch. Collect and dry the cones for use in brewing or other purposes.
- Winter care: Japanese hop plants are hardy perennials but benefit from protection in harsh winter climates. Mulch around the base of the plant to insulate the roots and cut back the above-ground growth in late fall or early winter.
By following these steps, you can successfully grow Humulus Japonicus plants in your garden.

Place in a window with dappled sun or a spot in the middle of a room. Or directly in a window facing west or east.

1. Check the soil moisture level before watering. Insert a finger or a moisture meter about 1-2 inches into the soil to ensure that it is dry enough to require watering.
2. Choose an appropriate watering method. Humulus Japonicus plants prefer to be watered from a watering can or a drip irrigation system rather than a sprinkler, which can damage the leaves and flowers.
3. Water the plant thoroughly. Pour water slowly and evenly over the soil until it begins to come out of the drainage holes at the bottom of the container or saturates the surrounding soil.
4. Avoid over-watering. Make sure to allow the soil to dry out slightly between watering sessions, as over-watering can lead to root rot and other fungal diseases.
5. Consider the plant's environmental conditions. Hot and humid weather or direct sunlight can increase the need for watering, while cooler temperatures and lower light levels may reduce it.
6. Monitor the plant for signs of stress. Wilting leaves, brown leaf edges, or slow growth may indicate that the plant is not getting enough water, while yellowing leaves or root rot may indicate over-watering.
The plant requires regular fertilization during its growing season. Use a balanced fertilizer with equal parts nitrogen, phosphorus, and potassium. Apply the fertilizer every two weeks during the spring and summer months, and decrease the frequency to once a month during the fall. Be sure to water the plant thoroughly after fertilizing to prevent burning of the roots.
For successful growth of Humulus Japonicus, it is essential to use a well-draining and nutrient-rich soil. The soil should have a slightly acidic to neutral pH level ranging from 6.0 to 7.5. It should be loose and aerated to ensure adequate air circulation and water drainage. The ideal soil for this plant is a loamy soil that consists of a combination of sand, clay, and organic matter. It should also contain sufficient amounts of nitrogen, phosphorus, and potassium to support the plant's growth and development. Additionally, adding organic matter such as compost or well-rotted manure to the soil will improve its fertility and overall health. It is important to avoid using heavy, compacted, or waterlogged soils, as these can lead to root rot and other problems for the plant.
To propagate this plant, start by taking stem cuttings from a healthy parent plant. Choose a stem that is mature and has at least two leaf nodes. Cut the stem at a 45-degree angle with clean, sharp shears, ensuring that the cutting is at least 4-6 inches long. Remove the leaves from the bottom half of the stem.
Next, dip the cut end of the stem into rooting hormone powder to encourage root growth. Plant the cutting in a well-draining soil mix and water it thoroughly. Cover the pot with a clear plastic bag to create a mini greenhouse and keep the cutting at a warm, bright location with indirect sunlight.
Check the cutting regularly, ensuring that the soil remains moist but not waterlogged. In about 6-8 weeks, the cutting should have developed roots and be ready for transplanting into a larger pot or directly into the garden.
When planting the rooted cutting, ensure that the soil is well-draining and in a location with full to partial sun exposure. Water the plant regularly and provide support for climbing vines if necessary.
With proper care and maintenance, the propagated plant should grow and produce new shoots, which can be harvested and replanted for continual propagation.


