Plant Overview
Often called the "Bracted Hydrangea," this Japanese native is the refined "introvert" of the hydrangea family. While its cousins flaunt massive, loud pom-poms, this species is known for its elegant, slow-unfolding mystery. It is a late-summer star, often starting its show just as other garden flowers begin to fade, making it a prized choice for woodland gardens.
🔍 How to Identify
- 🌸 Peony-Like Buds: The most striking feature is the flower bud. Before opening, the blooms are encased in large, rounded bracts that look remarkably like pale green peonies or oversized pearls.
- 🌿 Felted Foliage: Unlike the waxy or glossy leaves of common hydrangeas, these leaves are soft, dull green, and covered in fine, bristly hairs, giving them a distinctive "sandpaper" or felt-like texture.
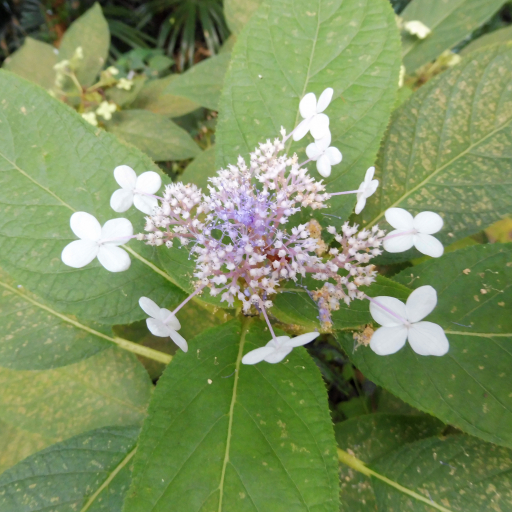
- 🎨 Lacecap Structure: When the buds finally "burst," they reveal delicate lacecap clusters. These consist of a center of tiny, fertile flowers surrounded by a ring of larger, showy sterile florets in shades of lavender, misty blue, or creamy white.
🏡 In Your Garden
- ☁️ Shadow Seeker: Because of its thin, hairy leaves, this plant is highly sensitive to the sun's heat. It thrives in dappled light or deep shade; even a few hours of direct afternoon sun can cause the foliage to scorch and turn crisp.
- 💧 Moisture Consistency: It has a shallow root system that "drinks" quickly. It doesn't just prefer moisture—it demands it. Using a thick layer of organic mulch is essential to keep the root zone cool and prevent the plant from wilting during summer dry spells.
⚠️ Safety & Toxicity
- 🐾 Toxic to Pets: Like all members of the Hydrangea genus, this plant contains cyanogenic glycosides.
- 🤢 Symptoms: If leaves or flower buds are chewed by cats, dogs, or horses, it can cause stomach upset, vomiting, and lethargy. It is generally not life-threatening unless eaten in large quantities, but it’s best kept out of reach of curious nibblers.
✨ Fun Fact
The species name involucrata comes from the Latin word for "wrapped" or "enclosed." This refers to the unique involucre—the protective ruff of leaves that tightly wraps the flower head like a secret gift until it is ready to bloom.

Detailed Care Instructions
To grow Hydrangea involucrata, you can follow these steps:
- Choosing the right location: Hydrangea involucrata prefers partial shade to shade, so select a planting spot with dappled sunlight or a few hours of direct morning sunlight.
- Soil preparation: These plants thrive in well-draining, rich soil that is slightly acidic. Amend the soil with organic matter like compost or peat moss to improve drainage and fertility.
- Planting: Dig a hole that is wider and deeper than the plant's root ball. Place the plant in the hole, making sure it sits at the same depth as it was in the nursery container. Backfill the hole with soil and gently firm it around the plant.
- Watering: Hydrangea involucrata requires regular watering to keep the soil moist but not waterlogged. Water deeply at least once a week, especially during dry spells or hot summers.
- Mulching: Apply a layer of organic mulch around the base of the plant to help retain moisture, suppress weeds, and regulate soil temperature.
- Pruning: Prune Hydrangea involucrata immediately after flowering to remove spent blooms and maintain a neat shape. Avoid pruning in late summer or fall, as it may remove next year's flower buds.
- Fertilizing: Apply a balanced, slow-release fertilizer in spring or use a liquid fertilizer every 2-3 weeks during the growing season. Follow the instructions on the fertilizer package for proper dosage.
- Protecting from frost: Hydrangea involucrata is not frost-tolerant. If you live in a colder climate, consider providing winter protection like wrapping the plant in burlap or covering it with a frost blanket.
Remember to regularly monitor the plant for pests and diseases and take appropriate measures if any issues arise. With proper care, your Hydrangea involucrata plant should grow and flourish over time.

Place in a window with dappled sun or a spot in the middle of a room. Or directly in a window facing west or east.

To water this particular plant, you should first determine the moisture level of the soil to ensure it is not over-watered. Overwatering can cause root rot and harm the plant. However, hydrangeas generally require a moderate amount of watering, with the soil being kept moist but not water-logged.
A good way to check the soil moisture level is to dig down about an inch or two and feel the soil around the roots. If the soil is dry, it’s time to water again. If you have yet to water the plant, water slowly and deeply, allowing the water to sink into the soil around the roots.
It is important to avoid watering the foliage of the plant, as this can cause diseases and fungal growth. Instead, water directly at the base of the plant. During the summer months, when temperatures are high and the soil dries out quicker, you may need to water the plant every 2-3 days, or even daily in extreme heat.
During winter, the plant goes into dormancy and requires less water. You should reduce the frequency of watering, making sure to keep the soil slightly moist.
Overall, it is important to monitor the plant's moisture level regularly and adjust your watering routine accordingly.
To fertilize this plant, apply a slow-release, balanced fertilizer in early spring before new growth appears. Follow the instructions on the fertilizer package for the appropriate amount to apply based on the size of the plant. Apply the fertilizer evenly around the base of the plant, taking care not to get any on the leaves or stems. Water thoroughly after fertilizing to ensure the nutrients are absorbed by the roots. Repeat the fertilization process once or twice throughout the growing season, spacing out applications by several months. Avoid fertilizing too close to the end of the growing season, as this can encourage new growth that may not have time to harden off before winter.
Hydrangea Involucrata prefers a soil that is well-draining yet retains some moisture, and slightly acidic with a pH range between 5.0-6.0. The soil should be rich in organic matter and humus, and have good aeration and drainage to prevent waterlogging and root rot. It is recommended to mix in some peat moss or well-aged compost to improve the soil texture and fertility. Additionally, adding some slow-release fertilizer or bone meal can help provide the necessary nutrients for healthy growth and flowering.
To propagate this plant, you will need to take a cutting from the parent plant. Choose a branch that is healthy and has at least three nodes (the place on the stem where leaves grow). Cut the branch just below the third node with a sharp, clean pair of scissors or pruning shears.
Remove any leaves from the bottom half of the cutting. Dip the cut end into rooting hormone to help it establish roots more quickly. Fill a small pot with moist, well-draining soil.
Make a small hole in the soil and insert the cutting, gently firming the soil around it. Water the cutting and cover it with a plastic bag or a clear plastic dome to create a humid environment.
Place the pot in a bright, but not direct, light spot and keep the soil moist. After a few weeks, you should see new growth appearing on the cutting, which is a sign that it has rooted.
After a few more weeks, when the roots are well-established and the plant has started to grow vigorously, you can remove the plastic covering and gradually acclimate it to normal room conditions. In a few months, you'll have a healthy new plant to enjoy!


