Plant Overview
Known as "True Indigo" or "Blue Gold," this ancient legume has colored the world’s textiles for millennia. From the robes of Egyptian Pharaohs to the first pairs of Levi’s jeans, this shrub's leaves hide a secret chemical that transforms into a deep, regal blue only upon oxidation. Originally from the tropical regions of Asia and Africa, it is now cherished by hobbyists both as a historical artifact and a hardy, soil-improving garden specimen.
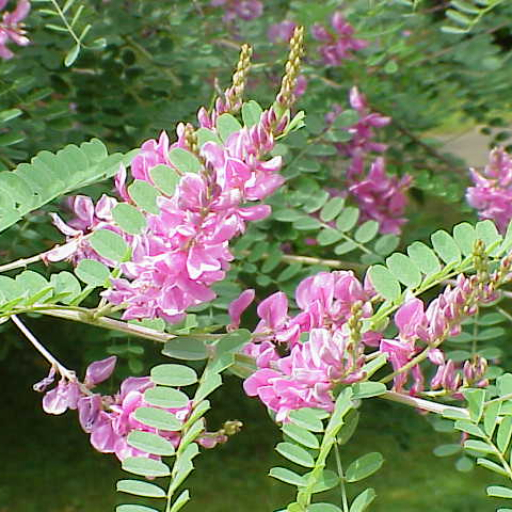
🔍 How to Identify
- 🌿 Feathery Foliage: Features pinnate leaves consisting of about 9 to 15 light green, oval-shaped leaflets that give the shrub a delicate, airy appearance.
- 🌸 Butterfly Blooms: Clusters of small, pink or violet pea-like flowers grow on upright spikes (racemes), usually appearing during the height of summer.
- 🫛 Curved Pods: After flowering, the plant produces slender, cylindrical seed pods that often curve slightly, a classic hallmark of the Fabaceae (pea) family.
🏡 In Your Garden
- 🌱 Nitrogen Fixer: As a member of the legume family, Indigofera has a symbiotic relationship with soil bacteria to "fix" nitrogen, meaning it actually improves the soil quality for the plants growing around it.
- ☀️ Sun Seeker: This plant thrives on intense heat and full sun; without enough light, it becomes "leggy" and loses its ability to produce the precursor compounds needed for high-quality pigment.
- 💧 Taproot Sensitivity: Once established, it is remarkably drought-tolerant, but it hates being moved. The deep taproot is fragile, so choose its permanent "forever home" in your garden carefully to avoid transplant shock.
⚠️ Safety & Toxicity
- 🐾 Mild Toxicity: While not considered high-risk, the plant contains compounds that can cause gastrointestinal upset if the leaves or seeds are ingested by curious pets or small children.
- 🧤 Skin Safety: The raw plant is generally safe to handle, though the concentrated dye extraction process can cause temporary skin staining—a mark historically known as the "dyer's hand."
✨ Fun Fact
In the 18th century, indigo was so valuable in the American colonies that it was referred to as "Blue Gold" and was even used as a form of currency. The word "indigo" itself comes from the Greek word indikon, which simply means "from India."

Detailed Care Instructions
To grow Indigofera tinctoria (also known as True indigo or Dyer's indigo), follow these steps:
- Climate and soil requirements: Indigofera tinctoria prefers warm, tropical climates or Mediterranean-like conditions. It can tolerate a wide range of soils but thrives in well-draining sandy or loamy soils.
- Choosing the right location: Select a spot that receives full sun for at least 6 hours a day. Indigofera tinctoria is not suitable for indoor cultivation.
- Timing: Start the seeds indoors about 4-6 weeks before the last frost date in your area. This will give the plants a head start and ensure they have a longer growing season.
- Seed preparation: Soak the seeds in water for 24 hours before planting to enhance germination. This can help soften the seed coat and promote quicker sprouting.
- Planting: Plant the soaked seeds in individual pots or seed trays, about ¼ inch deep in well-draining potting soil. Keep the soil consistently moist but not waterlogged.
- Transplanting: Once the danger of frost has passed, and the seedlings have grown to a height of about 4-6 inches, transplant them to their permanent location in the garden. Space the plants about 18-24 inches apart if growing multiple plants.
- Watering: Indigofera tinctoria requires regular watering. Water deeply, allowing the soil to dry out slightly between waterings to prevent overwatering and root rot.
- Fertilization: Fertilize the plants with a balanced, organic fertilizer or compost every 4-6 weeks during the growing season to promote healthy growth.
- Pruning: Indigofera tinctoria benefits from regular pruning to maintain its shape and encourage bushier growth. Prune back about 1/3 of the plant after blooming or whenever necessary.
- Harvesting: Harvest the leaves when the plant is about 1-2 years old. Cut the leaves close to the stem, leaving sufficient growth for future regrowth.
- Dye extraction: To extract the indigo dye, follow specific dye extraction methods using the harvested leaves. Many resources and tutorials are available online that provide detailed instructions for dye extraction.
Remember that growing Indigofera tinctoria for dye extraction requires patience, as it takes time for the plant to mature and develop a suitable leaf yield for dye production.

Place in a bright room that is sun drenched almost all day. Or directly in a south-facing window.

1. First, determine the appropriate soil type for the Indigofera Tinctoria plant. Ideally, the plant requires well-drained soil that is rich in organic matter.
2. When watering the plant, it is important to avoid getting water on the leaves as this could lead to fungal diseases. Therefore, the best method is to water the soil directly.
3. The plant should be watered consistently to keep the soil evenly moist, but not waterlogged. In general, the plant will require watering every 2-3 days, depending on weather conditions and soil type.
4. To ensure that the plant is getting enough water, check the soil frequently. If the soil feels dry to the touch, it is time to water again.
5. During periods of drought or high temperatures, the plant may require more frequent watering.
6. It is also important to note that the Indigofera Tinctoria plant can tolerate periods of drought. Therefore, avoid overwatering the plant as this can lead to root rot.
7. Lastly, always use room temperature water to avoid shocking the plant with cold water.
- Begin fertilizing the Indigofera Tinctoria plant in late spring, once new growth is visible.
- Choose a high-quality, balanced and slow-release fertilizer with equal proportions of nitrogen (N), phosphorus (P), and potassium (K), such as a 10-10-10 formula.
- Dilute the fertilizer according to the manufacturer's instructions, usually mixing it with water at a specific ratio.
- Water the plant thoroughly before applying the fertilizer to ensure the soil is moist but not waterlogged.
- Apply the diluted fertilizer evenly around the base of the plant, ensuring it reaches the soil rather than just spraying the foliage.
- Avoid over-fertilizing, as it can lead to excessive growth or burning of the plant.
- Repeat the fertilization process every 4-6 weeks throughout the growing season.
- During the dormant period in winter, suspend fertilization until new growth resumes in the following spring.
- Monitor the plant for any signs of nutrient deficiencies or excesses, such as yellowing or browning leaves, and adjust fertilization accordingly.
- Always follow the specific fertilizing recommendations for your region and climate, as environmental factors can influence plant nutrition requirements.
When growing the plant Indigofera Tinctoria, it is important to use a well-draining soil that is rich in nutrients and organic matter. The soil pH should be in the slightly acidic to neutral range, ideally between 6.0 and 7.5. It is important to avoid soils that are heavy, waterlogged, or unless enriched, as these conditions can cause root rot and hinder the growth of the plant. Additionally, it is recommended to fertilize the plant regularly with a balanced fertilizer to promote healthy growth and a full yield.
To propagate Indigofera Tinctoria plant, you can follow these steps:
- Collect cuttings: Select healthy stems that are about 4-6 inches long. Ensure that the stems are not flowering or producing seeds. Use clean, sharp pruning shears or a knife to make a clean cut just below a leaf node.
- Prepare the cutting: Remove the lower leaves from the cutting, leaving only the top few leaves. This will optimize energy resources for root development. If there are any flowers or buds present, pinch them off to redirect energy towards rooting.
- Hormone treatment (optional): While not necessary, you can dip the cut end of the stem into a rooting hormone powder or gel. This can enhance rooting and increase success rates.
- Prepare the planting medium: Fill a container or seed tray with a well-draining potting mix. You can use a mixture of peat moss, perlite, and vermiculite. Moisten the soil slightly, ensuring it's not waterlogged.
- Plant the cutting: Create a small hole in the soil using a pencil or your fingertip. Insert the lower end of the cutting into the hole, ensuring that at least two nodes are submerged in the soil. Gently press the soil around the cutting to provide stability.
- Provide appropriate conditions: Place the container in a location that receives bright, indirect sunlight. Protect it from direct sunlight, as excess heat can harm the cutting. Maintain a temperature between 70-80°F (21-27°C) for optimum rooting.
- Mist regularly: Spray a fine mist of water over the foliage and soil to maintain humidity levels. This will prevent the cutting from drying out. However, avoid over-watering to prevent rotting.
- Monitor and care: Keep a close eye on the cutting to ensure it doesn't wilt or show signs of stress. Mist as needed, adjust its placement if necessary, and provide gentle air circulation to discourage fungal diseases.
- Root development: After a few weeks, inspect the cutting for signs of root development. Gently tug on the stem to check for resistance, indicating the formation of roots. Once roots have established, growth will become more evident.
- Transplanting: Once the cutting has a well-established root system with multiple roots, it's ready for transplanting. Choose a larger pot or prepare a suitable outdoor spot with well-draining soil. Carefully remove the cutting from the container, ensuring minimal damage to the roots. Plant it in the new location and water thoroughly.
Remember to provide ongoing care, including regular watering, fertilization, and protection from extreme weather conditions. With time and proper nurturing, your Indigofera Tinctoria plant will grow into a beautiful addition to your garden.


