Plant Overview
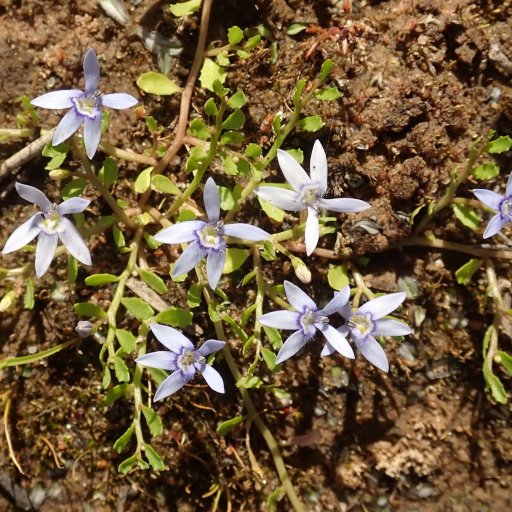
Known affectionately as the Blue Star Creeper, this tiny powerhouse transforms ordinary garden paths into celestial carpets. Originating from the damp grasslands of Australia and New Zealand, it is beloved by gardeners for its incredible resilience and its ability to bloom so profusely that the foliage nearly disappears under a sea of pale blue stars. It is the go-to choice for those looking to add a "fairy-tale" feel to their stone walkways.
🔍 How to Identify
- 🌸 Star-Shaped Blooms: Features tiny, five-petaled flowers in shades of pale blue, lavender, or white that look like fallen stars nestled in the grass.
- 🍃 Dense Foliage: The leaves are minute, oval, and bright green, growing so closely together that they create a soft, moss-like mat only an inch or two high.
- 🌱 Creeping Habit: Look for prostrate stems that "creep" along the soil surface, rooting at every node to form a tight, interwoven web.
🏡 In Your Garden
- 👟 Foot Traffic Hero: This is one of the few flowering groundcovers that can handle "heavy" light traffic. It is tough enough to be stepped on by bare feet or pets without bruising, making it perfect for filling gaps between stepping stones.
- 💧 Moisture Seeker: Because of its "Fluviatilis" (meaning "of the river") name, it craves consistent moisture. It thrives in damp spots where other plants might rot, and it will quickly wilt if left in parched, bone-dry soil.
⚠️ Safety & Toxicity
- 🐾 Mildly Toxic: The plant contains milky sap with alkaloids similar to those found in Lobelia. While not usually deadly, it can cause stomach upset if ingested by curious pets or small children.
- 🧤 Skin Irritation: Some sensitive individuals may experience a mild rash or "contact dermatitis" from the sap when dividing the plants or pulling weeds nearby. Wearing gloves is recommended for long gardening sessions.
✨ Fun Fact
Despite its delicate appearance, the Blue Star Creeper is often used as a "mow-less lawn." In temperate climates, it stays evergreen year-round and provides a nectar source for tiny native pollinators that other larger flowers might ignore!

Detailed Care Instructions
| Humidity | Normal |
| Lighting | Full Sun |
| Difficulty | Medium |
| Hardiness Zones | 6 - 9 |
To grow Isotoma fluviatilis, commonly known as blue star creeper or laurentia, you can follow the steps below:
- Obtaining the plant: Purchase Isotoma fluviatilis seeds or young plants from a local nursery or reputable online sellers.
- Selecting a suitable location: Choose a location where the plant can receive partial to full sun. Blue star creeper also thrives in shade or dappled light. Ensure the soil is well-draining and fertile.
- Preparing the soil: Loosen the soil and remove any weeds or debris from the planting area. Work in organic matter, such as compost or well-rotted manure, to improve soil fertility and drainage.
- Planting seeds: If starting from seeds, sprinkle the Isotoma fluviatilis seeds over the prepared soil and lightly press them into the surface. Water gently to ensure the seeds settle in.
- Transplanting young plants: If using young plants, dig a hole slightly larger than the root ball and place the plant in the hole. Backfill with soil, firm it gently, and water thoroughly.
- Watering: Keep the soil consistently moist, but avoid overwatering, as Isotoma fluviatilis prefers slightly damp soil rather than saturated conditions. Water deeply whenever the top inch of soil feels dry to the touch.
- Fertilizing: Provide a balanced, slow-release fertilizer once every season to promote healthy growth. Follow the instructions on the fertilizer packaging for appropriate dosage.
- Mulching: Apply a layer of organic mulch, like wood chips or shredded leaves, around the plants to help conserve moisture, suppress weeds, and maintain a more even soil temperature.
- Pruning: Trim the plant occasionally to promote denser growth and control its spreading habit. You can also prune after the flowering season to maintain a tidy appearance.
- Protecting from extreme temperatures: If you live in an area with severe winters, blue star creeper may need extra protection. Consider covering the plants with mulch or a frost cloth to shield them from frost and extreme cold.
- Propagation: Isotoma fluviatilis can be propagated through division. Every few years, carefully dig up a clump, separate it into smaller sections, and replant them in desired areas.
By following these steps, you can successfully grow and enjoy the beautiful Isotoma fluviatilis plant.

Place in a window with dappled sun or a spot in the middle of a room. Or directly in a window facing west or east.

Isotoma Fluviatilis should be watered with a gentle stream of water at the base of the plant, directly around the root zone. Avoid getting water on the foliage or flowers as this can encourage fungal growth. Watering should be consistent but not excessive, allowing the soil to dry out slightly between waterings. It is important to make sure the soil is well-draining to prevent waterlogged conditions, which can lead to root rot. During hot, dry spells, the plant may require more frequent watering to prevent it from wilting. Mulching around the base of the plant can help retain moisture in the soil and reduce the need for frequent watering.
To fertilize this plant, apply a balanced fertilizer with an N-P-K ratio of 10-10-10 every two to three months during the growing season. Dilute the fertilizer to half strength before applying it to the soil. Avoid getting fertilizer on the foliage or stem to prevent burning the plant. Water the plant thoroughly after fertilizing. If the plant shows signs of nutrient deficiency, such as yellowing leaves or stunted growth, increase the frequency of fertilization.
Isotoma Fluviatilis plant prefers well-draining soil that contains equal parts of loam, sand, and peat moss. The pH range should be between 6.0 to 7.5, which is slightly acidic to neutral. The soil should be rich in organic matter to help with moisture retention and nutrient uptake. Avoid heavy, clay soils that tend to retain too much moisture. Adding perlite or coarse sand can improve drainage. Regular fertilization is necessary to maintain healthy growth, especially during the growing season. Avoid using heavy chemical fertilizers and opt for organic alternatives instead.
To propagate this particular plant, you will need to take stem cuttings. Firstly, choose a healthy plant to take cuttings from and make sure you have a clean, sharp pair of scissors. Cut a section of stem that is approximately 4-6 inches long and has a few sets of leaves. Remove any leaves from the bottom 2 inches of the stem.
Next, prepare a pot with a good quality potting mix. Make a hole in the center of the potting mix and insert the stem cutting, making sure the bottom of the cutting is covered with the potting mix. Water the cutting well and cover the pot with a clear plastic bag to create a humid environment.
Place the pot in a bright, indirect light location and keep the soil lightly moist. After a few weeks, the cutting should start to grow roots and can be slowly introduced to lower humidity levels by gradually removing the plastic bag. Once the cutting has established roots and new growth, it can be transplanted into a larger pot or directly into the garden.