Plant Overview
Often called the Sword-leaf Torch Lily, this South African native brings a structural, architectural elegance to any landscape. While many of its cousins are famous for "fire" colors, Kniphofia ensifolia is prized for its more sophisticated palette of lime-green and buttery-yellow. It stands like a tall, glowing candle in the summer garden, offering a vertical accent that is hard to ignore.
🔍 How to Identify
- 🗡️ The Foliage: True to its name, the leaves are rigid, bluish-green, and deeply keeled (V-shaped). They resemble long swords and can form a dense, fountain-like mound.
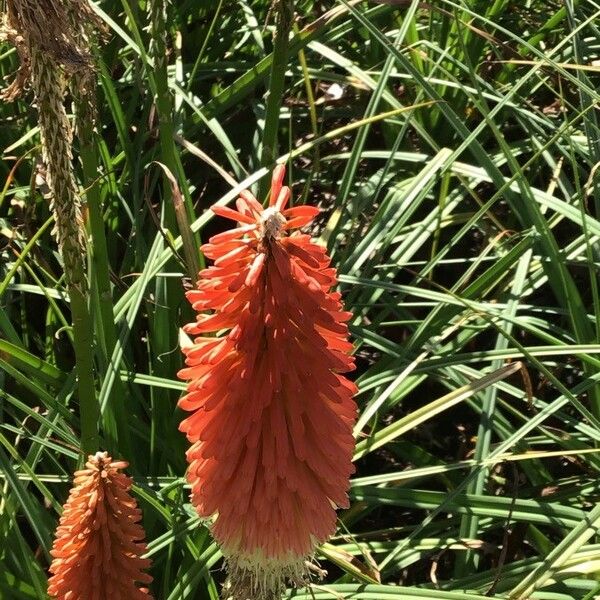
- 🕯️ The Bloom Spike: It produces a stout, leafless stem topped with a dense, cylindrical cluster of tubular flowers.
- 🎨 Color Gradient: The buds at the top are often a soft greenish-white or pale orange, opening into creamy white or bright yellow flowers as they mature downward.
🏡 In Your Garden
- 💧 Thirsty Roots: While most "Red Hot Pokers" are famous for surviving droughts, K. ensifolia naturally grows near marshes and mountain streams. It is much happier with "wet feet" than other varieties and thrives in soil that stays consistently moist.
- ☀️ Sun Seeker: To get those iconic tall spikes, it needs full sun. In too much shade, the flower stalks may lean or become "floppy" as they search for light.
- 🐝 Nectar Bar: The tubular flowers are a massive hit with pollinators. If you live in a region with hummingbirds, expect them to become daily visitors to these nectar-rich towers.
⚠️ Safety & Toxicity
- ✅ Safe Status: Kniphofia ensifolia is generally considered non-toxic to humans, cats, and dogs. It is a "pet-safe" choice for a structural garden.
- 🧤 Sharp Edges: Though not poisonous, the leaf margins can be quite sharp and serrated. It is wise to wear gloves when pruning or dividing the plant to avoid irritating "paper cuts" on your hands.
✨ Fun Fact
The name ensifolia comes from the Latin word ensis, meaning "sword." This isn't just a poetic description—the leaves were historically used by indigenous groups in Southern Africa for weaving and creating strong fiber bonds.

Detailed Care Instructions
Growing Kniphofia ensifolia, commonly known as the Red Hot Poker plant, can be a rewarding experience due to its striking, torch-like flower spikes. Here’s a step-by-step guide to help you grow this vibrant plant:
1. Selecting a Location
- Sunlight: Choose a location that receives full sun to partial shade. Full sun is preferable for best flowering.
- Soil: The plant prefers well-draining soil. If your garden soil is heavy clay, consider amending it with sand, compost, or organic matter to improve drainage.
2. Planting
- Timing: Plant Kniphofia ensifolia in the spring or early fall.
- Spacing: Space plants about 18-24 inches apart to allow for growth and air circulation.
- Depth: Dig a hole that's twice the width and the same depth as the plant’s root ball. Position the plant in the hole so that the crown of the plant (where the roots meet the stem) is level with the soil surface.
3. Watering
- Initial Watering: Water thoroughly after planting to help establish roots.
- Regular Watering: Water moderately. The soil should be kept moist but not waterlogged. Once established, Kniphofia ensifolia is quite drought-tolerant and will only need watering during extended dry periods.
4. Mulching
- Mulch around the base of the plant but not directly against the stem to help conserve moisture, suppress weeds, and regulate soil temperature.
- Organic Mulch: Use organic mulch like bark chips, straw, or compost.
5. Feeding
- Fertilization: Apply a balanced, slow-release fertilizer in early spring as new growth begins. Avoid excessive nitrogen as it can promote foliage growth at the expense of flowers.
- Compost: Adding a layer of compost around the plant in spring can also provide nutrients and improve soil structure.
6. Pruning and Maintenance
- Deadheading: Remove spent flower spikes to encourage more blooms and keep the plant tidy.
- Cutting Back: In late fall or early spring, trim back any dead or damaged leaves to the base of the plant.
- Division: Every few years, you may need to divide the plants to prevent overcrowding and maintain vigor. Divide in early spring or late summer, taking care to get as much of the root system as possible.
7. Pest and Disease Management
- Pests: Kniphofia ensifolia is relatively pest-resistant but keep an eye out for common garden pests like aphids and slugs.
- Diseases: Proper spacing and watering practices can help prevent fungal diseases. Ensure good air circulation and avoid overhead watering.
8. Winter Care
- Mulching: In colder regions, apply a thicker layer of mulch around the base of the plant in late fall to protect the roots from freezing temperatures.
- Protection: If you live in an area with harsh winters, consider providing additional protection by covering the plant with burlap or a frost cloth.
By following these guidelines, you should be able to successfully grow and enjoy the beautiful blooms of Kniphofia ensifolia in your garden.
To water this plant, it is important to first check the soil moisture level before providing any additional water. The best way to do this is by sticking your finger about an inch into the soil to see if it feels moist or dry.
If the soil feels dry, it is time to water the plant. Use a watering can or hose with a gentle spray nozzle to give the plant a thorough watering, making sure to avoid getting water on the leaves. Water directly at the base of the plant, being sure to soak the soil deeply.
It is important not to overwater this plant, as this can lead to root rot. Allow the soil to dry out slightly between waterings.
Here are the fertilizing instructions for Kniphofia ensifolia:
- Soil Preparation: Before planting, incorporate organic matter such as compost or well-rotted manure into the soil to improve fertility and drainage.
- Initial Planting: When you plant Kniphofia ensifolia, you can mix a balanced, slow-release granular fertilizer into the soil. Look for one with an N-P-K ratio (nitrogen, phosphorus, potassium) of around 10-10-10 or similar.
- Spring Feeding: In early spring, as new growth begins, apply a balanced slow-release granular fertilizer around the base of the plant. Follow the dosage instructions on the fertilizer package.
- Summer Boost: If your plant is actively growing and flowering, you can provide an additional light feeding in early summer. Use a balanced liquid fertilizer diluted to half strength and apply it with water.
- Watering: After fertilizing, water the plant thoroughly to help the nutrients seep into the soil and reach the roots.
- Avoid Over-Fertilizing: Fertilize sparingly; over-fertilizing can lead to excessive foliage growth at the expense of flowers.
- Mulching: Applying a layer of organic mulch around the base of the plant can help retain moisture and add nutrients to the soil as it decomposes.
- End of Season: As the growing season winds down, avoid fertilizing late in the season to allow the plant to prepare for dormancy.
Remember to always follow the specific instructions provided on your fertilizer package, as concentrations and application methods can vary.
Kniphofia Ensifolia plant requires a well-draining soil that is rich in organic matter. The soil should be slightly acidic to neutral, with a pH between 6.0 and 7.0. A sandy loam soil that has been amended with compost or other organic matter is ideal. The plant also prefers a soil that is moist but not waterlogged. Ensuring good drainage is crucial for this plant, as it can be susceptible to root rot if the soil is too wet. Avoid using heavy clay soils, as they are too dense and can limit water and nutrient uptake. A layer of mulch around the plant can help to maintain moisture levels in the soil and suppress weed growth.
Propagating Kniphofia ensifolia, a striking perennial known for its vibrant, torch-like flower spikes, can be accomplished through either division or seed. Here's a detailed guide on both methods:
Propagation by Division
- Timing: The best time to divide Kniphofia ensifolia is in early spring just as new growth begins or in late summer/early autumn after flowering.
- Preparation:
- Water the plant thoroughly a day before you plan to divide it. This ensures that the plant is well-hydrated and makes it easier to separate the clumps.
- Prepare the new planting site or pots with well-draining soil mixed with compost to retain moisture while providing adequate drainage.
- Water the plant thoroughly a day before you plan to divide it. This ensures that the plant is well-hydrated and makes it easier to separate the clumps.
- Digging Up:
- Carefully dig around the base of the plant, keeping a generous distance to avoid damaging the roots. Lift the plant out of the ground gently.
- Shake off excess soil to expose the roots and identify natural divisions or offsets.
- Carefully dig around the base of the plant, keeping a generous distance to avoid damaging the roots. Lift the plant out of the ground gently.
- Dividing:
- Using a sharp, sterile knife or spade, divide the clump into smaller sections. Each section should have at least one healthy growing point or shoot and a good portion of roots.
- Trim any damaged or dead roots with clean, sterile scissors.
- Using a sharp, sterile knife or spade, divide the clump into smaller sections. Each section should have at least one healthy growing point or shoot and a good portion of roots.
- Replanting:
- Plant the divisions at the same depth they were growing previously. Space them adequately to allow for future growth.
- Water the newly planted divisions thoroughly to settle the soil around the roots and help them establish.
- Plant the divisions at the same depth they were growing previously. Space them adequately to allow for future growth.
- Aftercare:
- Keep the soil moist but not waterlogged until the new plants are well-established.
- Mulch around the base to retain moisture and suppress weeds.
Propagation by Seed
- Keep the soil moist but not waterlogged until the new plants are well-established.
- Seed Collection:
- Collect seeds from mature plants after the flowering period. The seeds are found in the spent flower spikes and should be fully matured before collection.
- Allow the seed pods to dry on the plant, then remove and store them in a cool, dry place.
- Collect seeds from mature plants after the flowering period. The seeds are found in the spent flower spikes and should be fully matured before collection.
- Sowing Seeds:
- Sow seeds in late winter or early spring.
- Fill a seed tray or pots with a well-draining seed mix.
- Sprinkle the seeds on the surface of the soil and lightly cover them with a thin layer of vermiculite or fine sand, ensuring they are not buried too deeply.
- Sow seeds in late winter or early spring.
- Germination:
- Place the tray or pots in a propagator or cover with a clear plastic lid to maintain humidity. A warm environment with a temperature of around 18-22°C (64-72°F) promotes germination.
- Keep the soil consistently moist but not waterlogged by misting it regularly.
- Place the tray or pots in a propagator or cover with a clear plastic lid to maintain humidity. A warm environment with a temperature of around 18-22°C (64-72°F) promotes germination.
- Growing On:
- Once seedlings emerge, typically within 2-4 weeks, gradually acclimate them to normal growing conditions by removing the cover.
- Transplant the seedlings into individual pots when they are large enough to handle, continuing to grow them on until they are robust enough to be planted outdoors.
- Once seedlings emerge, typically within 2-4 weeks, gradually acclimate them to normal growing conditions by removing the cover.
- Planting Out:
- Once the risk of frost has passed and the seedlings have developed enough to withstand outdoor conditions, transplant them into the garden.
- Choose a sunny location with well-draining soil, and plant them at the same depth as they were growing in the pots.
General Tips:
- Once the risk of frost has passed and the seedlings have developed enough to withstand outdoor conditions, transplant them into the garden.
- Ensure good air circulation around the plants to reduce the risk of fungal diseases.
- Avoid excessive watering as this plant is relatively drought-tolerant once established.
- Remove spent flower spikes to encourage further blooming and prevent the plant from self-seeding uncontrollably.
By following these steps, you can successfully propagate Kniphofia ensifolia, whether you choose to do so by division or from seed.


