Plant Overview
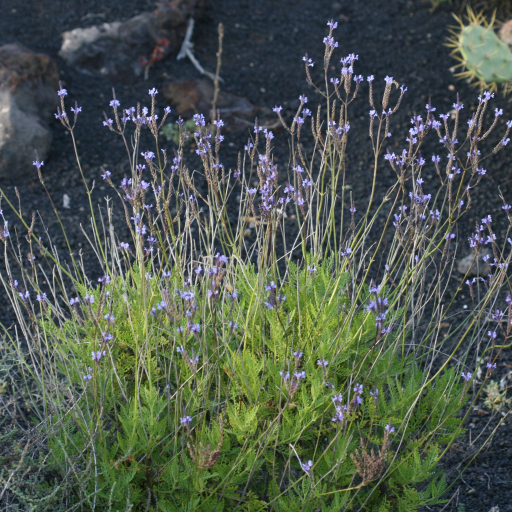
Known as the "Canary Island Lavender," this exotic beauty traded the classic needle-like leaves of its cousins for delicate, fern-like foliage. Hailing from the rugged, volcanic terrain of the Atlantic, it brings a wild, architectural flair to any sun-drenched space. It is often called "Lace Lavender" because of its intricate, deeply lobed silver-green leaves that look more like a forest fern than a common herb.
🔍 How to Identify
- 🌿 Fern-like Foliage: The most striking feature is its bipinnate leaves. Instead of simple blades, the foliage is deeply divided into small, lace-like segments.
- 🔮 Electric Blooms: It produces vibrant, deep purple-blue flower spikes that are often more branched and airy than the dense "cones" of English lavender.
- 👃 Spicy Aroma: If you rub the leaves, you’ll notice a scent that is resinous, piney, and spicy—quite a departure from the sweet, soapy perfume of French or English varieties.
🏡 In Your Garden
- 🌋 Volcanic Roots: In its native home, it thrives in rocky, well-draining soil. It hates "wet feet," so ensure your garden bed or pot has plenty of grit or perlite to let water escape quickly.
- ☀️ Sun Seeker: This plant is a true child of the sun. It requires bright, direct light to keep its foliage silver-grey and to encourage those stunning vertical flower stalks to reach for the sky.
- ❄️ Tender Nature: Unlike hardy lavender species, the Canary Island variety is frost-sensitive. If you live in a cold climate, it is best kept in a container that can be moved indoors when temperatures drop.
⚠️ Safety & Toxicity
- 🟢 Human Safety: Non-toxic to humans. The flowers are sometimes used in artisanal syrups or as garnishes, though the flavor is much stronger and more medicinal than culinary lavender.
- 🐾 Pet Caution: Like most members of the Lavandula genus, it contains linalool. While not deadly, it can cause digestive upset (vomiting or diarrhea) in cats and dogs if they decide to have a large snack.
- 🙌 Skin Check: The essential oils are potent. While therapeutic for many, those with very sensitive skin might experience mild redness if they handle the crushed foliage excessively.
✨ Fun Fact
Because this species blooms almost year-round in its native habitat, it serves as a vital "refueling station" for the Canary Island Large White butterfly and various rare endemic bees, making it a biodiversity superhero!

Detailed Care Instructions
To grow Lavandula Canariensis (Canary Island Lavender), here are some steps you can follow:
- Climate and location: Lavandula Canariensis can thrive in regions with a Mediterranean climate, characterized by hot and dry summers and mild winters. Choose a location that receives full sun exposure for at least 6-8 hours a day.
- Soil preparation: These plants prefer well-draining soil with a slightly alkaline pH. Amend heavy or clay soil with organic matter like compost or peat moss to improve drainage. The addition of sand can also help improve drainage.
- Planting: You can start Lavandula Canariensis by sowing seeds indoors in spring or by planting established seedlings in the garden. If planting seeds, sow them in seed-starting mix, keeping the soil consistently moist until germination. If using seedlings, dig a hole that is slightly larger than the root ball, place the plant in the hole, and backfill with soil. Space the plants about 2-3 feet apart to allow for air circulation.
- Watering: Once established, Lavandula Canariensis is drought-tolerant and only requires watering during dry spells or in extreme heat. Avoid overwatering, as this can cause root rot. Water deeply and then allow the soil to dry out between waterings.
- Mulching: Apply a layer of organic mulch, like straw or wood chips, around the base of the plant to help retain moisture and suppress weeds. Make sure the mulch does not directly touch the stems to prevent rotting.
- Pruning: Regular pruning is essential for maintaining the health and shape of the plant. After the flowering period, typically in late spring or early summer, prune back spent flower stems to promote bushier growth and extend the lifespan of the plant.
- Fertilizing: Lavandula Canariensis generally doesn't require much fertilization. Applying a balanced, slow-release fertilizer in early spring can provide some nutrients for healthy growth. Follow the manufacturer's instructions for the appropriate dosage.
- Pest and disease control: Lavender plants are generally resistant to pests and diseases. However, occasional issues like aphids or root rot can occur. Monitor the plants regularly and address any issues promptly. Avoid excessive watering and provide proper air circulation to prevent fungal diseases.
By following these steps, you can successfully grow Lavandula Canariensis and enjoy its beautiful purple flowers and aromatic foliage.

Place in a bright room that is sun drenched almost all day. Or directly in a south-facing window.

To water this plant, it is important to first check the soil moisture level. This can be done by sticking your finger approximately an inch into the soil, or by using a moisture meter. If the soil feels dry, it is time to water the plant.
When watering, it is important to water slowly and deeply, allowing the water to penetrate the soil and reach the roots. Avoid getting water on the leaves, as this can lead to fungal infections.
In general, this plant prefers to be watered infrequently but deeply, allowing the soil to dry out slightly between watering sessions. Watering frequency will depend on factors such as the size of the plant, the size of the pot, and the humidity levels in the environment.
It is also important to avoid overwatering this plant, as this can lead to root rot and other problems. If the soil feels consistently damp or the plant appears to be wilting despite adequate water, it may be a sign of overwatering. In this case, adjust the watering schedule accordingly and consider repotting the plant in a well-draining soil mix.
To fertilize this plant, use a slow-release fertilizer with a balanced N-P-K ratio. Apply it to the soil around the plant in early spring and again in midsummer. Be careful not to over-fertilize, as this can damage the plant. Always follow the instructions on the fertilizer package and water the plant well after applying the fertilizer.
The ideal soil for this particular plant should have good drainage capabilities, a slightly alkaline pH level and contain a mixture of organic materials such as compost, peat moss, and sand. It should not be too heavy or compacted as this can prevent water and nutrient absorption, and ultimately lead to a weakened plant. Additionally, it is important to avoid using soil that contains excessive amounts of nitrogen as this can cause the plant to produce lush leaf growth instead of developing strong roots and flowers.
To propagate this plant, you will need to obtain a stem cutting that is about 4-6 inches long. Make sure the cutting is taken from a healthy plant during its active growth phase. Remove the lower leaves from the stem cutting, leaving only a few upper leaves intact. Dip the cut end in rooting hormone powder.
Prepare a potting mix by mixing perlite and peat moss in equal parts. Moisten the mixture and fill a small container with it. Use a pencil to poke a hole in the center of the mix and insert the cutting in the hole. Gently press the potting mix around the cutting to secure it in place.
Place the pot in a warm, brightly lit location where the cutting will receive indirect light. Keep the potting mix moist but not saturated. In about 2-4 weeks, roots should start forming from the cutting. Once the young plant is well-established and shows signs of new growth, transplant it into a larger container or into the garden.
Common pests of the canary island lavender include Spider mites, thrips, whiteflies. Make a habit of checking your canary island lavender frequently for pests so that any infestations can be caught and managed early.


