Plant Overview
Known across the globe as Henna or the Mignonette Tree, Lawsonia inermis is the ancient source of the world's most famous natural dye. For thousands of years, its leaves have been crushed into a paste to create intricate "Mehndi" designs for celebrations, cooling the skin in the scorching heat of North Africa and South Asia. Beyond its utility, it is a surprisingly fragrant shrub that fills the evening air with a scent reminiscent of roses and jasmine.
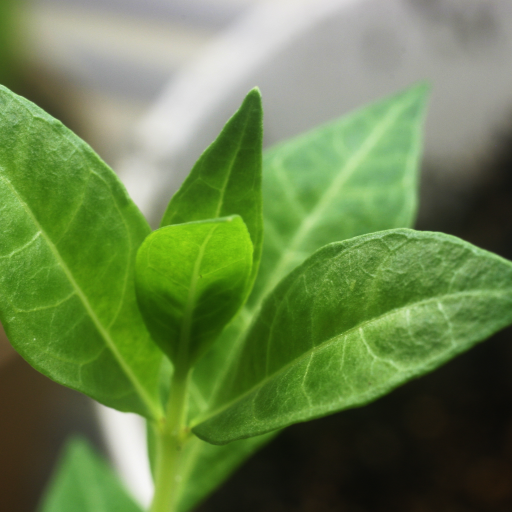
🔍 How to Identify
- 🌿 The Leaves: Small, narrow, and lance-shaped, these bright green leaves grow opposite one another along the stems. They contain "lawsone," the molecule responsible for the signature reddish-orange stain.
- 🌸 The Blooms: It produces delicate, pyramidal clusters of small, star-shaped flowers. They are usually creamy white or pale pink, though red varieties exist, and they possess a powerful, sweet fragrance.
- 🎋 Growth Habit: This is a woody, multi-stemmed shrub or small tree that can reach up to 15 feet in the wild, though it is easily kept smaller in a garden or large container.
- 📦 The Fruit: After flowering, it produces small, globose brown capsules that split open to reveal many tiny, angular seeds.
🏡 In Your Garden
- ☀️ Sun Seeker: This plant is a true child of the desert; it requires intense, direct sunlight to produce the high concentrations of dye in its leaves. If grown in shade, it will become leggy and lose its potency.
- 🏜️ Drainage is Key: While it is incredibly drought-tolerant, it is highly susceptible to root rot. It prefers sandy or loamy soil that allows water to pass through quickly—think "Mediterranean" or "Desert" vibes for its potting mix.
- 🌡️ Heat Lover: It thrives in temperatures above 70°F (21°C). If you live in a cooler climate, it must be moved indoors or into a greenhouse for the winter, as it will drop its leaves if the temperature dips below 50°F.
⚠️ Safety & Toxicity
- 🟢 Safe for Skin: Pure, natural henna is generally safe for topical use on humans and has been used medicinally for its antifungal and cooling properties.
- 🚫 Ingestion: While the dye is safe for skin and hair, the leaves and seeds should not be eaten. Ingesting large amounts can cause gastrointestinal upset in humans.
- 🐾 Pet Warning: Henna is considered toxic to dogs, cats, and horses if ingested. It can lead to oxidative damage to red blood cells (hemolytic anemia). Keep your pets away from the foliage.
- 🛑 Chemical Alert: Never confuse the pure plant with "Black Henna" found in some shops, which often contains PPD (a chemical hair dye) that can cause severe allergic reactions and scarring.
✨ Fun Fact
Henna has been found on the hair and nails of Egyptian mummies dating back over 5,000 years! It wasn't just for beauty; the plant acts as a natural preservative and was believed to help the deceased transition into the afterlife with grace.

Detailed Care Instructions
| Humidity | Normal |
| Lighting | Part Sun |
| Difficulty | Medium |
| Hibernation | Cold Period |
| Temperature | 18°C - 28°C |
| Hardiness Zones | 9B - 11 |
To grow Lawsonia Inermis (Henna) plants, you can follow these steps:
- Choose a suitable location: Henna plants thrive in hot and dry climates. They require full sun, so choose a location that receives at least 6-8 hours of direct sunlight per day.
- Prepare the soil: Henna plants prefer well-draining soil. Ensure the soil is friable, loamy, and rich in organic matter. If your soil is heavy clay or compacted, add organic matter like compost or peat to improve drainage.
- Planting: Henna plants can be started from seeds or cuttings. If using seeds, soak them in warm water for 24 hours before planting to improve germination rates. Sow the seeds about 1/4 to 1/2 inch deep in the prepared soil, spacing them 1-2 feet apart. If using cuttings, take 8-10 inch long stem cuttings from a mature plant and plant them directly in the soil.
- Watering: Initially, keep the soil consistently moist until the plants are established. Once established, henna plants are drought-tolerant and need watering only when the soil becomes dry. Avoid overwatering, as excessive moisture can lead to root rot.
- Fertilizing: Henna plants benefit from occasional fertilization with a balanced, slow-release fertilizer. Apply the fertilizer according to the package instructions, usually every 2-3 months during the growing season.
- Pruning: Pruning is not required for henna plants unless you want to shape them or control their size. You can trim them lightly after the flowering period to promote bushier growth.
- Pests and diseases: Henna plants are generally pest and disease resistant. However, they can occasionally be affected by spider mites, aphids, or fungal diseases. Monitor your plants regularly and address any issues promptly using organic pest control methods or appropriate fungicides.
- Harvesting: The leaves of the henna plant are typically harvested about six months after planting, once the plant has reached maturity. Harvest only a few leaves at a time to let the plant continue to grow. Dry the harvested leaves in a well-ventilated area out of direct sunlight.
Remember to research and understand any specific growing requirements for your specific climate and location, as they may vary.

Place in a bright room that is sun drenched almost all day. Or directly in a south-facing window.

To water this plant, you should begin by creating a schedule for watering that takes into account the plant's current state, the time of year, and the conditions in which it is growing. In general, this plant prefers to have consistently moist soil, but not to the point of being saturated or waterlogged. When watering, be sure to apply water slowly and evenly to the soil surrounding the base of the plant, rather than soaking the leaves or stem. You may want to consider using a watering can or hose with a gentle spray setting, as this will help ensure that you don't accidentally overwater the plant. Additionally, it's important to closely monitor the plant's growth and appearance over time, as changes in color or texture may indicate that you need to adjust your watering regimen.
To fertilize the Lawsonia inermis plant, follow these instructions:
- Choose a slow-release organic fertilizer or a balanced, water-soluble fertilizer with equal amounts of nitrogen, phosphorus, and potassium (N-P-K ratio of 10-10-10 or similar).
- Dilute the fertilizer according to the instructions on the package. Avoid using too much fertilizer, as it can harm the plant.
- Apply the fertilizer during the active growing season, typically in spring or early summer. Avoid fertilizing during dormant periods or in winter.
- Water the plant thoroughly before applying the fertilizer to ensure the soil is moist but not waterlogged.
- Use a watering can or sprayer to evenly distribute the diluted fertilizer throughout the soil around the plant's base. Avoid directly applying the fertilizer to the leaves or stem.
- After applying the fertilizer, water the plant again to help the nutrients penetrate the soil and reach the roots.
- Monitor the plant's response to the fertilization and adjust the frequency or amount of fertilizer application if necessary. Be careful not to over-fertilize, as it can cause leaf burn or other damage.
- Repeat the fertilization process every four to six weeks during the growing season, or as recommended by the manufacturer for the specific fertilizer product.
Remember to always follow the instructions provided with the fertilizer product and consider the specific needs of your Lawsonia inermis plant for optimal growth and health.
The best type of soil to use for the plant Lawsonia inermis is a well-draining soil that is slightly acidic with a pH level between 5.5 to 7.0. The soil should be rich in nutrients and organic matter to ensure healthy growth and development of the plant. A mixture of loamy soil, sand, and peat moss is ideal for planting Lawsonia inermis. The soil should be well-aerated and able to retain moisture without becoming waterlogged. It is important to avoid using heavy clay soil as it can lead to poor drainage and root rot. Additionally, regular fertilization with a balanced fertilizer is necessary to ensure that the plant receives the necessary nutrients for optimal growth.
To propagate Lawsonia Inermis plant, you can follow these step-by-step details:
- Start with healthy parent plants: Select mature and healthy Lawsonia Inermis plants as the source for propagating new plants. Ensure that the parent plants are free from diseases or pests.
- Collect cuttings: Use clean, sharp pruning shears to collect cuttings from the parent plant. Look for vigorous stems that are about 6 to 8 inches long and have several pairs of healthy leaves. Make a clean cut just below a leaf node.
- Prepare the cuttings: Remove the lower set of leaves from each cutting, leaving only a few pairs of leaves at the top. This helps reduce water loss and encourages root development.
- Treat with rooting hormone (optional): Although not necessary, you can dip the bottom of the cuttings into a powdered or gel rooting hormone to promote rooting. This hormone encourages the formation of roots on the cuttings.
- Prepare the rooting medium: Fill a small container or seedling tray with a well-draining rooting medium. You can use a mixture of equal parts peat moss, perlite, and sand. Moisten the rooting medium slightly, avoiding excess water. It should be moist but not soggy.
- Plant the cuttings: Make planting holes in the rooting medium using a pencil or similar tool. Insert the bottom end of each cutting into a planting hole, ensuring that at least two sets of leaves are above the surface. Gently press the medium around the cutting to stabilize it.
- Create a humid environment: To maintain adequate humidity levels around the cuttings, cover the container or tray with a clear plastic bag or plastic dome. This helps create a mini greenhouse and prevents excessive moisture loss from the cuttings.
- Provide indirect light: Place the container or tray in a location that receives bright, indirect light. Avoid direct sunlight, as it can scorch the cuttings. You can also use fluorescent grow lights if natural light is insufficient.
- Maintain optimal conditions: Throughout the propagation process, it is crucial to keep the rooting medium consistently moist but not waterlogged. Check the moisture level regularly and mist the cuttings with water if needed. Avoid overwatering, as it can lead to rotting.
- Monitor progress: After a few weeks, you should start to see new growth emerging from the cuttings. This indicates that roots have formed successfully. Carefully remove the plastic covering and continue to provide proper care as the newly rooted plants develop.
- Transplanting: Once the rooted cuttings have developed a good root system, gently transplant them into individual pots or desired growing locations using a well-draining potting mix. Provide regular care, including appropriate watering and fertilization, to ensure healthy growth.
By following these steps, you can successfully propagate Lawsonia Inermis plants and expand your collection or share this exceptional plant with others.
Common pests of the egyptian-privet include Spider mites. Make a habit of checking your egyptian-privet frequently for pests so that any infestations can be caught and managed early.


