Plant Overview
Often called the "Snowy Mermaid" or the "Chilean Iris," this elegant South American native brings a sense of airy sophistication to any landscape. While it looks like a clump of ornamental grass at first glance, it surprises onlookers in late spring with ethereal, starry white blooms that dance above the foliage. It is a prized choice for "white gardens" and architectural borders due to its clean lines and year-round structure.
🔍 How to Identify
- 🍃 Foliage: Features stiff, leathery, sword-shaped leaves that grow in tight, fan-like clumps, maintaining a deep green color throughout the winter.
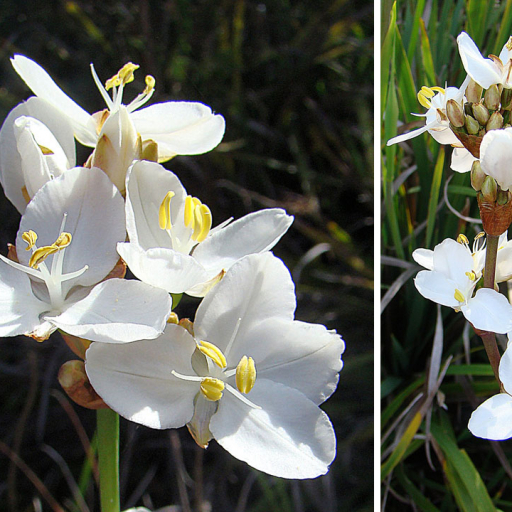
- ❄️ Blooms: Clusters of pure white, three-petaled flowers with prominent yellow centers appear on upright stalks that rise just above the leaves.
- 🟠 Seed Pods: After the flowers fade, the plant produces attractive, globose seed capsules that turn a golden-orange to brown, providing visual interest in the fall.
🏡 In Your Garden
- 🌱 Root Sensitivity: This plant is known for its "settled" nature; it possesses a delicate root system that hates being moved. It is best to choose its permanent home carefully, as transplanting can lead to a long period of sulking or failure to bloom.
- 🌬️ Coastal Toughness: Despite its delicate-looking flowers, it is remarkably salt-tolerant and wind-resistant, making it a perfect candidate for coastal gardens where other perennials might struggle.
⚠️ Safety & Toxicity
- 🐾 Pet Safety: Libertia chilensis is generally considered non-toxic to dogs, cats, and horses, making it a "worry-free" addition to family spaces.
- 🤲 Physical Texture: While not chemically toxic, the leaves are quite fibrous and stiff; always wear gloves when pruning large clumps to avoid minor skin irritation or "grass cuts" from the leaf edges.
✨ Fun Fact
The genus name Libertia was chosen to honor Marie-Anne Libert, a pioneering 19th-century Belgian botanist and mycologist who was one of the first women to be recognized for her scientific contributions to the study of "lower" plants like mosses and fungi.

Detailed Care Instructions
To grow Libertia Chilensis plants, follow these steps:
- Choose a suitable location: Libertia Chilensis plants thrive in full sun to partial shade. Select a well-draining site with fertile soil.
- Prepare the soil: Dig a hole about twice the diameter and depth of the plant's root ball. Work organic matter, such as compost or aged manure, into the soil to improve its fertility and drainage.
- Plant the seedling: Place the Libertia Chilensis plant in the hole, ensuring that the top of the root ball is level with the soil surface. Backfill the hole with soil and gently firm it around the roots.
- Water thoroughly: Water the newly planted seedling thoroughly to settle the soil and help the roots establish. Provide regular watering during dry spells, but avoid overwatering to prevent root rot.
- Mulch the area: Apply a layer of organic mulch, such as wood chips or straw, around the plant to conserve moisture, suppress weeds, and regulate soil temperature.
- Provide regular care: Libertia Chilensis plants require little maintenance once established. However, ensure they receive even moisture during the growing season. Avoid allowing the soil to dry out completely.
- Fertilize occasionally: While not necessary, you can apply a balanced slow-release fertilizer once a year in early spring to promote healthy growth. Follow the manufacturer's instructions for application rates.
- Prune as needed: Remove any dead or damaged foliage as it appears. Pruning can also help manage the size and shape of the plant.
- Protect from extreme conditions: In areas with harsh winter climates, protect the plant with a layer of mulch or cover it with burlap during extreme cold spells.
With proper care, your Libertia Chilensis plant should grow and thrive, providing beautiful foliage and delicate flowers.

Place in a bright room that is sun drenched almost all day. Or directly in a south-facing window.

The best way to water this plant is to ensure that the soil remains consistently moist, but not waterlogged. It is important to water deeply, allowing the water to penetrate through the soil and reach the roots of the plant. Avoid allowing the soil to dry out completely, as this can cause stress to the plant and lead to wilting or leaf drop. During periods of hot or dry weather, the plant may require more frequent watering to prevent drying out. It is also important to keep the foliage dry to prevent the development of fungal diseases. Water at the base of the plant rather than from above to avoid wetting the leaves. Make sure that the pot or container has good drainage to prevent water from pooling around the roots. Regularly check the soil moisture levels by sticking a finger a few inches into the soil – if it feels dry, it’s time to water.
To fertilize this plant, use a balanced 10-10-10 fertilizer in early spring and then again in mid-summer. Apply according to package instructions and avoid over-fertilization, as this can harm the plant. Water the plant thoroughly after fertilizing to help the nutrients reach the roots.
The plant requires well-drained soil with a pH level ranging between acidic to neutral (pH level of 5.5 to 7.0). It prefers soil that is rich in organic matter and is moist but not waterlogged. The ideal soil for this plant should have a good balance of nutrients and be porous enough to allow air to circulate freely around the roots. It is recommended to mix the soil with compost or bark mulch for better drainage and moisture retention. The plant can tolerate a variety of soil types, including sandy soils, loamy soils, and clay soils, as long as they are well-draining and have a pH within the ideal range. Additionally, it is important to ensure that the soil is free of weeds and debris before planting.
One way to propagate this plant is by using seeds. Collect the seeds from the plant and sow them in well-draining soil. Keep the soil moist and ensure that the seeds are getting enough light. The seeds will germinate in a few weeks.
Another method is by division. Gently remove the plant from its pot or garden bed and carefully separate the roots into smaller sections. Each section should have some roots and leaves attached to it. Replant each section in a new container or back into the garden bed, ensuring they receive adequate water and light.
Finally, the plant can also be propagated by stem cuttings. Take a stem cutting from the mother plant, remove the leaves from the bottom of the stem, and dip it in a rooting hormone. Plant the stem in a well-draining soil mix and keep it moist. Within a few weeks, roots should begin to form and a new plant will begin to grow.


