Plant Overview
Commonly known as the Black Twinberry or Bearberry Honeysuckle, this shrub is a dramatic storyteller of the North American wilderness. It earns its name from its peculiar habit of producing flowers and fruits in perfectly symmetrical pairs, which are eventually cradled by striking, deep-red "capes." Whether found in a coastal forest or a backyard rain garden, it is a bustling hub for wildlife activity.
🔍 How to Identify
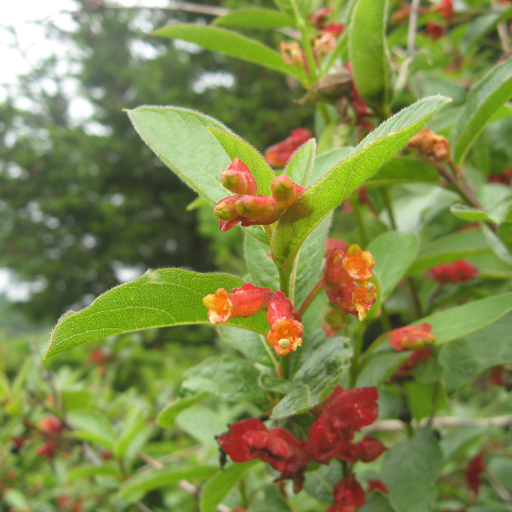
- 🌼 The Twin Blooms: Small, tubular, pale yellow flowers that always grow in pairs on a single stalk.
- 🍷 Dramatic Bracts: As the fruit matures, the green leaf-like structures at the base of the flowers turn a brilliant, flashy maroon or purple-red.
- 🖤 Ink-Black Berries: Two shiny, jet-black berries sit side-by-side in the center of the red bracts, looking like jewels in a velvet box.
- 🍃 Velvety Foliage: Large, oval-shaped green leaves that are often slightly hairy on the undersides and arranged oppositely along the stems.
🏡 In Your Garden
- 💧 Water Lovers: Twinberry is a "wetland" specialist. It is the perfect solution for those soggy, poorly drained spots in your yard where other plants might rot.
- 🐦 Wildlife Magnet: This plant is a high-energy pit stop. Hummingbirds frequent the yellow tubes for nectar, while the dark berries provide essential nutrients for migrating songbirds and even small mammals.
- 🌱 Growth Habit: It is a fast grower with a somewhat "leggy" or wild appearance. If you prefer a tidier look, it responds well to heavy pruning in late winter to encourage a bushier shape.
⚠️ Safety & Toxicity
- 👅 Bitter Warning: While birds and bears feast on the berries, they are considered unpalatable to humans. They have a notoriously bitter, soapy, and unpleasant taste.
- 🤢 Digestive Upset: The berries are generally considered non-toxic in small amounts, but consuming them can cause nausea, vomiting, or stomach cramps in children or pets. It is best to treat this plant as strictly ornamental.
✨ Fun Fact
In some Indigenous traditions of the Pacific Northwest, the Twinberry was nicknamed the "Crow’s Berry" or "Monster's Food." Because of the dark, staining juice of the fruit, it was also historically used as a traditional pigment for hair dye and face paint!

Detailed Care Instructions
To grow Lonicera involucrata, also known as twinberry honeysuckle, follow these steps:
- Choose a suitable location: Lonicera involucrata thrives in full sun to partial shade. Select a spot that receives at least 4-6 hours of direct sunlight per day. The soil should be well-draining and rich in organic matter.
- Prepare the soil: Prior to planting, amend the soil with compost or well-rotted manure to improve fertility and drainage. Remove any weeds or grass from the planting area.
- Planting: Dig a hole that is twice as wide and as deep as the plant's root ball. Place the plant into the hole, making sure the top of the root ball is level with the soil surface. Backfill the hole with soil, gently firming it around the plant.
- Watering: Water the plant thoroughly after planting to settle the soil. Lonicera involucrata prefers consistently moist soil, so water regularly, especially during dry periods. Aim to keep the soil evenly moist, but not waterlogged.
- Mulching: Apply a layer of organic mulch around the base of the plant to help conserve moisture, suppress weed growth, and maintain a consistent soil temperature. Make sure the mulch does not touch the stem to prevent rotting.
- Pruning: Lonicera involucrata benefits from regular pruning to maintain its shape, promote healthy growth, and control its size. Prune in late winter or early spring before new growth begins. Remove any dead, damaged, or crossing branches and trim back excessively long or straggly growth.
- Fertilizing: Lonicera involucrata generally does not require heavy feeding. However, you can apply a balanced slow-release fertilizer in early spring to provide nutrients throughout the growing season. Follow the package instructions for application rates.
- Support: Depending on the specific variety of Lonicera involucrata you are growing, it may benefit from a trellis, fence, or other support structure to climb upon. Install the support system early in the plant's growth to avoid damaging the roots.
- Pest and disease control: Monitor the plant regularly for any signs of pests or diseases. Common issues include aphids, powdery mildew, and leaf spots. Prune affected branches and apply appropriate organic treatments if necessary.
- Propagation: Lonicera involucrata can be propagated through softwood cuttings taken in late spring or early summer. Choose healthy, non-flowering stems and root them in a well-draining rooting medium. Keep the cuttings consistently moist and in a warm, bright location until they root.
With proper care and maintenance, your Lonicera involucrata should thrive and produce beautiful flowers and berries.

Place in a bright room that is sun drenched almost all day. Or directly in a south-facing window.

Lonicera Involucrata plant should be watered regularly to keep the soil moist but not water-logged. One way to determine if the plant needs water is to stick a finger into the soil about an inch deep. If the soil feels dry, it's time to water. When watering, pour water slowly and evenly over the soil until it runs out the drainage holes in the bottom of the pot or container. Be sure to empty the saucer underneath the pot after watering to prevent the plant from sitting in standing water which can lead to root rot. In periods of high heat or low humidity, the plant may require more frequent watering. However, be careful not to overwater the plant as it can lead to root rot and other fungal diseases.
To fertilize the plant, apply a slow-release fertilizer in the spring. Mix the fertilizer into the soil around the base of the plant, taking care not to disturb the roots. Water the plant thoroughly after fertilizing. Repeat the fertilizing process every year in the spring for optimal growth and health.
Lonicera involucrata grows best in well-draining, moist soil that is slightly acidic to neutral in pH. The soil should be rich in organic matter, such as leaf mold or compost, and have good aeration. Clay soils are not suitable for Lonicera involucrata, as they can become waterlogged and restrict root growth. Loamy or sandy soils are preferred. The plant also requires full to partial sunlight for optimal growth. Avoid planting in areas with extreme temperatures, as the plant can become stressed and susceptible to disease. Proper soil preparation before planting, including the addition of organic matter and ensuring adequate drainage, is essential for the health and success of Lonicera involucrata.
To propagate this plant, you will need to take a stem cutting that is about four to six inches long. Cut the stem at a 45-degree angle just below a node, which is where a leaf meets the stem.
Next, remove all the leaves from the bottom two inches of the stem. You can use a sharp knife or scissors to make a clean cut.
Dip the cut end of the stem into rooting hormone powder, which will help the cutting develop roots more quickly.
Fill a small pot with well-draining potting soil and make a hole in the center. Insert the cutting into the hole, making sure that the bottom two inches of the stem are buried in the soil.
Water the cutting thoroughly and place a clear plastic bag over the pot to create a humid environment. Place the pot in a bright, indirect light location.
Check the cutting every few days to make sure the soil stays moist and mist the inside of the plastic bag if it starts to get dry. After a few weeks, you should start to see new growth and roots forming.
Once the cutting has established roots and new growth, you can transplant it into a larger pot or directly into the garden.


