Plant Overview
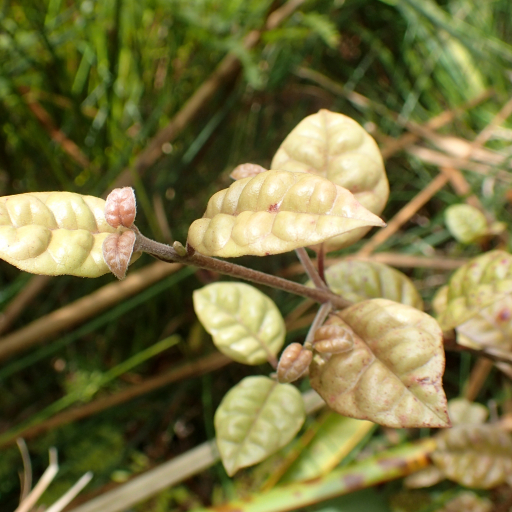
Known as the "Ramarama" or the "Bubble Leaf" in its native New Zealand, Lophomyrtus bullata is a visual masterpiece of the forest understory. Its most striking feature is its heavily puckered, "blistered" foliage that catches the light in shades of deep green and burnished copper. In Māori tradition, its name "Ramarama" suggests a glowing or gleaming quality, a nod to how the glossy leaves shimmer in the dappled sunlight.
🔍 How to Identify
- 🍃 The "Bubble" Leaves: The leaves are famously "bullate" (puckered), looking as though they are covered in small air bubbles or blisters.
- 🎨 Color Palette: New growth often emerges in vibrant reds or deep purples, maturing into a glossy olive green with bronze highlights as the seasons change.
- 🌸 Delicate Blooms: In summer, it produces small, creamy-white flowers with long, prominent stamens that look like tiny bursts of fireworks against the dark foliage.
- 🫐 Dark Berries: After flowering, it develops small, dark red to black berries that are a favorite snack for local forest birds.
🏡 In Your Garden
- 🧱 Architectural Hedging: Because of its dense growth habit and stunning color, it is frequently used as a decorative hedge or a "feature" shrub to add texture to a landscape.
- 🌦️ The Myrtle Rust Watch: This plant is currently vulnerable to Myrtle Rust, a fungal disease. If you notice yellow, powdery spots on the leaves, it’s important to contact local conservationists or treat it immediately to protect the species.
- 🧤 Pruning for Color: It responds beautifully to light pruning, which encourages the flush of colorful new "bubbles" that gardeners find so attractive.
⚠️ Safety & Toxicity
- ✅ Generally Safe: The Ramarama is considered non-toxic to humans and common pets like cats and dogs.
- 🚫 Berry Caution: While the berries are not known to be poisonous, they are not a culinary fruit for humans. It is best to leave them for the birds to avoid any potential stomach upset.
✨ Fun Fact
The Latin specific epithet bullata literally translates to "inflated" or "studded with bubbles," perfectly describing the unique texture of the foliage that makes it look like it has been vacuum-sealed over tiny marbles!

Detailed Care Instructions
To grow Lophomyrtus Bullata (also known as Ramarama), follow these steps:
- Choose a suitable location: Lophomyrtus Bullata prefers partial shade to full sun. Select a spot that receives at least a few hours of direct sunlight each day. Additionally, ensure that the soil is well-draining and rich in organic matter.
- Dig a hole: Dig a hole that is slightly wider and deeper than the root ball of the plant. Make sure the hole is large enough to accommodate the plant's roots comfortably.
- Prepare the soil: Mix some compost or well-rotted manure into the soil to enhance its fertility. This will help provide the plant with essential nutrients and aid in moisture retention.
- Plant the shrub: Gently remove the Lophomyrtus Bullata plant from its container and place it in the prepared hole. Ensure that the top of the root ball is level with the surrounding soil. Backfill the hole with soil and gently tamp it down to remove air pockets.
- Water thoroughly: After planting, water the shrub thoroughly to settle the soil around the roots. Ensure that the soil remains evenly moist, but avoid overwatering to prevent root rot. In general, watering once or twice a week should be sufficient, depending on weather conditions.
- Mulch the area: Apply a layer of organic mulch around the base of the plant, such as wood chips or straw. This will help retain soil moisture, suppress weeds, and regulate soil temperature.
- Pruning: Regularly prune Lophomyrtus Bullata to maintain its desired shape and size. Pruning can be done in early spring or late autumn. Remove any dead, damaged, or crowded branches to promote airflow and healthy growth.
- Fertilizing: Apply a balanced, slow-release fertilizer in spring to provide the plant with necessary nutrients. Follow the manufacturer's instructions for the appropriate dosage.
- Pest control: Check the plant regularly for common pests such as aphids or scale insects. If pests are present, use an appropriate organic pesticide or insecticidal soap to control them.
- Winter care: Lophomyrtus Bullata is hardy in most temperate regions but may require protection in colder climates. Apply a layer of mulch around the base of the plant before winter to insulate the roots. You can also wrap the shrub in burlap if necessary to prevent frost damage.
By following these steps, you can successfully grow Lophomyrtus Bullata and enjoy its attractive foliage and vibrant color.

Place in a bright room that is sun drenched almost all day. Or directly in a south-facing window.

To water this plant, first, check the soil moisture level by inserting a finger into the soil. If the top inch or two of the soil feels dry, it is time to water. Use room temperature water and water slowly at the base of the plant until water starts to drain out of the bottom. Allow the water to drain completely before placing the plant back in its decorative container or plant saucer. Avoid overwatering and make sure the soil has adequate drainage to prevent root rot. Depending on the environment and time of year, the frequency of watering may vary.
To fertilize the Lophomyrtus Bullata plant, follow these instructions:
- Choose a balanced, water-soluble fertilizer specifically designed for use on ornamental plants.
- Dilute the fertilizer according to the instructions provided on the packaging. Use a container or watering can to hold the dilute solution.
- Apply the fertilizer during the growing season, which is typically spring and summer.
- Prior to applying the fertilizer, make sure the soil is moist; avoid fertilizing when the soil is dry.
- Pour the diluted fertilizer solution evenly around the base of the plant. Take care not to over-fertilize, as it can lead to excessive growth or damage the roots.
- Do not allow the fertilizer solution to come into contact with the leaves or foliage of the plant, as it may cause burning or damage.
- After fertilizing, water the plant thoroughly to help the roots absorb the nutrients.
- Repeat the fertilization process according to the instructions provided by the fertilizer manufacturer, generally every 4-8 weeks during the growing season.
- Monitor the plant's growth and adjust the fertilization schedule if necessary.
- Store any unused fertilizer in a cool, dry place away from direct sunlight.
Remember to always follow the specific instructions provided by the fertilizer manufacturer for the best results.
Lophomyrtus Bullata plant requires well-draining soil that is slightly acidic with a pH of 5.5 to 6.5. The soil should be rich in organic matter and have good moisture retention while also being oxygenated. It is recommended to mix peat moss or organic compost into the soil to improve its texture and nutrient content. The plant prefers a soil that is slightly moist but not waterlogged, as excessive moisture can lead to root rot. It is also recommended to avoid using heavy clay soils.
Lophomyrtus Bullata is a plant species that can be propagated through several methods. Here are some detailed steps on how to propagate this plant:
- Choose a healthy and mature Lophomyrtus Bullata plant from which to take cuttings. Look for a plant that has no signs of disease or pest infestation.
- Prepare a clean and sharp pair of pruning shears or scissors. It is important to ensure that your tools are clean to minimize the risk of transmitting any diseases or pathogens.
- Select a suitable stem or stems for taking cuttings. Choose stems that are about 4-6 inches long and have several sets of healthy leaves. Make sure to select softwood or semi-hardwood stems, which are flexible and still have some green color.
- Make a clean and angled cut just below a leaf node on the selected stem. A leaf node is where the leaf meets the stem. This angled cut will increase the surface area for rooting.
- Remove any lower leaves from the cutting, leaving a few sets of leaves at the tip. This will minimize moisture loss and encourage root development.
- Dip the cut end of the cutting into a rooting hormone powder or gel. This step is optional but can significantly increase the success rate of root formation.
- Prepare a propagation tray or small pots by filling them with a well-draining potting mix. Ensure the soil is moist but not waterlogged.
- Make a planting hole in the soil using your finger or a pencil. Gently insert the cutting into the hole, ensuring that at least one set of leaves is above the soil level.
- Firmly press the soil around the cutting to secure it in place and provide good soil-to-stem contact.
- Mist the cutting with water to increase humidity around the plant and promote healthy growth. You can also place a clear plastic bag or a propagating dome over the tray or pot to create a greenhouse-like environment.
- Place the propagation tray or pot in a warm, bright location, but avoid direct sunlight as it can scorch the cutting.
- Maintain consistent moisture levels in the soil by regularly misting the cutting and ensuring the soil does not dry out. However, be cautious not to overwater as this can cause root rot.
- After a few weeks, gently tug on the cutting to check for root growth. If you feel resistance, it indicates that roots have formed.
- Once the cutting has developed a good root system, it can be transplanted into a larger pot or directly into the garden.
By following these steps, you can successfully propagate Lophomyrtus Bullata and expand your collection of this beautiful plant.


