Plant Overview
Often called the Chilean Wolfberry or Coralillo, this rugged shrub is a close cousin to the famous Goji berry. Native to the arid coastlines and plains of Chile and Argentina, it is a master of survival, painting dusty landscapes with splashes of bright red, jewel-like berries. It is the "tough love" plant of the South American wilderness—delicate in bloom but armed with sturdy thorns.
🔍 How to Identify
- 🍃 The Foliage: Small, narrow, and slightly succulent leaves that grow in tight clusters (fascicles) along the stems to conserve moisture in dry winds.
- 🌸 The Blooms: Tiny, tubular flowers that range from creamy white to pale lavender, often featuring intricate purple veining that guides pollinators to the center.
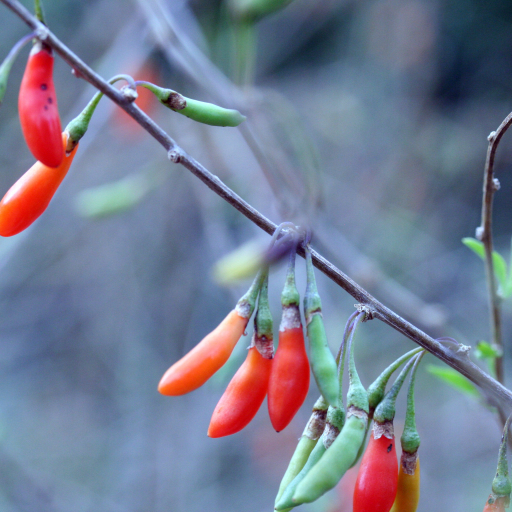
- 🍒 The Berries: Small, round, glossy fruits that ripen to a vibrant coral-red, appearing in late summer and autumn like miniature ornaments.
🏡 In Your Garden
- 🌊 Salt Specialist: This plant is an "extremophile" for the backyard; it thrives in salty coastal air and poor, sandy soils where most other ornamental plants would struggle to survive.
- 🐦 Wildlife Fortress: Because of its dense, zig-zagging branches and sharp thorns, it provides a perfect "safe house" for small songbirds to nest away from predators, while the berries provide a vital food source.
⚠️ Safety & Toxicity
- 🌵 Physical Hazard: The primary danger of the Chilean Wolfberry is its thorns. They are stiff and sharp, making the plant a natural "barbed wire" fence.
- 🐾 Pet & Human Safety: While some Lycium species have edible berries, many wild Solanaceae (Nightshade) family members can cause stomach upset if consumed in large quantities. It is best to treat this as an ornamental plant and keep curious pets from chewing on the foliage, which contains bitter alkaloids.
✨ Fun Fact
Lycium chilense is so well-adapted to drought that it can perform a "disappearing act." During extreme heat or prolonged dry spells, it may drop its leaves entirely to enter a state of dormancy, only to sprout lush green foliage again within days of a single rainstorm!

Detailed Care Instructions
Lycium chilense, commonly known as Chilean goji or desert thorn, is a hardy shrub native to South America. Here are steps you can follow to grow this plant successfully:
1. Choose the Right Location
- Sunlight: Lycium chilense prefers full sun, so select a location that receives at least 6-8 hours of direct sunlight per day.
- Soil Type: It thrives in well-drained soils. Sandy or loamy soils that are slightly alkaline to neutral are ideal.
2. Soil Preparation
- Test the soil pH and amend it if necessary. Ideally, the pH should be around 6.0 to 7.5.
- Improve drainage by mixing in sand or perlite if you have heavy clay soil.
3. Planting
- Seeds: You can start from seeds, which should be sown in a seed tray or directly into the ground after the last frost. Sow seeds about 1/4 inch deep.
- Cuttings: Alternatively, take cuttings in late summer. Use semi-hardwood cuttings, dip them in rooting hormone, and plant them in a pot with a well-draining potting mix.
4. Watering
- Water the young plants regularly but avoid overwatering. Once established, Lycium chilense is drought-tolerant and requires minimal watering.
- Water during dry spells, especially when young plants are establishing their root systems.
5. Fertilization
- Use a balanced, slow-release fertilizer at the beginning of the growing season. Organic fertilizers are also a good option.
- Avoid over-fertilizing, which can lead to excessive leaf growth at the expense of fruit production.
6. Pruning
- Prune the plant to maintain its shape and encourage bushy growth. Remove dead or damaged branches as necessary.
- Pruning can also help improve air circulation within the plant.
7. Pest and Disease Management
- Lycium chilense is generally resistant to pests and diseases, but keep an eye out for common issues like aphids or spider mites.
- If pests are found, treat them with insecticidal soap or neem oil.
8. Harvesting
- The plant produces small red berries that are edible and can be harvested when ripe.
- Wait until the fruit is fully developed, usually in late summer to early fall, for the best flavor.
9. Winter Care
- In colder climates, protect young plants with mulch or frost cloth if temperatures drop significantly.
10. Propagation
- Besides seeds and cuttings, you can also propagate the plant through layering, where a branch is buried in the soil while still attached to the parent plant.
By following these steps, you should be able to successfully grow Lycium chilense in your garden. Happy gardening!

To properly water Lycium chilense, follow these guidelines to ensure healthy growth:
1. Soil Moisture Level: This plant prefers well-draining soil. Before watering, check the moisture level of the soil. If the top 1-2 inches are dry, it’s time to water.
2. Watering Frequency: During the growing season (spring and summer), water when the soil is dry. In hot climates, this may mean watering once a week. In cooler seasons (fall and winter), reduce the frequency, as the plant requires less moisture.
3. Watering Method: Use a soaker hose or drip irrigation system to provide consistent moisture to the roots without over-saturating. If using a watering can, water at the base of the plant to avoid wetting the leaves, which can increase the risk of fungal diseases.
4. Quantity: Water deeply to ensure that moisture reaches the root zone. This means applying enough water so that it penetrates the soil to a depth of at least 6-8 inches. However, avoid waterlogging the soil as it can lead to root rot.
5. Environmental Considerations: Adjust your watering based on weather conditions. In hot, dry, or windy weather, you may need to increase watering frequency, whereas in cooler or rainy conditions, decrease it.
6. Mulching: Apply a layer of mulch around the base of the plant to help retain soil moisture and regulate temperature. This can reduce the need for frequent watering.
7. Signs of Over or Under-Watering: Check for signs of stress. Yellowing leaves may indicate overwatering, while wilting or browning edges may suggest underwatering. Adjust your watering practices based on these observations.
By following these guidelines, you can ensure that Lycium chilense receives the appropriate amount of water for optimal growth and health.
To fertilize Lycium chilense effectively, follow these guidelines:
- Timing: Fertilize in early spring as new growth begins and again in mid-summer if necessary. Avoid fertilizing in late fall or winter.
- Type of Fertilizer: Use a balanced, slow-release fertilizer with an N-P-K ratio of approximately 10-10-10 or a fertilizer specifically formulated for shrubs. You may also consider organic options, such as compost or well-rotted manure.
- Application Rate: Follow the manufacturer's instructions for application rates based on the size of the plant. Generally, for young plants, use about 1 ounce (30 grams) of fertilizer per foot of plant height. For larger plants, increase the amount accordingly.
- Method of Application:
- Granular Fertilizer: Spread the fertilizer evenly around the base of the plant, avoiding direct contact with the stems. Lightly work it into the top layer of soil.
- Liquid Fertilizer: Dilute according to the package directions and apply it directly to the soil around the base of the plant, ensuring the soil is moist beforehand.
- Granular Fertilizer: Spread the fertilizer evenly around the base of the plant, avoiding direct contact with the stems. Lightly work it into the top layer of soil.
- Watering: Water the plant thoroughly after applying fertilizer to help dissolve the nutrients and promote absorption.
- Soil Testing: Consider conducting a soil test to determine nutrient levels and pH. This can help tailor your fertilization regimen more specifically to the needs of your plant.
- Observation: Monitor the plant for signs of over-fertilization, such as leaf burn or excessive growth. If you notice these signs, reduce the amount of fertilizer used in the following cycles.
By following these instructions, you can promote healthy growth and maintain the vitality of your Lycium chilense plant.
Lycium chilense thrives best in well-draining soil that has good aeration properties. A sandy or loamy soil mix is ideal, as it allows excess water to drain while retaining some moisture for the roots. The soil should have a slightly acidic to neutral pH, ideally ranging from 6.0 to 7.0.
When preparing the soil, consider incorporating organic matter, such as compost or well-rotted manure, to enhance nutrient content and improve soil structure. This additional organic material can help retain moisture without causing the soil to become too compacted.
In areas with heavy clay soil, amending the soil with sand or perlite can improve drainage. It's also important to ensure that the planting site has good sun exposure, as this species prefers full sun conditions. Overall, aim for a balance that allows for both drainage and moisture retention to support healthy growth.
Lycium chilense can be propagated through several methods, notably from seeds and cuttings. Here’s a detailed guide on each propagation method:
1. Seed Propagation
Step 1: Seed Collection
- Harvest mature berries when they are fully ripe, typically in late summer to early fall.
- Remove the seeds from the berries and rinse them to eliminate any pulp.
Step 2: Stratification (Optional) - Some gardeners recommend stratifying seeds to increase germination rates. Place the seeds in a damp paper towel, store them in a plastic bag, and refrigerate for about 4-6 weeks.
Step 3: Sowing Seeds - Fill seed trays or small pots with a well-draining potting mix, such as a mixture of peat and perlite.
- Sow the seeds about 1/4 inch deep and cover lightly with soil.
- Water gently to moisten the soil without waterlogging.
Step 4: Germination Conditions - Place the trays in a warm, bright location, but avoid direct sunlight which can dry out the soil.
- Maintain soil moisture by misting or carefully watering when necessary.
Step 5: Transplanting Seedlings - Once seedlings have developed a few sets of true leaves and are large enough to handle, transplant them into individual pots.
- Acclimate the young plants to outdoor conditions gradually before planting them in their permanent location.
2. Cutting Propagation
Step 1: Selecting Cuttings - In spring or early summer, select healthy, semi-hardwood stems. Choose stems that are about 4-6 inches long and have several nodes.
Step 2: Preparing Cuttings - Use a sterile, sharp knife or pruner to take cuttings just below a node.
- Remove the lower leaves to prevent rot and leave a few leaves at the top.
Step 3: Rooting Hormone (Optional) - To enhance root development, dip the cut end in rooting hormone.
Step 4: Planting the Cuttings - Fill small pots with a well-draining potting medium.
- Insert the cuttings into the soil, burying them about halfway, ensuring that at least one node is below the surface.
Step 5: Watering and Care - Water the cuttings lightly and cover them with a plastic bag or a humidity dome to maintain high humidity.
- Place the pots in a warm, bright location but out of direct sunlight.
Step 6: Monitoring Growth - Check for root development in about 4-6 weeks. Gently tug on the cuttings to feel for resistance, which indicates root growth.
Step 7: Transplanting Rooted Cuttings - Once rooted and growing well, transplant the cuttings into larger pots or directly into the garden after acclimatization.
Additional Tips
- Ensure good drainage in pots to avoid waterlogging, which can lead to rot.
- Monitor for pests and diseases during the propagation process, maintaining clean conditions to promote healthy growth.
- Both methods can be done in pots or directly in the ground, but starting in pots allows for better control of conditions.
By following these steps, you can successfully propagate Lycium chilense and cultivate new plants.


