Plant Overview
Often called the Dotted Loosestrife, this perennial is like bottled sunshine for the damp or shaded corners of your yard. Known for its tall, leafy spires and brilliant yellow blooms, it has been a cottage garden staple for centuries due to its rugged "un-killable" nature. It’s a plant that radiates energy and resilience, thriving with gusto where more delicate flowers might falter.
🔍 How to Identify
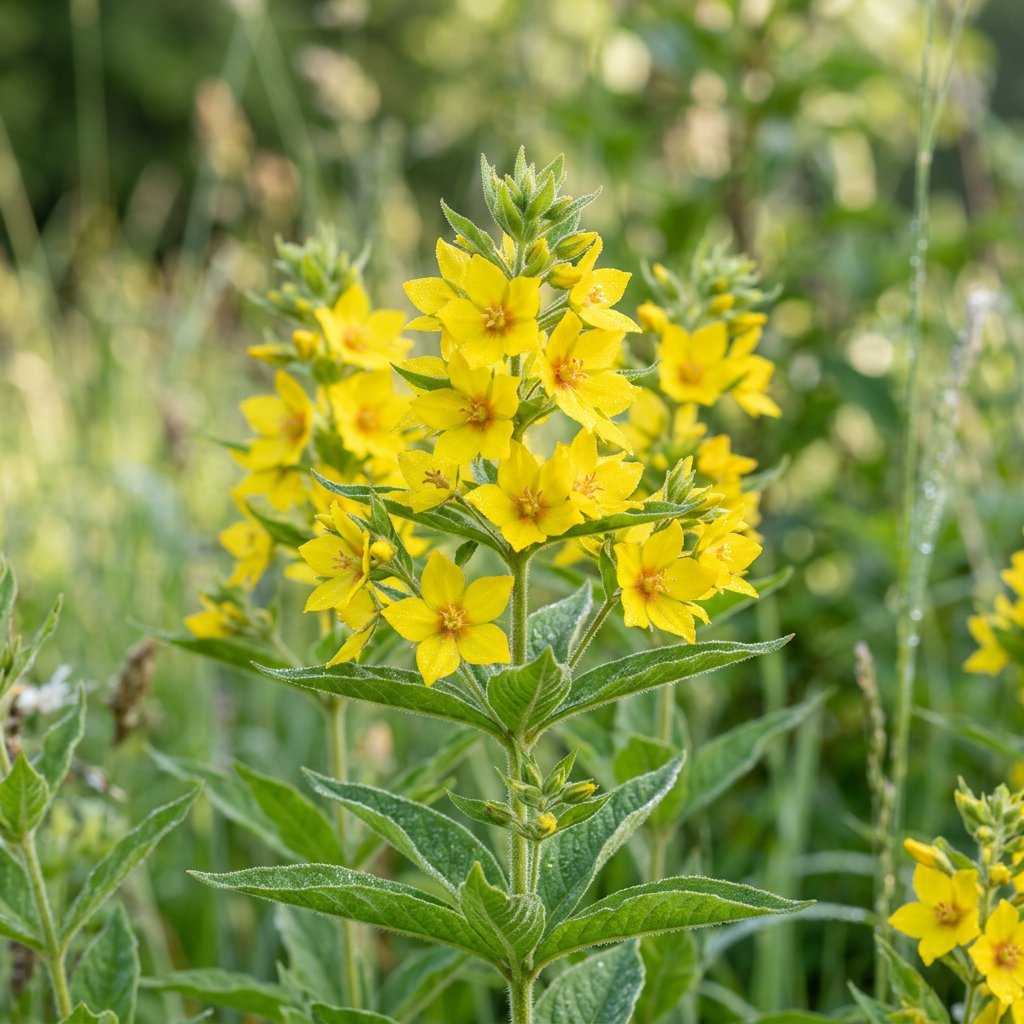
- 🌼 Golden Blooms: Star-shaped, bright yellow flowers emerge in the summer, featuring a distinctive orange or brownish "eye" at the center.
- 🍃 Whorled Foliage: The medium-green, lance-shaped leaves are unique because they grow in "whorls"—circling the stem in groups of three or four at the same level.
- 📏 Sturdy Spires: It grows in dense, upright clumps that can reach up to 3 feet tall, creating a vertical texture that stands strong even in summer rain.
🏡 In Your Garden
- 💧 The Moisture Master: Unlike many garden plants that fear "wet feet," this species thrives in moist, heavy soil. It is an excellent choice for pond edges, bog gardens, or that one soggy spot in the yard where grass won't grow.
- 🏃 A Spirited Spreader: It expands via underground runners (rhizomes). While this makes it a great groundcover for large areas, it can be a bit of a "space invader" in small beds. Planting it in a bottomless bucket buried in the ground can help keep its wandering roots in check.
⚠️ Safety & Toxicity
- ✅ Non-Toxic: Lysimachia punctata is generally considered safe for humans, cats, and dogs. It is not listed on the ASPCA's toxic plant list.
- 🧤 Mild Irritation: While not poisonous, the fine hairs on the stems and leaves can occasionally cause very mild skin irritation for people with highly sensitive skin. Wearing gloves during a heavy pruning session is a simple precaution.
✨ Fun Fact
The Dotted Loosestrife has a "secret deal" with a specific group of rare bees called Macropis. Instead of offering them nectar like most flowers, it produces a unique floral oil that the bees use to waterproof their nests and feed their larvae!

Detailed Care Instructions
| Humidity | Normal |
| Lighting | Part Sun |
| Toxicity | Poisonous |
| Difficulty | Medium |
| Hardiness Zones | 4 - 8 |
To grow Lysimachia punctata, also known as yellow loosestrife, you can follow these steps:
- Choose a suitable location: Lysimachia punctata thrives in a sunny or partially shaded area. It prefers moist, well-draining soil but can tolerate a wide range of soil types, including clay and sandy soil.
- Prepare the soil: Before planting, ensure the soil is well-prepared. Remove any weeds or debris from the planting area and amend the soil with organic matter, such as compost or aged manure, to improve its fertility and drainage.
- Planting: Dig a hole slightly larger than the root ball of the plant. Place the plant in the hole, ensuring the top of the root ball is level with or slightly above the soil surface. Backfill the hole with soil, gently firming it around the roots.
- Watering: After planting, thoroughly water the plant to settle the soil around the roots. Water regularly to keep the soil moist but not waterlogged. During hot and dry periods, increase the frequency of watering to prevent the plant from drying out.
- Mulching: Apply a layer of organic mulch, such as wood chips or straw, around the base of the plant to help retain moisture, suppress weed growth, and regulate soil temperature.
- Fertilizing: Lysimachia punctata typically requires minimal fertilization. However, you can apply a balanced, slow-release fertilizer in early spring to promote healthy growth. Follow the instructions on the fertilizer packaging for application rates.
- Pruning: In late winter or early spring, prune back any dead or damaged stems to encourage new growth. Maintain the desired shape and size of the plant by selectively removing any overgrown or unwanted stems throughout the growing season.
- Division: Lysimachia punctata can benefit from division every few years to maintain vitality and control its spread. Divide the plant in early spring or fall by carefully digging up the clump and separating it into smaller sections. Replant the divisions as needed.
By following these steps, you can successfully grow Lysimachia punctata in your garden.

Place in a window with dappled sun or a spot in the middle of a room. Or directly in a window facing west or east.

To properly water this plant, you should first determine its water needs based on factors such as temperature, sunlight exposure, and soil type. It is important to avoid overwatering, which can lead to root rot and other problems. You can ensure proper drainage by planting it in well-draining soil and using a pot with drainage holes. When watering, aim to moisten the soil evenly without saturating it. You may want to use a watering can or hose with a gentle nozzle to avoid damaging the plant. Additionally, always check the soil moisture before watering to ensure it is necessary.
To fertilize this plant, start by choosing a balanced, all-purpose fertilizer. Mix the fertilizer with water according to the package instructions. Use this mixture to water the plant every 2-3 weeks during the growing season. Be sure to water thoroughly, allowing the soil to soak up the fertilizer. Avoid getting the fertilizer mixture on the leaves or stems of the plant, as this can cause burning.
When planting Lysimachia Punctata, it is important to choose a soil that is well-draining and humus-rich. A loamy soil is ideal, as it provides a balance of drainage and moisture retention. The soil should be slightly acidic with a pH between 5.5 and 6.5. It is recommended to use a good quality soil mixed with organic matter such as compost or peat moss to improve soil quality and nutrient content. In addition, Lysimachia Punctata prefers moist soil, so be sure to water regularly to maintain appropriate moisture levels.
To propagate this plant, you will need to carefully remove a stem cutting from the mother plant. The cutting should be around 4-6 inches in length and have a few sets of leaves. Then, remove the lower sets of leaves, leaving only a few sets at the top of the cutting.
Next, prepare a small pot with well-draining soil and make a small hole in the center of the soil. Dip the end of the cutting in rooting hormone and place it in the hole, gently packing the soil around it.
Water the cutting thoroughly and cover the pot with a clear plastic bag to create a mini greenhouse effect. Keep the pot in a warm and bright location, but out of direct sunlight.
Check the cutting regularly for signs of new growth and roots. Once the cutting has rooted and new growth has emerged, you can transplant it to a larger pot or into your garden.
Common pests of the large yellow loosestrife include Spider mites, fungus gnats, aphids, whiteflies. Make a habit of checking your large yellow loosestrife frequently for pests so that any infestations can be caught and managed early.


