Plant Overview
Known affectionately as "Cheeses" because of its disk-shaped seed pods, the Malva (Common Mallow) is a resilient beauty that has decorated cottage gardens and waysides for centuries. Native to Europe and North Africa, it is a hardy survivor that tells a story of ancient herbalism and Victorian floral fashion. Its elegant, striped blooms make it a favorite for those seeking a wild, romantic aesthetic in their landscape.
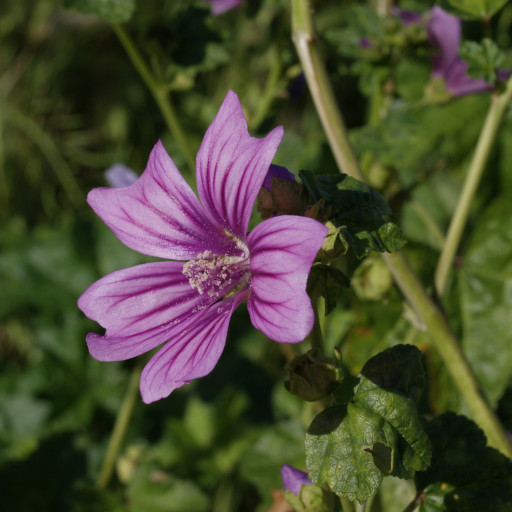
🔍 How to Identify
- 🌸 The Petals: Look for five heart-shaped petals, typically in shades of lilac or deep pink, marked with distinct dark purple veins that radiate from the center like a starburst.
- 🍃 The Foliage: The leaves are rounded and scalloped, often featuring 5 to 7 shallow lobes. They have a slightly fuzzy texture and grow on long, sturdy stalks.
- 🧀 The "Cheese": After the flowers fade, the plant produces flat, circular seed capsules. These look remarkably like tiny, green wheels of sliced cheese, giving the plant its famous folk nickname.
🏡 In Your Garden
- 🦋 Pollinator Buffet: Malva is a high-traffic station for honeybees and butterflies. Its long blooming season, stretching from mid-summer to the first frost, provides a vital nectar source when other flowers begin to fade.
- 🌱 The Taproot Secret: This plant develops a deep, sturdy taproot very quickly. This allows it to survive droughts and poor soil, but it also means it hates being moved. Always plant your Malva in its "forever home" rather than trying to transplant it later.
- 📏 Space & Stature: Depending on the variety, Malva can grow quite tall and bushy. It may require staking in windier gardens, as its heavy flower spikes can lean after a summer rain.
⚠️ Safety & Toxicity
- ✅ Safe for All: Malva is generally considered non-toxic to humans, dogs, and cats. It has a long history of being used in salads and soups in various cultures.
- ⚠️ Nitrate Note: While the plant itself is safe, Mallows are "accumulator" plants. If grown in soil heavily treated with chemical fertilizers or near runoff, the leaves can store high levels of nitrates, which can be irritating if consumed in large quantities.
✨ Fun Fact
The English word for the color "mauve" actually comes from the French name for this plant (Mauve). Before the mid-19th century, this specific shade of pale purple didn't have a name in the English language until it was inspired by the delicate Malva petals!

Detailed Care Instructions
To grow Malva plant, you can follow these steps:
- Choose the planting location: Malva plants thrive in areas with full sun to partial shade and well-drained soil. Select an area in your garden that receives at least 6-8 hours of sunlight each day.
- Prepare the soil: Malva plants prefer loose, friable soil. Prior to planting, loosen the soil with a garden fork or tiller. Remove any weeds or debris from the planting area.
- Sow the seeds: Malva seeds can be sown directly in the garden or started indoors 6-8 weeks before the last frost date. If starting indoors, fill a seed tray or pots with seed starting mix, plant the seeds, and keep them in a warm, well-lit area until they germinate. If sowing directly in the garden, scatter the seeds over the prepared soil and lightly cover them with a thin layer of soil.
- Watering and maintenance: Keep the soil evenly moist after planting until the seeds germinate. Once the plants are established, water them deeply once a week, or more frequently during hot, dry periods. Avoid overwatering, as it can lead to root rot. Mulching around the plants can help conserve moisture and suppress weed growth.
- Fertilization: Malva plants generally do not require much fertilization. However, you can apply a balanced, slow-release fertilizer during the growing season to provide essential nutrients. Follow the manufacturer's instructions for the appropriate dosage.
- Pruning: Regularly remove spent flowers to encourage continuous blooming. If the plants become leggy or untidy, you can also trim them back by cutting a few inches from the top. This promotes bushier growth.
- Pests and diseases: Malva plants are generally resistant to pests and diseases. However, keep an eye out for aphids, snails, and slugs. In case of infestation, use insecticidal soap or organic pest control methods to control them.
- Harvesting: Malva plants produce attractive flowers that can be cut for floral arrangements. Additionally, the leaves of some Malva species are edible and can be harvested for culinary use.
Remember to check the specific growing requirements for the variety of Malva plant you have, as different species may have slightly different needs.

Place in a bright room that is sun drenched almost all day. Or directly in a south-facing window.

Watering a particular type of plant requires adequate knowledge and understanding of the plant's water requirements. For this specific plant, it is important to keep the soil consistently moist but not waterlogged. It is recommended to water this plant deeply once a week instead of lightly watering it daily. Before watering, make sure to check the soil for dryness by inserting your finger a few inches into the soil. If it feels dry, it is time to water. Watering should be done either early in the morning or late in the evening to avoid evaporation. When watering, make sure to direct the water at the base of the plant to avoid wetting the leaves, which can lead to diseases. Avoid overwatering, as this plant is susceptible to root rot. Overall, consistent and adequate watering is essential to keep this plant healthy and thriving.
To fertilize this plant, you should apply a balanced fertilizer once a month during the growing season. Use a slow-release granular fertilizer according to the instructions on the package. Alternatively, you can use a liquid fertilizer, diluting it according to the instructions on the package, and apply it to the soil around the plant. Avoid over-fertilizing as it may cause excessive growth and weaken the plant's resistance to diseases and pests.
For Malva plants, it is best to use a type of soil with good drainage and aeration. A soil that is evenly moist without being too wet is ideal. The soil should also be rich in organic matter and have a slightly acidic to neutral pH level. Avoid using heavy or clay soils as they can cause root rot and limit water and nutrient uptake. A mix of topsoil, compost, and sand or perlite can create a suitable growing medium for a Malva plant.
To propagate this particular plant, the first step is to gather healthy stem cuttings from the parent plant. The cuttings should be about six inches long and taken from the upper part of the plant. The lower leaves should be removed and the remaining leaves should be cut in half to reduce the amount of moisture the cutting loses through transpiration.
The cuttings should then be dipped in rooting hormone and planted in a well-draining potting mix. The soil should be kept moist and the cuttings should be placed in a warm, brightly lit area with no direct sunlight. It is important to keep the soil moist but not waterlogged.
After a few weeks, new growth should appear indicating that roots have formed. At this point, the cuttings can be carefully transplanted to individual pots or larger containers. It is important to continue to water the new plants regularly and to gradually introduce them to more sunlight.
In addition to stem cuttings, this plant can also be propagated by division or by collecting and planting its seeds. Division should be done in the spring or fall, and seeds should be collected and planted in the fall.


