Plant Overview
Often called the Barrel Medic, this humble Mediterranean native is a quiet superstar in the world of science. While it may look like a common patch of clover at first glance, it serves as the "laboratory rat" of the plant kingdom, helping researchers understand how plants "talk" to soil bacteria. Whether you find it in a research greenhouse or a wild meadow, it is a master of self-sufficiency and soil enrichment.
🔍 How to Identify
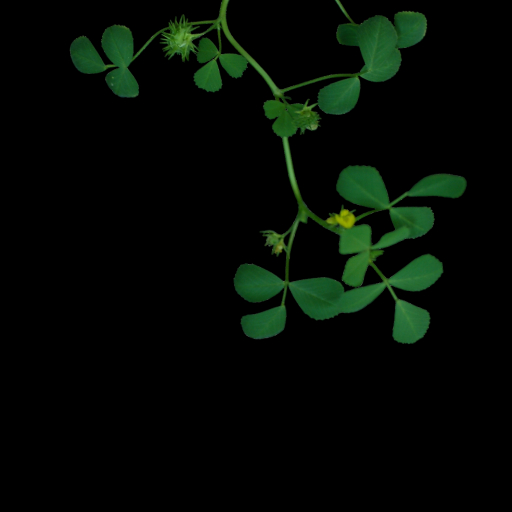
- ☘️ Trifoliate Leaves: Like its clover cousins, it features leaves in groups of three. Each leaflet is wedge-shaped, often with a tiny notch at the tip and slightly "toothed" edges.
- 🌼 Golden Blooms: It produces small, bright yellow flowers that resemble miniature pea blossoms, typically appearing in clusters of two to five.
- 🌀 Barrel-Shaped Pods: Its most defining feature is the seed pod, which coils tightly into a cylindrical "barrel" shape, often adorned with soft, hooked spines.
🏡 In Your Garden
- 🌱 The Nitrogen Factory: This plant is a "green manure" hero. It forms a symbiotic relationship with soil bacteria to pull nitrogen from the air and "fix" it into the ground, naturally fertilizing the area for future inhabitants.
- 🚜 Hardy Annual Habit: It is an annual plant that thrives in well-drained, slightly alkaline soils. Because it has a deep taproot, it is surprisingly drought-tolerant once established, though it dislikes being moved once its roots are set.
⚠️ Safety & Toxicity
- ✅ Safe Status: Medicago truncatula is generally considered non-toxic to humans, dogs, and cats.
- 🐄 Livestock Note: While it is a high-quality forage crop, like many legumes, it contains saponins. If livestock (specifically sheep or cattle) graze exclusively on it in massive quantities, it can occasionally cause minor bloating, but it is typically viewed as a beneficial pasture plant.
✨ Fun Fact
Because it has a relatively small genome and grows very quickly, Medicago truncatula was the first legume to have its entire DNA sequence mapped! Scientists use it to learn how to help other crops, like peas and beans, grow better without chemical fertilizers.

Detailed Care Instructions
Growing Medicago Truncatula, also known as barrel medic or barrel clover, is relatively easy if you follow these steps:
- Seeds: Purchase Medicago Truncatula seeds from a trusted seed supplier or a local nursery. Make sure the seeds are viable and fresh.
- Soil: Choose a well-draining soil mix with a slightly acidic to neutral pH (around 6.0-7.0). Barrel clover can grow in a wide range of soil types, but it prefers loamy or sandy soil.
- Preparation: Prepare the planting area by removing any weeds, rocks, or debris. Till or loosen the soil to a depth of about 6-8 inches (15-20 cm).
- Sowing: Sow the Medicago Truncatula seeds directly into the prepared soil. Broadcast the seeds evenly, and gently press them into the soil to ensure good seed-to-soil contact. Do not bury them too deeply; a 1/4 inch (0.6 cm) depth is sufficient.
- Watering: Water the area thoroughly after sowing to moisten the soil. Keep the soil consistently moist but not waterlogged. Avoid overwatering, as it can lead to root rot.
- Light and Temperature: Medicago Truncatula thrives in full sun, so choose a location that receives at least 6-8 hours of direct sunlight per day. It can tolerate partial shade but may not grow as vigorously. The plant prefers moderate temperatures, around 60-75°F (15-24°C).
- Maintenance: Keep the planting area free of weeds, as they can compete with the young Medicago Truncatula plants for nutrients and sunlight. Regularly check for pests and diseases, and take appropriate measures if any issues arise.
- Fertilization: If the soil is deficient in nutrients, you can apply a balanced fertilizer, such as a 10-10-10 slow-release formula, according to the manufacturer's instructions. However, barrel clover usually doesn't require heavy fertilization.
- Harvesting: Medicago Truncatula can be harvested for forage or used as a cover crop. You can start harvesting the leaves and stems when they reach the desired maturity, typically after about 40-60 days of growth.
Remember to research specific requirements for your region and adjust the care accordingly, as different climates and conditions may influence the growth of Medicago Truncatula.

Place in a bright room that is sun drenched almost all day. Or directly in a south-facing window.

Watering Medicago Truncatula plant requires the use of clean water and proper watering techniques. To water the plant, you should pour water gently at the base of the plant, making sure that the water reaches the roots. Avoid overwatering the plant as it can cause root rot, which can damage the plant. It is recommended to water the plant once a week, but it could vary depending on the plant's need for water and the season. Ensure that the soil is not soaked with water and give time for the water to drain before putting it back to its original position. Additionally, it is essential to keep an eye on the plant's leaves and make sure that they do not get too wet, as this can cause damage to the foliage. Instead of using tap water, you can use rainwater or distilled water as these are free of chlorine and other chemicals.
To fertilize this plant, provide it with a balanced, all-purpose fertilizer in the early spring just as new growth emerges. Make sure to follow the instructions on the fertilizer package for application rates. During the growing season, you can also supplement with a liquid fertilizer once every two weeks. Water the plant well before and after applying fertilizer to prevent burning the roots. Avoid over-fertilizing as this can cause leaf burn and reduce overall plant health.
The most suitable type of soil for Medicago Truncatula plant is a well-drained soil with a pH between 6.0 and 7.0. The soil must be rich in organic matter and nutrients, such as nitrogen, phosphorus, and potassium. It should also have good water retention capacity without becoming waterlogged. The soil must be aerated properly to avoid the build-up of harmful microorganisms, and it should not contain any contaminants or pathogens that may harm the plant. Additionally, the soil should not be too compacted, as this can affect the plant's growth and development. Overall, the soil must provide a favorable environment for the Medicago Truncatula plant to grow healthy and produce a good yield.
The propagation process of a certain plant species involves a few specific steps. Firstly, select mature and healthy specimens of the plant from which cuttings can be obtained. Secondly, sterilize all of the necessary tools, such as scissors and pots. Thirdly, take cuttings from the plant, ensuring that they are at least 4-6 inches long and do not have any damaged or diseased foliage. Fourthly, dip the end of the cutting in rooting hormone powder and then plant it in a pot filled with moist and well-draining soil. Fifthly, cover the pot with a clear plastic bag or a plastic dome to create a humid environment that encourages root growth. Sixthly, place the pot in a shaded area and keep it consistently moist by misting it regularly or placing it on a tray of water. Finally, after several weeks, check the cutting for root development by gently tugging on it. If it resists, then it has successfully rooted, and it can be gradually acclimated to brighter light and less humidity.


