Plant Overview
Commonly known as the Braceleted Honey Myrtle, this Australian native is a master of endurance and elegance. Often found clinging to coastal cliffs, it sports a weeping silhouette and fluffy, cream-colored spikes that look like miniature bottlebrushes. In many gardens, it is the ultimate "green wall," prized for its ability to provide privacy while acting as a sanctuary for local birds.
🔍 How to Identify
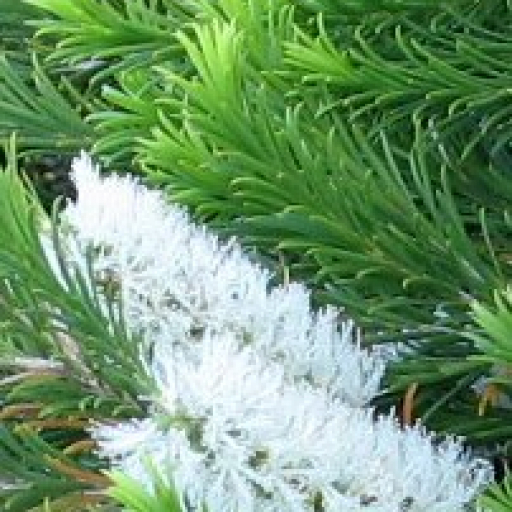
- 🌿 The Foliage: Look for fine, needle-like leaves that are dark green and crowded along the stems. They often curve slightly at the tips, giving the branches a soft, feathery appearance.
- ☁️ The Flowers: It produces cylindrical, creamy-white flower spikes that resemble small, fuzzy brushes. These usually bloom in late spring and summer, coating the tree in a "snowy" layer.
- 📜 The Bark: The trunk features distinctive gray, fibrous bark that feels papery to the touch and peels away in thin strips, a classic trait of the Melaleuca family.
🏡 In Your Garden
- 🌊 Coastal Warrior: This plant is incredibly salt-tolerant. It thrives in seaside environments where harsh salt spray and sandy soils would cause other plants to wither.
- ✂️ Privacy Screen: Because it grows rapidly and maintains a dense habit, it is an excellent choice for a windbreak or a tall hedge. To keep it from becoming "leggy," give it a light trim after the flowering season.
- 🐝 Pollinator Magnet: The nectar-rich blossoms are a favorite for honeyeaters, bees, and butterflies, making it a "must-have" for anyone looking to support local biodiversity.
⚠️ Safety & Toxicity
- ✅ General Safety: The Braceleted Honey Myrtle is generally considered non-toxic to humans and pets through touch or proximity.
- 💧 Essential Oils: Like its cousin, the Tea Tree, the leaves contain aromatic oils. While these smell wonderful, they can cause mild stomach upset in pets if ingested in large quantities.
- 🧤 Pruning Note: While not poisonous, the fine foliage can be slightly scratchy; wearing gloves during heavy pruning is recommended for those with sensitive skin.
✨ Fun Fact
The species name armillaris comes from the Latin word armilla, which means "bracelet." This refers to the way the circular seed pods or the leaf arrangements can look like tiny jewelry encircling the plant's stems!

Detailed Care Instructions
To grow Melaleuca armillaris, also known as Bracelet Honey Myrtle, you can follow these steps:
- Climate and location: Ensure that you live in a suitable climate for growing this plant. Melaleuca armillaris thrives in Mediterranean, subtropical, and temperate regions. It prefers full sun or partial shade with well-draining soil.
- Soil preparation: Prepare the soil by loosening it with a garden fork or tiller. Melaleuca armillaris prefers slightly acidic to neutral soil with good drainage. Amend the soil with organic matter like compost to improve its fertility and drainage.
- Propagation: Melaleuca armillaris can be propagated by seeds or cuttings. For seeds, sow them in a seed-raising mix in spring or early summer. Cover the seeds lightly and keep the soil moist until germination. For cuttings, take 6-8 cm long semi-hardwood cuttings from healthy parent plants in late summer or early autumn. Dip the cuttings in rooting hormone, plant them in a pot with a well-draining mix, and keep them moist until they root.
- Planting: Once the seedlings have developed a few sets of true leaves or cuttings have rooted, carefully transplant them into the ground. Dig a hole twice as wide and deep as the root ball, place the plant in it, and backfill with soil. Gently firm the soil around the plant and water thoroughly.
- Watering and maintenance: Water your Melaleuca armillaris regularly, especially during the first year of establishment. While it is a relatively drought-tolerant plant, adequate moisture is essential for its growth. Mulching around the base of the plant will help retain moisture and suppress weed growth. Prune lightly to maintain a desired shape and remove any dead or damaged branches.
- Pest and disease control: Melaleuca armillaris is generally resistant to pests and diseases. However, keep an eye out for common issues like scale insects, aphids, or leaf spot diseases. If necessary, treat with appropriate organic or chemical controls.
- Fertilizing: Feed your Melaleuca armillaris with a slow-release, balanced fertilizer in early spring. Follow the package instructions for application rates. Avoid over-fertilization, as it can lead to excessive growth and weaken the plant.
Remember to observe your Melaleuca armillaris regularly for signs of stress or issues. Provide the appropriate care, and you will enjoy the beauty of this attractive plant in your garden.

Place in a bright room that is sun drenched almost all day. Or directly in a south-facing window.

Melaleuca Armillaris plants should be moistened regularly to maintain their health and growth. The watering frequency and the quantity of water supplied to the plant depend upon its location, weather conditions, and the soil type it is grown in. In general, it is recommended to water the Melaleuca Armillaris plant deeply and thoroughly once a week during the dry season. During the rainy season, it can be watered less frequently, depending on the amount of rainfall. One should ensure that the soil is moist but not waterlogged. Over-watering can lead to root rot and eventually kill the plant. It is advisable to water early in the morning to prevent moisture loss due to evaporation during the day. Additionally, one should avoid getting water on the foliage to prevent fungal growth and plant diseases.
To fertilize this plant, use a balanced, slow-release fertilizer with an NPK ratio of 10:10:10 or similar. Apply the fertilizer in early spring as new growth begins to emerge and again in mid-summer. Use a fertilizer spreader or apply by hand, being careful not to get any fertilizer on the foliage or stems. Water thoroughly after fertilizing to help distribute the fertilizer throughout the root system. Avoid over-fertilizing, as this can cause damage to the plant and increase the risk of pest and disease problems.
It is recommended to use light, well-draining soil with a pH range between 6.0-7.5 for this plant. The soil should have a good balance of organic matter and inorganic components to provide essential nutrients to the plant. It is best to avoid heavy or compacted soils as they may retain excess moisture which can lead to root rot. Adding perlite or sand to the soil mixture can help improve drainage and prevent waterlogging. Additionally, it is important to ensure that the soil is not too alkaline as this can lead to nutrient deficiency and negatively impact plant growth.
To propagate this plant, choose a healthy stem cutting that is at least 8-10cm long. Remove the leaves from the bottom half of the stem and dip it in rooting hormone. Place the stem cutting in a pot filled with a well-draining soil mix and water thoroughly. Cover the pot with a plastic bag to increase humidity and place it in a bright, indirect light location. Ensure the soil remains moist by watering lightly every few days. After a few weeks, check for roots by gently tugging on the stem cutting. Once roots have formed, remove the plastic bag and gradually acclimate the new plant to direct sunlight.


