Plant Overview
Often called the Prickly-leaved Paperbark, this Australian native is a master of textures and a true survivor. It is instantly recognizable by its ghostly, peeling white trunk and its dense canopy of tiny, sharp-edged leaves. Historically valued for its ability to thrive in waterlogged soils, it has become a favorite for urban planners looking for a tree that is as tough as it is beautiful.
🔍 How to Identify
- 📜 The Bark: The most striking feature is its thick, spongy, and papery white bark that peels away in large, soft flakes, revealing a creamy-tan underlayer.
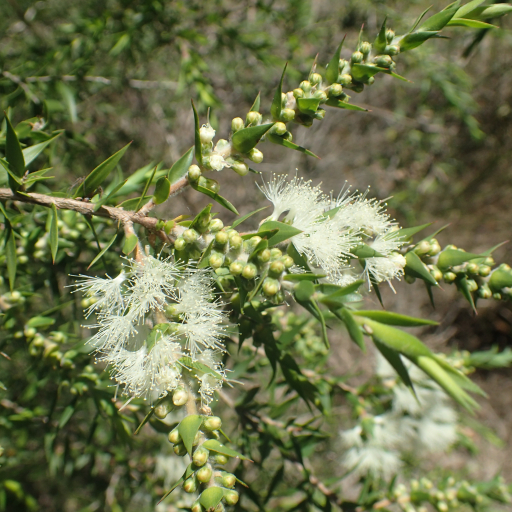
- 🗡️ The Foliage: The leaves are very small (about 10–15mm), ovate, and end in a distinctively sharp, prickly point. They often have a slight "twist" to their shape, giving the branches a ruffled look.
- ☁️ The Blooms: In late spring and summer, the tree is covered in creamy-white flower spikes. These look like small, fuzzy bottlebrushes and emit a light, sweet scent that attracts pollinators.
🏡 In Your Garden
- 💧 The "Wet Feet" Specialist: This is one of the best trees for solving drainage issues. It is highly tolerant of swampy ground and can even withstand temporary flooding, acting like a natural pump for soggy patches of your yard.
- 🛡️ Bird Sanctuary: Because the foliage is so dense and the leaf tips are prickly, it provides a perfect "fortress" for small birds. They love to build nests deep inside the branches where larger predators can't reach them.
- 🌬️ Coastal Warrior: It is incredibly hardy against strong winds and salt spray, making it a go-to choice for coastal gardens or as a tall, evergreen windbreak.
⚠️ Safety & Toxicity
- 🟢 General Safety: This plant is considered non-toxic to humans, dogs, and cats. It does not carry the high levels of essential oils found in some of its relatives (like the Tea Tree) that can be problematic if ingested in large amounts.
- 🧤 Physical Hazard: The primary "danger" is the foliage itself. The leaves are genuinely sharp and can cause skin irritation or scratches. It is best planted away from narrow pathways where people might brush against it.
✨ Fun Fact
The species name styphelioides means "like Styphelia," referring to its resemblance to a genus of Australian heaths. Even though it looks delicate, its wood is so durable and resistant to rot that it was historically used for building fences and even underground piles in wet ground!

Detailed Care Instructions
To successfully grow Melaleuca styphelioides (Prickly-leaved paperbark), follow these steps:
- Choose a suitable location: The plant prefers full sun to part shade, so select a spot in your garden that receives at least 6 hours of direct sunlight per day. Make sure the soil is well-draining.
- Prepare the soil: Melaleuca styphelioides can tolerate a range of soil types, but it thrives best in fertile, well-draining soil. Improve the soil quality by adding organic matter such as compost or well-rotted manure and mix it well.
- Planting: Dig a hole slightly larger than the plant's root ball. Gently remove the plant from its container and place it in the hole, ensuring the top of the root ball is level with or slightly above the soil surface. Backfill the hole with soil, firming it gently around the plant.
- Watering: Water the plant deeply immediately after planting to help settle the soil. After that, water it regularly during the first growing season to establish a healthy root system. Once established, Melaleuca styphelioides is relatively drought tolerant but will benefit from occasional deep watering during prolonged dry periods.
- Mulch: Apply a layer of organic mulch around the base of the plant, keeping it a few inches away from the trunk. Mulching helps to retain soil moisture, suppress weed growth, and regulate soil temperature.
- Pruning: Prune the plant lightly to maintain its shape and remove any dead, damaged, or crossing branches. Pruning can be done after flowering, typically in late spring or early summer.
- Fertilizing: Melaleuca styphelioides generally does not require frequent fertilizing. However, you can provide a slow-release fertilizer designed for native plants in spring if necessary.
- Pest and disease control: Prickly-leaved paperbark is generally resistant to common pests and diseases but may occasionally be susceptible to scale insects or leaf spot. Monitor the plant regularly and take necessary action if any issues arise, such as using organic insecticidal soap or appropriate fungicides.
Remember that Melaleuca styphelioides is a relatively slow-growing plant, so it requires patience to see substantial growth.

Place in a bright room that is sun drenched almost all day. Or directly in a south-facing window.

To properly water this plant, you should first choose a pot or container that has drainage holes in the bottom. Next, you will need to fill the container with a well-draining soil mix that is appropriate for the plant's needs. When watering, use a watering can or hose to water the soil until it is evenly moist, taking care not to let the water pool on the surface. You should avoid overwatering the plant, which can lead to root rot or other issues. Instead, wait until the top layer of soil feels dry to the touch before watering again. It's also important to note that this plant prefers to be kept on the drier side, so be sure to let the soil dry out between waterings. Finally, remember to consider the specific needs of the plant based on its location, such as the humidity and temperature of the environment, and adjust your watering accordingly.
To fertilize this plant, use a balanced fertilizer with equal amounts of nitrogen, phosphorus, and potassium. Apply the fertilizer once every two to three months during the growing season, which is typically spring and summer. Make sure to water the plant thoroughly before and after applying the fertilizer to prevent root burn. Avoid fertilizing during the dormant season, which is usually fall and winter.
The recommended soil for the Melaleuca Styphelioides plant is a well-draining mix with a pH between 5.5 and 7.5. It should ideally be a sandy loam or sandy clay loam that is rich in organic matter. Adequate water retention and drainage are crucial for this plant, so adding sand or perlite to the soil may be necessary to achieve optimal growing conditions. Additionally, it is important not to plant the Melaleuca Styphelioides plant in heavy, clay soils as they do not drain well and can lead to root rot.
To propagate this plant, first select a healthy parent plant from which to take cuttings. Cut a stem around 4-6 inches in length and remove the leaves from the bottom half of the stem. Dip the end of the cutting in rooting hormone and place it in a pot filled with a well-draining potting mix. Water the cutting gently and place a plastic bag over the pot to create a humid environment. Place the pot in a bright, indirect light location and keep the soil moist but not soggy. After a few weeks, the cutting should begin to root and new growth should appear. Once the new plant has established roots and is growing well, it can be transplanted into a larger pot or the garden.


