Plant Overview
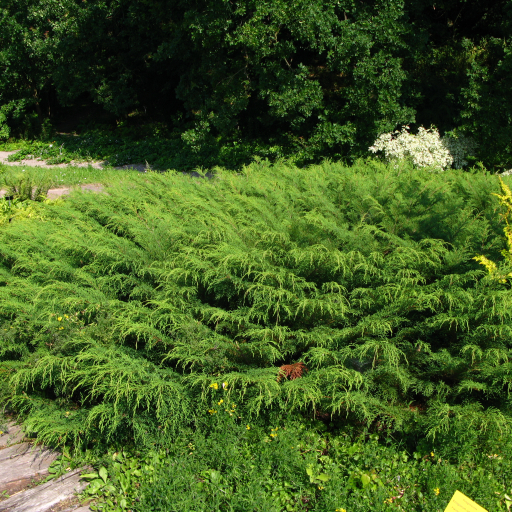
Known as the Siberian Carpet Cypress or Russian Arborvitae, this low-creeping evergreen is the lone survivor of its genus. Native to the harsh, mountainous regions of Eastern Russia, it was once a closely guarded botanical secret of the Soviet Union. It is the ultimate "problem solver" for gardeners looking for a hardy, elegant groundcover that can survive the most brutal winters.
🔍 How to Identify
- 🌿 Lace-Like Foliage: The branches are composed of delicate, scale-like needles that feel surprisingly soft to the touch, resembling the feathery fronds of a fern rather than a prickly juniper.
- 📏 Low-Profile Growth: It grows as a dense, flat-topped mound that rarely exceeds 12 inches in height but can spread several feet wide, creating a lush, "living rug" effect.
- 🎨 Seasonal Color Shift: While it maintains a vibrant green during the growing season, the foliage undergoes a dramatic transformation into a deep bronze or plum-purple as soon as the winter frost hits.
🏡 In Your Garden
- 🏔️ Siberian Toughness: Because it evolved in the Vladivostok region, it can withstand temperatures that would kill most other evergreens. Its low stature and flexible branches allow it to shrug off heavy snow loads that would snap taller shrubs.
- 🌑 Shade Versatility: Unlike many conifers that crave full sun to stay dense, this plant is remarkably shade-tolerant. It’s an excellent choice for the north side of buildings or the dappled shade of a woodland garden.
- 💧 Drainage is Key: While it appreciates consistent moisture and cool air, its roots are highly sensitive to "wet feet." Planting it in heavy clay without amendments can lead to root rot; it prefers the rocky, well-draining soil of its mountain heritage.
⚠️ Safety & Toxicity
- ✅ Low Risk: Microbiota decussata is generally considered non-toxic to humans and is not known to be dangerous to common household pets like cats and dogs.
- 🧤 Minor Irritation: Like many members of the cypress family, the foliage contains natural oils that may cause mild skin irritation or a temporary rash in sensitive individuals. It is always a good idea to wear gardening gloves when pruning or transplanting.
✨ Fun Fact
🕵️ The Cold War Conifer: Although discovered by botanists in 1921, its location in the sensitive military zones of the Soviet Far East meant it was kept hidden from the Western world for nearly 50 years. It wasn't until the 1970s that seeds finally "leaked" across the border, eventually becoming a staple in modern landscaping.

Detailed Care Instructions
To grow a Microbiota Decussata plant, also known as Russian cypress or Siberian cypress, follow these steps:
- Choose an appropriate location: Microbiota Decussata prefers full sun or partial shade. It can tolerate a wide range of soils, but it prefers well-draining soil. The plant is cold-hardy, so it is suitable for temperate and cold climates.
- Prepare the soil: Amend the soil with organic matter such as compost or peat moss to improve drainage and provide nutrients. Loosen the soil with a garden fork or tiller to ensure proper root development.
- Dig the planting hole: Make a hole that is slightly larger than the root ball of the plant. The depth should be equal to the height of the root ball.
- Plant the Microbiota Decussata: Gently remove the plant from its container and place it in the planting hole. Ensure that the top of the root ball is level with the surrounding soil. Backfill the hole with soil, firming it gently around the plant to remove any air pockets.
- Water thoroughly: Water the plant thoroughly after planting to settle the soil and provide moisture for root establishment. However, avoid overwatering, as excessive moisture can cause root rot.
- Mulch: Apply a layer of organic mulch around the base of the plant to help retain moisture, suppress weed growth, and insulate the roots against extreme temperatures.
- Pruning: Microbiota Decussata typically requires minimal pruning. However, you can trim any dead or broken branches to maintain a neat appearance.
- Regular maintenance: Ensure that the plant receives adequate water, especially during hot and dry periods. However, let the soil dry out slightly between waterings to prevent waterlogging. Fertilize the plant once a year in early spring with a balanced slow-release fertilizer to provide essential nutrients.
With proper care and maintenance, your Microbiota Decussata plant should grow well and provide a beautiful, low-maintenance ground cover or specimen in your garden.
Microbiota Decussata is a type of plant that requires proper watering to remain healthy and thrive. To water this plant, you should ensure that you do not over-water or under-water it. This is because the plant can become susceptible to diseases and pests when it is left with too much or too little water.
One way to water this plant is to use a watering can with a long spout so that the water reaches the roots directly. You should avoid splashing water on the foliage, as this can cause fungal diseases.
Before watering, you should check the soil moisture level by inserting your finger into the soil. If the soil feels dry to the touch, it's time to water the plant. However, if the soil feels moist, do not water the plant as it can lead to root rot.
When watering, it's essential to apply the water slowly and carefully. This allows the soil to absorb the water, and also prevents the water from running off. Water the plant until water drains out from the drainage holes in the pot.
It's recommended to water this plant once a week during the growing season and reduce watering in the winter months. This will help to prevent over-watering and keep the plant healthy.
In summary, watering Microbiota Decussata requires a delicate balance between not overwatering or underwatering. It should be checked regularly and watered when the soil is dry to the touch but not moist. It is also important to avoid splashing water on foliage and applying water slowly and carefully.
To fertilize this plant, use a slow-release granular fertilizer with a balanced ratio of nitrogen, phosphorus, and potassium. Apply the fertilizer in the spring when new growth begins, and again in mid-summer. Use a light hand when applying, as too much fertilizer can damage the plant. Water the plant thoroughly after fertilizing to activate the nutrients.
Microbiota Decussata plant prefers well-drained soil that is rich in nutrients. The soil should have a slightly acidic to neutral pH level, with a range between 6.0 to 7.5. It thrives in soils that are light and porous, ensuring that the roots have ample oxygen supply. A mixture of loam, sand, and peat moss is ideal for planting and growing Microbiota Decussata. Avoid using heavy clay soils or ones that are too compact and don't drain well. Additionally, it is best to avoid using soil that is too rich in nitrogen, as it can cause excessive growth and detract from the plant's appearance.
Microbiota Decussata is a small, evergreen shrub that is commonly propagated through a process called softwood cuttings. To do this, you will need to select healthy, young stems from the plant that are between 3-6 inches long and have a few sets of leaves.
Next, remove the bottom set of leaves from each cutting and use a sharp, clean pair of scissors or pruning shears to make a clean cut just below a node (a spot where a leaf attaches to the stem). You can then dip the cut end of each cutting in rooting hormone powder to encourage root growth.
Next, prepare a pot or container filled with well-draining potting soil. Moisten the soil slightly, and use a pencil or similar object to make a hole in the soil for each cutting. Carefully insert the cuttings into the holes, making sure to firm the soil around each one to ensure they're in place.
Cover the pot with a plastic bag or dome to create a humid environment for the cuttings, and place it in a bright, but indirect, location. Check the cuttings regularly to ensure the soil stays moist, but not waterlogged. In a few weeks, you should start to see roots forming on the cuttings.
Once the cuttings have rooted, you can remove the plastic bag or dome and gradually expose them to more light and air. Over time, you can transplant the new plants into larger containers or directly into your garden.