Plant Overview
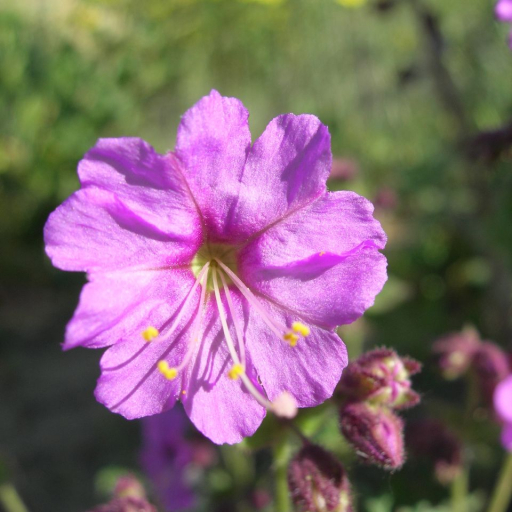
Commonly known as the Desert Wishbone Bush, this resilient native of the American Southwest is a true survivor of the scrublands. Its name comes from the way its stems fork repeatedly, creating a delicate, skeletal structure that looks like a series of tiny wishbones. Whether clinging to a rocky cliffside or brightening a coastal canyon, this plant offers a gentle splash of color in environments where few other things dare to bloom.
🔍 How to Identify
- 🦴 Wishbone Branching: The stems split in two at nearly every node, creating a distinct "Y" shape that is most visible when the plant is dormant.
- 🌸 Trumpet Blooms: Small, funnel-shaped flowers appear in clusters at the branch tips, ranging from a ghostly white to a soft, romantic magenta.
- 🍃 Sticky Foliage: The heart-shaped leaves are covered in fine, glandular hairs that feel slightly tacky to the touch—a clever adaptation to trap moisture and deter tiny pests.
🏡 In Your Garden
- ☀️ Sun Seeker: This plant is an expert at handling intense heat. It prefers rocky, well-draining soil and will actually suffer if it sits in heavy, wet clay.
- 💧 Drought Dormancy: Don't panic if it loses its leaves in mid-summer! Mirabilis laevis often goes dormant during the hottest months to conserve energy, only to spring back to life after the first refreshing rain.
⚠️ Safety & Toxicity
- 🚫 Mildly Toxic: Like its famous cousin, the "Four O'Clock" flower, the roots and seeds of the Wishbone Bush contain compounds that can cause stomach upset if ingested.
- 🐾 Pet Warning: Keep an eye on curious dogs or cats; while not usually fatal, eating the plant can lead to vomiting or digestive distress.
✨ Fun Fact
The flowers of the Wishbone Bush are "night-owls"—they typically wait until the cool of the late afternoon or evening to open their petals, specifically to attract nocturnal pollinators like sphinx moths!

Detailed Care Instructions
To grow Mirabilis laevis, also known as the desert four o'clock or red four o'clock, you can follow these steps:
- Climate and suitable location: Mirabilis laevis thrives in full sun to light shade and prefers a warm climate. It is native to the desert, so it requires well-drained soil and can tolerate dry conditions. Ensure that your gardening zone is suitable for this plant.
- Seed starting: Mirabilis laevis can be started from seeds indoors or sown directly into the garden after the last frost date. If starting indoors, sow the seeds in pots or trays filled with well-draining soil about 8-10 weeks before the last frost date. Plant the seeds about 1/4 inch deep and keep the soil evenly moist until they germinate.
- Seedling care: Once the seedlings emerge, place them in a sunny location and maintain a temperature of around 70°F (21°C). Water regularly, keeping the soil moist but not waterlogged. When the seedlings reach a height of around 2-3 inches, they can be transplanted outdoors.
- Outdoor planting: Find a location with well-draining soil and full sun to light shade. Prepare the soil by loosening it and removing any weeds or debris. Dig a hole slightly larger than the root ball of the seedling and gently place the plant in the hole, ensuring that the top of the root ball is level with or slightly above the soil surface. Backfill the hole with soil, gently firming it around the roots. Water thoroughly after planting.
- Watering and maintenance: Mirabilis laevis requires moderate watering. Water the plant deeply but infrequently, allowing the soil to dry out between waterings. Avoid overwatering, as it can lead to root rot. Mulching around the plant can help conserve moisture and suppress weed growth.
- Pruning: To encourage bushier growth and to remove any dead or damaged branches, prune the plant lightly. This can be done in early spring before new growth appears.
- Fertilization: Fertilization is generally not necessary for Mirabilis laevis. However, if you feel your plant needs a boost, you can apply a balanced, slow-release fertilizer during the growing season.
- Pests and diseases: Mirabilis laevis is relatively resistant to pests and diseases. However, keep an eye out for common garden pests like aphids or spider mites, and treat them accordingly if necessary.
With proper care and suitable growing conditions, Mirabilis laevis should thrive and provide beautiful blooms throughout the summer.

Place in a bright room that is sun drenched almost all day. Or directly in a south-facing window.

1. Check the soil moisture level – Before watering, check the soil for its moisture level by sticking your finger about an inch into the soil. If the soil feels dry, it’s time to water.
2. Use room temperature water – Use room temperature water when watering the plant. Cold water can shock the roots, while hot water can damage them.
3. Water at the base of the plant – When watering, it’s important to avoid getting the leaves wet. Water the plant at the base, directing the water towards the soil.
4. Water deeply – Water the plant deeply, soaking the soil. Shallow watering can encourage the roots to grow towards the surface, which can make the plant more susceptible to drought.
5. Don’t overwater – Overwatering can lead to root rot, which can kill the plant. After watering, allow the soil to dry out slightly before watering again.
6. Water less in winter – During the winter months, the plant may not require as much water. Check the soil moisture level and only water when necessary.
7. Use a drainage tray – If the plant is in a pot, use a drainage tray to catch excess water. Empty the tray after watering to prevent the plant from sitting in standing water.
In early spring, prepare the soil by digging in compost or well-rotted manure. Once the plant starts emerging in late spring, apply a balanced fertilizer every four to six weeks, following the manufacturer's instructions for dosage. Avoid over-fertilizing as it can cause the plant to become leggy and prone to disease. Water the plant deeply after each fertilization to help the nutrients penetrate the soil. In fall, stop fertilizing to allow the plant to enter dormancy.
Mirabilis Laevis plant requires a well-draining soil with good nutrient content. The soil should have a pH of 6.0 to 7.5 and should be rich in organic matter. A mixture of sandy loam and peat moss or compost can be used to create the ideal soil. Avoid using heavy clay soils or soils that are too moist, as this can lead to root rot and other fungal diseases. When planting, ensure that the soil is loose and aerated to promote healthy root development. Regular fertilization and watering will also help to create an ideal growing environment for Mirabilis Laevis plant.
Mirabilis Laevis can be propagated through seed starting or cuttings. If you plan to grow plants from seed, you must gather fresh seeds in the fall, when the plants begin to bolt. The seeds are encased in a dry seedpod, which you must let dry and crack open to remove the seeds. Work the seeds out of the pod, and store them in a dry place in envelopes or bags.
For stem cuttings, use a sharp, sterilized knife or shears to cut a section of stem from the parent plant. Select stems that have new growth at their tips, and make sure they are free of pests and diseases. Sterilizing the knife or shears by dipping them in rubbing alcohol before making the cut prevents the spread of soil-borne diseases.
Immediately remove any leaves or flowers from the bottom third of the stem, and dip the cut end into a rooting hormone powder, if desired. Next, fill a pot with moistened potting mix, and make a hole in the center. Insert the stem cutting into the hole, and firm the soil around it. Finally, water the cutting and cover the pot with a plastic bag or dome to keep moisture in.
Place the pot in a bright, warm location out of direct sunlight, and water the cutting whenever the top inch of soil feels dry. In a few weeks, the cutting should establish roots and begin to grow. Once the plant has grown sufficiently, it can be transplanted into a larger pot or moved outdoors.