Plant Overview
Known as the "Sweet Four O'Clock," Mirabilis longiflora is a desert-dwelling beauty that waits for the sun to dip before showing off its elegance. Hailing from the rugged landscapes of the American Southwest and Mexico, it fills the evening air with an intoxicating fragrance reminiscent of orange blossoms. It is a staple for "moon gardens," where its ghostly white blooms seem to glow under the light of the stars.
🔍 How to Identify
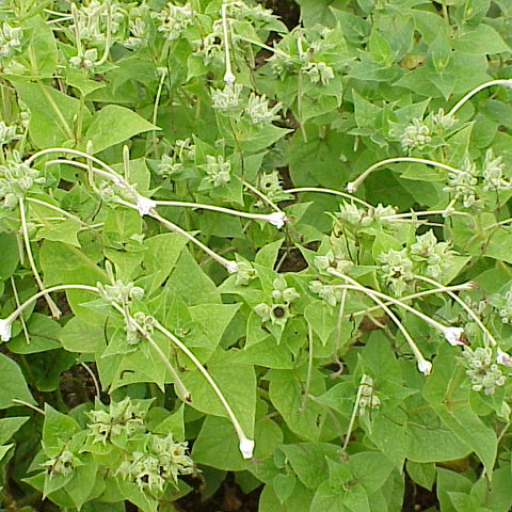
- 🌸 Floral Tubes: Characterized by exceptionally long, slender white trumpets that can reach up to six inches in length, often tipped with delicate pink or purple stamens.
- 🍃 Foliage: Large, vibrant green, heart-shaped leaves that are arranged oppositely along the stems.
- Sticky Texture:** The stems and leaves are covered in minute glandular hairs, giving the plant a distinctively tacky or "sticky" feel when touched.
🏡 In Your Garden
- 🌙 Nocturnal Appeal: Unlike most garden flowers, these open in the late afternoon and remain vibrant through the night; plant them near a patio or window to enjoy their scent during summer evenings.
- 🦋 Pollinator Paradise: The deep nectar tubes are an evolutionary "lock" that can only be opened by the long tongues of Sphinx moths (Hawkmoths), making your garden a hub for these dramatic nocturnal visitors.
- 🪵 Deep Taproots: This plant develops a thick, tuberous root system that helps it survive drought, but this also means it hates being moved once established—choose its home carefully!
⚠️ Safety & Toxicity
- 🚫 Toxic if Ingested: While beautiful, the entire plant is considered poisonous, with the highest concentration of toxins found in the seeds and the fleshy roots.
- 🐾 Pets and Children: Ingestion can cause vomiting, diarrhea, and stomach pain; ensure it is planted in an area where curious pets or toddlers won't be tempted to snack on the "peppery" looking seeds.
✨ Fun Fact
The species name longiflora literally translates to "long flower," a nod to the fact that its floral tube is one of the longest in the entire Four O'Clock family, specifically evolved to match the proboscis of a single type of moth!

Detailed Care Instructions
| Lighting | Full Sun |
To grow Mirabilis longiflora, also known as the Purple Four O'Clock flower, here are some steps you can follow:
- Choose a suitable location: This plant prefers full sun, so select a spot in your garden that receives at least 6-8 hours of direct sunlight each day.
- Prepare the soil: Make sure the soil is well-draining and enriched with organic matter. Add compost or well-rotted manure to improve the soil's fertility.
- Sow or transplant: Mirabilis longiflora can be grown from seeds or transplanted from nursery-grown plants. If using seeds, sow them directly in the garden after the danger of frost has passed, or start them indoors 6-8 weeks before the last frost date. Transplant young plants outdoors once they reach around 4-6 inches in height.
- Planting: Dig a hole that is slightly larger than the root ball of the plant. Place the plant in the hole, ensuring that the top of the root ball is level with or slightly above the soil surface. Fill the hole with soil, gently firming it around the roots.
- Watering: Keep the soil consistently moist, especially during dry periods. However, avoid overwatering, as the plant is sensitive to root rot. Water deeply when required, allowing the top few inches of soil to dry out between waterings.
- Mulching: Apply a layer of organic mulch, such as straw or wood chips, around the base of the plant. Mulch helps retain moisture, suppresses weeds, and keeps the soil cool.
- Fertilizer: Mirabilis longiflora generally does not require much fertilizer. However, you can apply a balanced, slow-release fertilizer once or twice during the growing season, following the manufacturer's instructions.
- Pruning: This plant benefits from occasional pruning to keep it well-shaped and vigorous. Prune off spent flowers to encourage continuous blooming and remove any dead or damaged branches.
- Pests and diseases: Mirabilis longiflora is generally resistant to pests and diseases. However, keep an eye out for common issues such as aphids, spider mites, or powdery mildew. Treat any infestations or infections promptly using suitable organic or chemical control methods.
- Enjoy: Once established, Mirabilis longiflora will reward you with its beautiful purple flowers. Enjoy the blooms and the pleasant fragrance they emit during the late afternoon and evening.

Place in a window with dappled sun or a spot in the middle of a room. Or directly in a window facing west or east.

When watering this plant, it is important to avoid overwatering as it can lead to root rot. The plant prefers well-draining soil and it is best to allow the soil to dry out slightly between watering. Water thoroughly, ensuring that the soil is evenly moist, but not waterlogged. It may require more frequent watering during periods of high heat or drought. It is also important to avoid getting water on the leaves as this can cause fungal issues.
To fertilize this plant, it is recommended to apply a balanced, slow-release fertilizer in the spring when new growth begins. Be sure to follow the instructions on the fertilizer package for the appropriate amount to apply based on the size of the plant. Additionally, it is beneficial to supplement with a liquid fertilizer once a month during the growing season. Avoid over-fertilizing, as this can lead to excessive foliage growth at the expense of blooms.
Mirabilis Longiflora plant prefers a well-draining soil that is rich in nutrients. It requires soil that is loamy and acidic in nature, having a pH range of 5.5-6.5. The soil should be moist but not waterlogged as it can lead to root rot. It benefits from the addition of organic matter such as compost or aged manure, which improves drainage and increases soil fertility. It is important to ensure that the soil is free from weeds and other plants that may compete for nutrients and water. When planting Mirabilis Longiflora, it is recommended to incorporate a slow-release fertilizer into the soil to provide the plant with the necessary nutrients for healthy growth.
To propagate this plant, you will need to take stem cuttings. Select a healthy stem that is at least 6 inches long and has several leaves attached to it. Make a clean cut with a sharp knife or scissors, just below a node (where the leaves attach to the stem). Remove any leaves from the bottom 2-3 inches of the stem.
Fill a small pot with moist soil or propagation mix. Make a hole in the center of the soil with a pencil or your finger and insert the stem cutting, making sure the cut end is buried 2 inches deep in the soil. Gently press the soil around the stem to hold it in place.
Mist the cutting with water and cover the pot with a clear plastic bag or a small plastic dome to create a mini greenhouse. This will help retain moisture and increase humidity around the cutting.
Place the pot in a bright, indirect light location, but away from direct sunlight. Keep the soil moist but not wet. Check the cutting regularly for any signs of pests or disease and remove any affected parts immediately.
After a few weeks, you should start to see new growth from the stem cutting. Once the roots have established and the plant is growing well, you can transplant it to a larger pot or into your garden.