Plant Overview
The Red Mulberry is the soul of the North American woodland. Often called the "Native Mulberry," it has provided sweet, juicy harvests for centuries, long before its Asian cousins were introduced to the continent. This tree is a hardy survivor that tells a story of the changing seasons, transforming from a lush green canopy into a gold-hued centerpiece in the autumn.
🔍 How to Identify
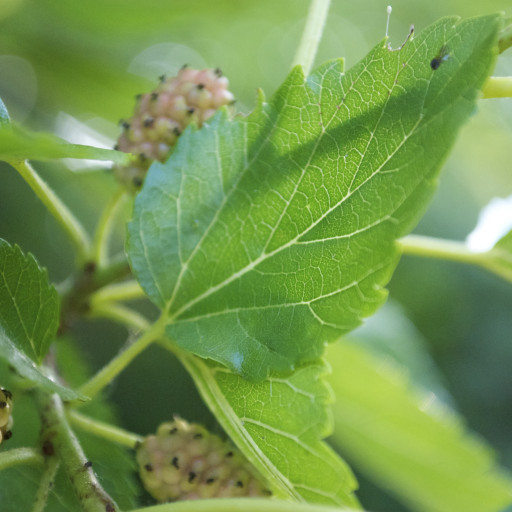
- 🍃 Textured Leaves: The leaves are large, heart-shaped, and often "polymorphic" (meaning one tree can have both oval and deeply lobed leaves). Crucially, the top surface feels like rough sandpaper, while the underside is softly hairy.
- 🍇 The "Blackberry" Tree: It produces compound fruits that look remarkably like elongated blackberries. They transition from green to a rich, staining purple-red when fully ripe in early summer.
- 🌳 Fissured Bark: As the tree matures, its greyish-brown bark develops flat-topped, scaly ridges that sometimes peel away in long, thin flakes.
🏡 In Your Garden
- 🐦 Wildlife Magnet: If you are a birdwatcher, this is the ultimate specimen. It attracts orioles, tanagers, and waxwings like a magnet. However, because the fruit stains, avoid planting it near driveways, sidewalks, or white fences.
- 🪵 Deep Roots: The Red Mulberry develops a significant taproot early in its life. This makes it very drought-tolerant once established, but it also means it "hates" being moved. Choose its forever home carefully in deep, well-draining soil.
⚠️ Safety & Toxicity
- 🐾 Safe for Consumption: The fully ripe purple fruits are edible and delicious for humans, dogs, and cats. They are packed with antioxidants and vitamin C.
- 🧪 Sap Sensitivity: Like many members of the Moraceae family, the stems and leaves contain a milky white latex (sap). This sap and the unripe (green) fruit can cause mild skin irritation or stomach upset if ingested in large quantities.
✨ Fun Fact
Indigenous peoples, such as the Choctaw and Cherokee, utilized the Red Mulberry for more than just food; they harvested the inner bark to weave soft, durable textiles and used the wood—which is remarkably resistant to rot—to craft bows and tool handles.

Detailed Care Instructions
| Color | Green |
| Soil Ph | Neutral To Basic |
| Lighting | Full Sun |
| Toxicity | Toxic |
| Soil Type | Rich, Moist, Well-Drained |
| Bloom Time | March To April |
| Plant Type | Tree |
| Native Area | Eastern United States |
| Sun Exposure | Full Sun To Part Shade |
| Hardiness Zones | 4-8 |
To grow Morus Rubra, also known as Red Mulberry, follow these steps:
- Choose a suitable location: Red Mulberry prefers full sun to partial shade. Choose a spot in your garden that receives at least 6 hours of direct sunlight a day. Ensure that the soil is well-draining to prevent waterlogging.
- Soil preparation: Red Mulberry thrives in slightly acidic to neutral pH soil. Prepare the soil by loosening it using a garden fork or tiller. Incorporate organic matter like compost or aged manure to improve soil fertility and drainage.
- Planting: Red Mulberry trees are usually grown from cuttings or purchased saplings. Dig a hole that is slightly wider and deeper than the root ball of the sapling. Place the tree in the hole, making sure the top of the root ball is level with or slightly above the soil surface. Backfill the hole with soil, gently firming it around the roots. Water thoroughly after planting.
- Watering: Water the newly planted Red Mulberry tree deeply and regularly, especially during the first year. Keep the soil moist but not waterlogged. Once the tree is established, it can tolerate some drought but will still benefit from regular watering during prolonged dry periods.
- Mulching: Apply a layer of organic mulch around the base of the tree, leaving a gap around the trunk to avoid excessive moisture around the stem. Mulching helps to conserve soil moisture, regulate soil temperature, and suppress weed growth.
- Pruning: Prune Red Mulberry trees in late winter or early spring while the tree is still dormant. Remove any weak, dead, or crossing branches. It is also beneficial to thin out the canopy to improve airflow and reduce the risk of disease.
- Fertilization: Fertilize the Red Mulberry tree in early spring using a balanced, slow-release fertilizer. Follow the package instructions for application rates. Avoid over-fertilizing, as it can lead to excessive vegetative growth with reduced fruit production.
- Pest and disease management: Red Mulberry trees are relatively pest and disease resistant. However, regular inspection for common pests like aphids or caterpillars is recommended. Treat any infestations promptly using appropriate organic or chemical pest control methods.
- Harvesting: Red Mulberries ripen from late spring to early summer. Once the fruit is fully ripe and falls easily from the tree with a gentle shake, it is ready to be harvested. Be sure to pick the fruit as soon as it ripens, as it can attract birds and other animals if left on the tree for an extended period.
By following these steps and providing proper care, you can successfully grow a healthy Red Mulberry tree in your garden.

Place in a bright room that is sun drenched almost all day. Or directly in a south-facing window.

To water this plant, it is best to give it a deep watering rather than frequent shallow watering. This means allowing the soil to dry out before watering again, but not to the point of wilting. It is important to ensure proper drainage to prevent waterlogging and root rot. Additionally, it is best to water at the base of the plant rather than overhead watering to avoid wetting the leaves and potentially causing disease.
To fertilize this plant, use a balanced fertilizer with an NPK ratio of 10-10-10. Apply the fertilizer in early spring before new growth appears and again in mid-summer. Be sure to follow the manufacturer's instructions for application rates. Avoid over-fertilization as it can lead to burns and damage to the roots. Water the plant well before and after fertilization to ensure the nutrients reach the roots.
For optimal growth of Morus Rubra plants, it is recommended to use well-draining soil that is rich in nutrients. The ideal pH range for the soil should be between 6.0 to 6.5. The soil should be able to retain adequate moisture without becoming waterlogged, as excessive moisture can lead to root rot and other fungal diseases. Adding organic matter such as compost or aged manure to the soil can be beneficial for the plant's growth and overall health. It is also important to avoid using soil that has been previously used to grow other plants that were prone to diseases or pests.
To propagate this plant, you will need to start by collecting the seeds or cuttings. For seeds, you can collect them from mature fruit that has fallen to the ground. For cuttings, select a healthy stem that is at least 6 inches long and remove all leaves except for the top two or three. Dip the cuttings in a rooting hormone and plant them in a well-draining soil mix.
If propagating from seeds, plant them in a tray or pot with well-draining soil. Cover them with a light layer of soil and water well. Keep the soil moist but not waterlogged and place the tray in a warm, bright spot. The seeds should germinate within 1-2 weeks.
For cuttings, cover the pot with a clear plastic bag to create a mini greenhouse. This will help to maintain high humidity levels around the cuttings and encourage faster root growth. Keep the soil moist but not waterlogged and place the pot in a bright spot out of direct sunlight. Rooting should occur within 2-3 weeks.
Once the cuttings or seeds have rooted and started to grow, you can transplant them into individual pots or directly into the ground. Make sure to keep them well-watered and protect them from extreme temperatures until they are established.
Common pests of the red mulberry include Scale insect, mealybugs, spider mites, thrips. Make a habit of checking your red mulberry frequently for pests so that any infestations can be caught and managed early.