Plant Overview
Often mistaken for its more famous cousin, the common Watercress, Nasturtium microphyllum—better known as the "One-row Watercress"—is a delicate aquatic treasure. This plant thrives where land meets water, often forming lush, floating mats in cool, slow-moving streams. For foragers and nature lovers, it is a symbol of pristine environments and spicy, culinary potential.
🔍 How to Identify
- 🌿 Single-Row Seeds: The easiest way to distinguish this species is its long, slender seed pods (siliques). When examined closely, the seeds inside are arranged in a single, neat row rather than two.
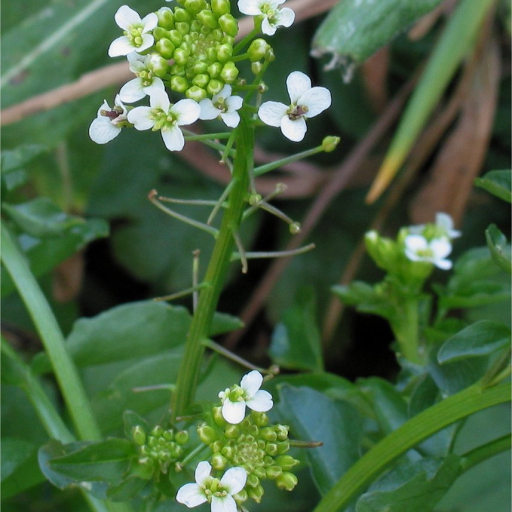
- 🍃 Lobed Foliage: The leaves are bright green, fleshy, and "pinnate," meaning they have several small leaflets branching off a central stem, ending in a larger, rounded terminal leaf.
- 🌸 Cross-Shaped Flowers: Like other members of the Mustard family, it produces tiny, four-petaled white flowers that grow in clusters at the tips of the stems.
🏡 In Your Garden
- 💧 The Running Water Rule: Unlike many garden plants, this species is semi-aquatic. It doesn't just like wet soil; it prefers shallow, moving water. It is a fantastic choice for the edges of a backyard pond or a slow-trickling water feature.
- 🌊 Bio-Indicator: This plant is quite picky about its environment. If you find it thriving in the wild, it is often a sign of high water quality, as it struggles to survive in stagnant or heavily polluted runoff.
⚠️ Safety & Toxicity
- 🍽️ Status: Generally considered edible and highly nutritious, but with a major caveat regarding its environment.
- 🐌 The "Fluke" Warning: While the plant itself is non-toxic to humans and pets, wild-harvested watercress can carry the larvae of the Sheep Liver Fluke if it grows near livestock. Always wash wild-harvested greens thoroughly or, better yet, cook them to ensure safety.
✨ Fun Fact
The genus name Nasturtium comes from the Latin words nasus tortus, which literally translates to "twisted nose." This refers to the pungent, peppery chemical compounds in the leaves that make your nose wrinkle or "twist" when you take a bite!

Detailed Care Instructions
To grow Nasturtium Microphyllum plants, follow these steps:
- Choose a sunny spot: Nasturtium Microphyllum thrives in full sun, so select a location with at least 6 to 8 hours of direct sunlight each day.
- Prepare the soil: The plant prefers well-draining, fertile soil. Mix organic matter like compost or well-rotted manure into the soil to improve fertility and drainage.
- Sow the seeds: Sow the seeds directly into the soil after the last frost date in your region. Space the seeds about 6 to 8 inches apart and sow them at a depth of 1/2 inch.
- Water regularly: Water the seeds immediately after planting and keep the soil evenly moist throughout the growing season. However, avoid overwatering as it can lead to root rot.
- Mulch the soil: Apply a layer of organic mulch around the plants to conserve moisture, suppress weed growth, and keep the soil cool.
- Provide support (optional): If you're growing climbing varieties of Nasturtium Microphyllum, provide support like trellises or stakes for the plants to climb on.
- Fertilize sparingly: Nasturtium Microphyllum plants don't typically require heavy fertilization. However, you can apply a balanced, slow-release fertilizer once or twice during the growing season to promote healthy growth.
- Deadhead spent blooms: Remove faded or spent flowers regularly to encourage continuous blooming and prevent the plant from going to seed too quickly.
- Watch for pests and diseases: Keep an eye out for common garden pests like aphids and caterpillars. If necessary, use organic pest control methods like picking them off by hand or using insecticidal soap.
- Harvest flowers and leaves: The vibrant orange, red, or yellow flowers and peppery leaves of Nasturtium Microphyllum are edible. Harvest them as desired to add flavor and color to salads and other dishes.
By following these steps, you should be able to successfully grow Nasturtium Microphyllum plants and enjoy their beautiful blooms and tasty leaves.

Place in a window with dappled sun or a spot in the middle of a room. Or directly in a window facing west or east.

To properly water this plant, ensure that the soil is consistently moist but not waterlogged. One way to determine whether or not to water is to stick your finger about an inch into the soil; if it feels dry, water the plant. When watering, do so at the base of the plant rather than from above to avoid getting the leaves wet. A good rule of thumb is to water deeply once a week, but adjust the frequency based on weather conditions and the moisture level of the soil. It is also important to avoid letting the plant sit in standing water, as this can lead to root rot.
To fertilize this plant, apply a balanced fertilizer with equal parts nitrogen, phosphorus, and potassium. The fertilizer should be slowly released and applied every four to six weeks during the growing season. Be sure to follow the dosage instructions on the fertilizer label and avoid applying too much or too frequently, as this can cause fertilizer burn and harm the plant. Additionally, it is recommended to fertilize in the morning or evening and avoid fertilizing during the hottest part of the day to prevent stress on the plant.
The ideal soil for the Nasturtium Microphyllum plant should be well-draining, fertile, and rich in organic matter. The soil should have a slightly acidic to neutral pH level between 6.0 to 7.0. It should be moist but not waterlogged, as the plant can rot in waterlogged soil. The plant can tolerate some soil drought, but regular watering is necessary during hot and dry periods. The soil should be loose and airy to allow for proper root growth and nutrient absorption. If the soil is too compact, it can restrict the plant's growth and development. The use of compost or aged manure can be beneficial for the plant's overall growth and health. Avoid using heavy clay soils as they can retain too much moisture and are difficult for the plant to establish in.
- Select a healthy parent plant that is mature and has not been subjected to recent transplantation or stress.
- Observe the parent plant and look for nodes, which appear as small bumps on the stem where new leaves emerge.
- Using a clean and sharp pair of scissors or pruning shears, cut a stem or several stems from the parent plant. Each stem should have at least one node.
- Prepare an appropriate soil mix that is well-draining and light. Avoid using heavy soils or soils that hold too much moisture.
- Use your finger or a pencil to create a hole in the soil. The hole should be slightly deeper than the stem cutting.
- Dip the cut end of the stem in rooting hormone powder. This step is optional but may increase the chances of success.
- Insert the stem into the hole and gently press the soil around it. Water the cutting well.
- Place the cutting in a sheltered location with bright, indirect sunlight. Avoid exposing it to direct sunlight or strong winds.
- Monitor the cutting regularly, making sure that the soil remains moist but not waterlogged. Within one to three weeks, new roots should start to develop.
- Once the cutting has established roots and started to produce new growth, it can be transplanted to its permanent location in the garden or container.


