Plant Overview
Often called the Desert Evening Primrose or Yellow Desert Primrose, this low-profile beauty is a master of survival in the arid landscapes of the American Southwest. It is famous for its "stemless" appearance, where massive, sunny blossoms seem to erupt directly from the sandy earth. In folklore, these desert blooms are sometimes seen as symbols of resilience, representing life’s ability to flourish even in the harshest, driest conditions.
🔍 How to Identify
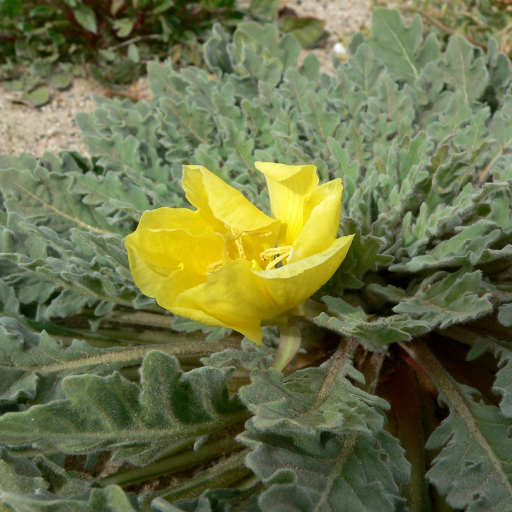
- 🌼 The Flowers: Large, four-petaled blossoms that start as a brilliant lemon yellow. As the flowers age and prepare to wilt, they undergo a beautiful color shift to a delicate peachy-pink or orange.
- 🍃 The Foliage: Long, narrow leaves arranged in a tight circular rosette at the base. The leaves are deeply lobed—resembling a dandelion—and are often covered in fine, silvery hairs to reflect the intense desert sun.
- 🌱 Growth Habit: A "prostrate" grower, meaning it hugs the ground. Because it lacks a tall central stem, it stays tucked away from the drying desert winds.
🏡 In Your Garden
- 🏜️ The Taproot Factor: This plant develops a deep, sturdy taproot to find water far underground. Because of this, it absolutely hates being moved once established. If you are planting it, choose its permanent "forever home" carefully.
- ☀️ Drought Strategy: It is a true desert native that thrives on neglect. It requires sandy or gravelly soil with perfect drainage. If the soil remains soggy for even a short period, the roots are highly susceptible to rot.
⚠️ Safety & Toxicity
- ✅ Status: Generally Non-Toxic.
- 🐾 Details: Oenothera primiveris is not known to be poisonous to humans, cats, or dogs. Its lack of thorns or irritating sap makes it a much friendlier desert resident than the cacti it often grows alongside.
✨ Fun Fact
These flowers are "night owls." To avoid the scorching heat of the day, they typically open in the late afternoon or at dusk. They emit a sweet fragrance specifically designed to attract Hawkmoths, which act as their primary pollinators under the moonlight.

Detailed Care Instructions
To grow Oenothera primiveris, also known as evening primrose, follow these steps:
- Choose a suitable location: Evening primroses require full sun to partial shade. Select a spot in your garden or container that receives at least 6-8 hours of direct sunlight each day.
- Prepare the soil: Evening primroses prefer well-draining soil. If your soil is heavy or clayey, amend it with organic matter like compost or well-rotted manure to improve drainage and fertility.
- Sowing seeds: Evening primroses can be directly sown outdoors or started indoors. If starting indoors, sow the seeds in seed-starting trays or individual pots about 6-8 weeks before the last frost date. Moisten the soil before sowing and place the seeds on top, gently pressing them into the soil without covering them. Keep the soil moist and warm (around 70°F/21°C) until germination, which usually takes about 2-3 weeks.
- Transplanting: Once the seedlings have grown to a size where they can be handled easily, transplant them outdoors after the last frost date. Space the plants about 12-18 inches apart to provide enough room for growth. Ensure the soil is well-prepared and drainable. If you directly sowed the seeds outdoors, thin the seedlings to the recommended spacing.
- Watering: Water the plants regularly, keeping the soil moist but not waterlogged. Evening primroses are drought-tolerant once established, but they appreciate consistent moisture during the growing season.
- Fertilizing: Evening primroses don't require excessive fertilization. However, you can apply a balanced, slow-release fertilizer in spring or use a diluted liquid fertilizer every few weeks during the growing season.
- Pruning: Evening primroses are generally low-maintenance plants and don't require extensive pruning. However, you can deadhead spent flowers to encourage continuous blooming and remove any damaged or dead foliage.
- Pests and diseases: Evening primroses are generally resistant to pests and diseases. However, you may occasionally encounter issues with aphids or powdery mildew. Regularly inspect the plants, and if necessary, treat with appropriate organic solutions or consult a local gardening expert.
By following these steps, you can successfully grow Oenothera primiveris plants and enjoy their beautiful flowers throughout the growing season.

Place in a bright room that is sun drenched almost all day. Or directly in a south-facing window.

To water this plant, ensure that the soil is dry before watering. When watering, aim for the soil around the base of the plant, avoiding getting water on the leaves. Water until the soil is moist, but not waterlogged. It is best to water in the morning, allowing excess water to evaporate throughout the day. Avoid allowing the soil to completely dry out, but also do not overwater, as this can lead to root rot. During periods of drought, additional watering may be necessary.
To fertilize this plant, use a balanced fertilizer with equal amounts of nitrogen, phosphorus, and potassium. Apply the fertilizer in the spring, once per month until summer. Water the plant before and after application, being careful not to get any fertilizer on the leaves. Avoid over-fertilizing, as it can damage the plant.
Oenothera Primiveris plant prefers well-draining soil that is loose and fertile. The pH of soil should ideally be neutral to slightly acidic, between 6.0 and 7.5. The plant may grow well in soils with low nutrient content, but it is recommended to add compost or other organic matter to improve the soil's fertility. Sandy loam soils are ideal for Oenothera Primiveris plant as they hold moisture well while also allowing for good drainage. Avoid planting the plant in heavy clay soils as they can hold too much moisture, leading to root rot.
To propagate this plant, you will need to take stem cuttings from a healthy parent plant. The best time to do this is in the early morning when it is cooler and the plant is less stressed. Make a cut just below a node, which is where the leaves attach to the stem. The cutting should be about 4-6 inches in length and have at least two leaves on it.
Remove the bottom leaves and dip the cut end into rooting hormone powder to encourage root growth. Then, place the cutting into a container filled with a well-draining soil mix. Water thoroughly and cover the container with a plastic bag or dome to create a humid environment.
Place the container in a bright, indirect light location and check regularly to make sure the soil stays moist but not too wet. Within a few weeks, the cutting should begin to develop roots. Once new growth appears, remove the plastic covering and gradually acclimate the plant to its new environment.
When the plant has grown large enough, it can be transplanted into a larger pot or directly into the garden.


