Plant Overview
Often called the Stately Prickly Pear, Opuntia elata is a tall, structural beauty native to the grasslands of Argentina, Brazil, and Uruguay. Unlike many of its dusty-looking desert cousins, this cactus boasts glossy, emerald-green pads that look almost polished. It is beloved by collectors for its vibrant, sunset-orange flowers and its tendency to grow into an impressive, tree-like shrub that commands attention in any landscape.
🔍 How to Identify
- 🌵 The Pads: Large, oval-shaped "cladodes" that are a rich, deep green. They have a distinctively smooth, glossy texture compared to the matte finish of other prickly pears.
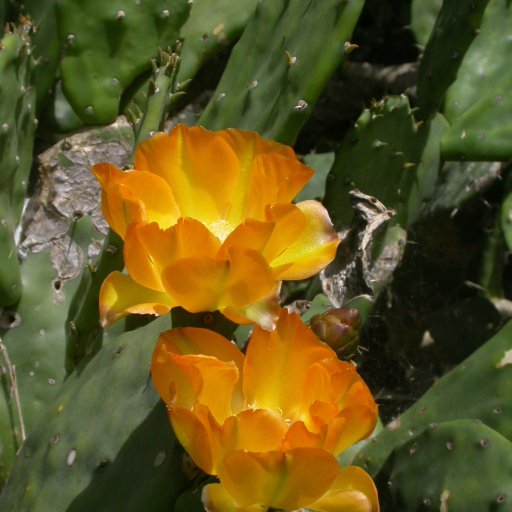
- 🧡 The Blooms: Stunning, cup-shaped flowers that transition from bright yellow to a deep, burnt orange as they age.
- ⚪ The Spines: This species is often "inermis" (spineless) or carries only a few long, white needles. However, it still possesses "glochids"—tiny, hair-like prickles—at the base of each growth point.
🏡 In Your Garden
- 🧱 Structural Growth: Because it can grow up to 10 feet tall, this cactus is best used as a focal point or a living security fence. It develops a thick, woody "trunk" over time, giving it a prehistoric, architectural look.
- ☀️ Sun & Drainage: While it is tougher than many cacti, it hates "wet feet." Plant it in a gritty, sandy mix. It thrives in full sun, which encourages the most prolific orange blooms in late spring.
- ✂️ Easy Propagation: Like most Opuntias, a single pad broken off and left to dry for a few days will easily strike roots when placed in soil, making it a favorite for sharing with friends.
⚠️ Safety & Toxicity
- 🌵 The "Invisible" Danger: While it may look smooth and spine-free, do not be fooled. It is covered in glochids—microscopic barbed hairs that are difficult to see but very painful to remove from skin or paws.
- 🐾 Pet Safety: The plant is generally non-toxic if nibbled, but the glochids can cause severe irritation to a pet's mouth, tongue, or eyes. It is best kept away from high-traffic areas where curious dogs or children might brush against it.
✨ Fun Fact
In its native South America, the deep purple fruit of the Opuntia elata is often used as a natural dye. When the fruit is ripe, it provides a vibrant pigment that was historically used to color textiles and even food!

Detailed Care Instructions
Here are some steps to help you grow an Opuntia Elata plant:
- Choose a suitable location: Opuntia Elata plants thrive in full sun, so select a spot that receives direct sunlight for at least 6-8 hours a day. Ensure that the soil is well-draining to avoid waterlogging.
- Soil preparation: Opuntia Elata requires well-drained soil with a pH level between 6.0 and 7.5. If your soil is heavy or has poor drainage, consider adding organic matter such as compost or sand to improve its texture.
- Planting: If you have a potted plant or pad, remove any spines with a pair of gloves or tongs to prevent injury. Dig a hole that accommodates the size of the plant or pad and place it gently into the ground. Backfill with soil, ensuring the plant is firmly supported.
- Watering: Opuntia Elata is a drought-tolerant plant but still requires regular watering during its establishment phase. Water deeply but infrequently, allowing the soil to dry out between waterings. Once established, water sparingly, as overwatering can lead to root rot.
- Fertilizing: Opuntia Elata plants generally do not require much fertilization. If you choose to fertilize, use a balanced fertilizer with equal NPK (nitrogen, phosphorus, potassium) ratios. Apply the fertilizer once or twice during the growing season, following the package instructions.
- Pruning: Opuntia Elata is a fast-growing plant that can develop large and sprawling pads. Prune the plant regularly to maintain its shape and prevent overcrowding. Additionally, remove any dead or diseased pads to promote healthy growth.
- Protection: If you live in a climate with cold winters, protect your Opuntia Elata plant by covering it with burlap or bringing it indoors during extreme temperatures. This will prevent frost damage to the plant.
Remember to wear appropriate protective gloves and clothing while handling Opuntia Elata plants, as they have spines that can cause irritation or injury.

Place in a bright room that is sun drenched almost all day. Or directly in a south-facing window.

Opuntia Elata is a type of cactus that requires minimal watering. When watering this plant, it is important to ensure that the soil is completely dry before providing any water. Overwatering can lead to root rot and damage the plant. In general, it is recommended to water Opuntia Elata once every two to three weeks during the growing season, and even less frequently during the dormant season. When watering, use a small amount of water and ensure that it drains away completely, as standing water can also be harmful to this plant. It is also important to avoid getting water on the leaves or stem, as this can lead to damage or rot. Overall, watering Opuntia Elata requires a light touch and careful attention to the plant's needs.
To fertilize the Opuntia Elata plant, follow these instructions:
- Select a balanced fertilizer: Look for a fertilizer with an NPK ratio of 10-10-10 or similar, which means it contains equal amounts of nitrogen (N), phosphorus (P), and potassium (K). This will provide a well-rounded nutrient supply for the plant.
- Dilute the fertilizer: Mix the fertilizer with water according to the package instructions. Generally, a dilution of 1 tablespoon of fertilizer in 1 gallon of water should work well.
- Apply the fertilizer: Using a watering can or sprayer, apply the diluted fertilizer to the soil around the plant's base. Avoid getting the fertilizer on the plant's stems, pads, or spines as it may cause burns or damage.
- Water thoroughly: After applying the fertilizer, water the plant thoroughly to ensure that the nutrients seep into the soil and reach the plant's roots.
- Timing and frequency: Fertilize the Opuntia Elata plant once every two to four weeks during the growing season, which is typically spring and summer. Avoid fertilizing during winter or dormancy periods.
- Monitor the plant's response: Keep an eye on the plant's growth and overall health. If the Opuntia Elata appears to be thriving, continue the fertilization schedule as recommended. However, if you notice signs of nutrient burn, such as yellowing or wilting leaves, reduce the fertilizer concentration or frequency.
Remember, while fertilization can be beneficial, it's crucial not to over-fertilize the Opuntia Elata plant, as excessive nutrients may cause harm.
Opuntia Elata is a type of cactus that requires well-draining soil to thrive. The most suitable soil for this plant is a mixture of sand, perlite, and peat moss. This type of soil allows the plant's roots to breathe and prevents water from accumulating, which can cause root rot. The pH of the soil should be neutral to slightly acidic. It's important to note that this plant is adapted to growing in arid and semi-arid regions, so it doesn't require a lot of water or nutrients. Over-fertilizing or over-watering this plant can lead to health issues.
Opuntia Elata is a species of cactus that can be propagated through various methods. Here's a detailed guide on how to propagate Opuntia Elata:
- Select a healthy parent plant: Choose a mature Opuntia Elata plant that is healthy and has no signs of disease or damage. Look for a plant that has strong, vibrant pads.
- Prepare the tools: Get a clean, sharp pair of pruning shears or a knife for cutting the pads. Also, prepare a sterile potting mix for rooting and a suitable pot or container for planting.
- Choose a suitable pad for propagation: Select a healthy and mature pad from the parent plant. Choose a pad that is at least six months old and has hardened off. It should be thick, fleshy, and free from any signs of damage or disease.
- Let the pad callus: After selecting a suitable pad, allow it to dry and callus for a few days. This step helps prevent rotting when planting.
- Cut the pad: Using clean pruning shears or a knife, make a clean cut on the pad, leaving a flat surface. Make sure the cut is straight and not slanted or angled.
- Allow the cutting to dry: Set the cut pad aside in a warm, dry place, out of direct sunlight. Let it dry for about a week or until the cut surface forms a callus. This step helps prevent rotting during the rooting process.
- Prepare the rooting medium: While the pad is drying, prepare a well-draining potting mix. A mix containing cactus or succulent soil combined with perlite or coarse sand is recommended. Sterilize the mix if possible to minimize the risk of disease or pests.
- Plant the cutting: Once the pad has calloused, fill a clean pot or container with the prepared potting mix. Make a small hole in the center of the potting mix and gently insert the calloused end of the pad into the hole. Ensure that the cut end is in contact with the potting mix.
- Water the cutting: Lightly water the cutting until the potting mix is damp but not saturated. Avoid overwatering as excessive moisture can lead to rotting. Allow the soil to dry out slightly between waterings to prevent root rot.
- Provide appropriate care: Place the newly planted cutting in a bright location that receives indirect sunlight. Protect it from extreme temperatures and harsh weather conditions. Keep the humidity levels moderate and avoid excessive moisture.
- Monitor growth and adjust care: Over the next few weeks, monitor the cutting for signs of root development and new growth, which indicates successful propagation. Adjust the care regimen if required, ensuring adequate light, watering, and temperature conditions.
- Transplanting: Once the newly rooted cutting has developed a well-established root system and new growth, it can be transplanted into a larger pot or directly into the ground, depending on your preference and climate conditions.
Remember, Opuntia Elata is sometimes used interchangeably with its common names, such as the "Blind Prickly Pear" or "Spreading Prickly Pear."
Common pests of the riverina pear include Scale insect, mealybugs, spider mites. Make a habit of checking your riverina pear frequently for pests so that any infestations can be caught and managed early.


