Plant Overview
The Wonga Wonga Vine is a powerhouse of the Australian bush, known for its ability to transform a plain fence into a waterfall of creamy blossoms almost overnight. Its scientific name, Pandorea, is a nod to the Greek myth of Pandora’s Box, referring to the way its large seed pods burst open to release a multitude of papery seeds. This vigorous climber is a favorite for gardeners who want high-impact greenery and a touch of wild, woodland charm.
🔍 How to Identify
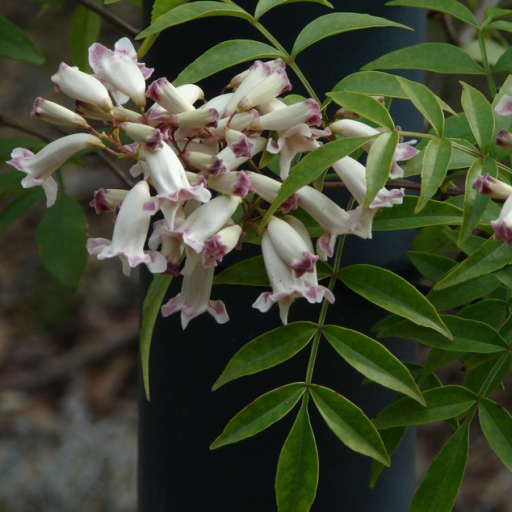
- 🎺 The Flowers: Small, bell-shaped or tubular blossoms that usually appear in dense clusters. They are typically creamy-white or pale yellow, often featuring dramatic purple or maroon streaks deep inside the "throat."
- 🍃 The Foliage: Rich, glossy green leaves that are "pinnate," meaning they are divided into several smaller leaflets. The leaves have a polished sheen that looks healthy even when the plant isn't in bloom.
- 🌀 The Growth Habit: A woody, twining vine that doesn't use tendrils to climb; instead, it wraps its entire stem tightly around supports like trellises, pillars, or neighboring trees.
🏡 In Your Garden
- ✂️ Vigorous Vitality: This plant is a fast learner and an even faster grower. Because it is so enthusiastic, it requires regular pruning after its spring flowering to keep it from "swallowing" nearby shrubs or jumping onto your roof.
- 🧱 Structural Support: Due to its woody nature, the Wonga Wonga Vine can become quite heavy over time. It requires a sturdy, permanent structure like a pergola or a heavy-duty wire fence rather than a flimsy plastic lattice.
- 💧 Establishment Phase: While it is remarkably drought-tolerant once its roots are deep in the earth, it appreciates consistent moisture during its first two years to help it build the energy needed for its massive floral displays.
⚠️ Safety & Toxicity
- ✅ Low Risk: Pandorea pandorana is not considered high-risk for toxicity. There are no common reports of it being deadly to humans or common household pets.
- 🌿 Skin Sensitivity: Like many vigorous vines, the sap or the fine hairs on new growth may cause very mild skin irritation or "itchiness" for gardeners with sensitive skin. Wearing gloves during heavy pruning is always a smart move.
✨ Fun Fact
The seed pods of the Wonga Wonga Vine are large, oblong "boats" that turn brown and woody. When they ripen, they split in half to reveal hundreds of seeds, each equipped with its own transparent, papery wing to help it fly away on the wind!

Detailed Care Instructions
| Humidity | Normal |
| Lighting | Shade |
| Difficulty | Medium |
| Hibernation | Cold Period |
| Temperature | 17°C - 27°C |
To grow Pandorea pandorana, also known as the Wonga Wonga vine, follow these steps:
- Find a suitable location: Choose a spot in your garden that receives full sun or partial shade. The plant prefers a warm and protected area.
- Soil preparation: Pandorea pandorana grows well in a well-draining soil mix. Add organic matter such as compost or well-rotted manure to improve soil fertility and drainage.
- Propagation: You can propagate Pandorea pandorana either by seed or cutting. If using seeds, soak them in water for 24 hours before planting to improve germination. If using cuttings, take semi-hardwood cuttings from healthy, mature plants and plant them in moist potting mix.
- Planting: Dig a hole in the prepared soil that is slightly larger than the pot or root ball. Place the plant in the hole at the same depth it was in the pot and backfill with soil, firming it gently around the base of the plant.
- Watering: Keep the soil evenly moist but not soaking wet. Pandorea pandorana appreciates regular watering, especially during dry spells. Mulching around the base of the plant can help retain moisture.
- Fertilization: Feed the plant with a balanced slow-release fertilizer in spring before new growth begins. Follow the package instructions for application rates.
- Pruning: Prune the plant after flowering to maintain its shape and control its growth. Remove dead or damaged branches as needed.
- Support: Pandorea pandorana is a climbing vine, so provide a trellis, fence, or other support structure for it to grow on. Ensure the support structure is sturdy enough to hold the weight of the vine.
- Pest and disease control: Monitor the plant regularly for any signs of pest infestation or disease. Common pests include aphids and caterpillars, while fungal diseases like powdery mildew can occur in humid conditions. Use appropriate organic or chemical treatments to control pests and diseases.
- Enjoy the blooms: Pandorea pandorana produces clusters of tubular, trumpet-shaped flowers in spring or summer, attracting birds and insects with their fragrance and nectar. Enjoy the beautiful blooms and the wildlife they attract.
Remember to check with local authorities or gardening experts to ensure that Pandorea pandorana is suitable for your region and doesn't pose any invasive species threats.

Place in a bright room that is sun drenched almost all day. Or directly in a south-facing window.

To water this plant, it is important to ensure that the soil is thoroughly moistened but not waterlogged. This can be achieved by watering deeply and infrequently, rather than shallowly and frequently. It is also important to consider the specific needs of the plant based on factors such as the climate and soil type. In general, it is best to water this plant in the morning or evening when temperatures are cooler and the sun is not as strong, as this can help prevent the water from evaporating too quickly. Additionally, it is important to monitor the plant for signs of over- or under-watering, such as wilting or yellowing leaves, and adjust the watering schedule accordingly.
To fertilize this plant, apply a balanced fertilizer with an N-P-K ratio of 10-10-10 or 20-20-20 during the active growing season, which is usually in spring and summer. Dilute the fertilizer according to the instructions on the label and apply it to the soil around the base of the plant. Water the plant immediately after fertilizing to help it absorb the nutrients. Limit fertilizer application during the dormant season, which is usually in fall and winter, to avoid harming the plant.
The ideal soil for the Pandorea Pandorana plant is well-draining, slightly acidic soil with a pH between 5.5 and 6.5. It should be a mix of loam, sand, and organic matter, such as compost or peat moss, to promote healthy root growth and ensure adequate water retention. The soil should be kept consistently moist but not waterlogged, as the plant prefers moderate moisture levels. It is also recommended to add a slow-release fertilizer to the soil during the growing season to encourage healthy growth and blooming.
To propagate this plant, select healthy stems. Cut them at a 45-degree angle just below a node or where a leaf joins the stem. Remove the bottom leaves, leaving only a few remaining at the top. If the stem is long, you can make multiple cuttings.
Dip the cut end in rooting hormone powder and tap off any excess. Make a hole in a potting mix with your finger or a pencil and insert the cutting, gently pressing the soil around it to secure it in place.
Keep the cutting in a warm and bright location, but out of direct sunlight. Ensure the soil stays moist, but not waterlogged, and mist the cutting regularly. After a few weeks, you should notice new growth, which is a sign that the cutting has taken root.
Once the cutting has established roots, gradually expose it to more sunlight and start to reduce the frequency of misting. When it has outgrown its container, you can transplant it into a larger pot or outdoors in a suitable location.


