Plant Overview
Known as the "Flanders Poppy" or the "Breadseed Poppy," the Papaver genus carries a weight of history and symbolism unlike almost any other flower. These ethereal beauties are famous for their tissue-paper petals that seem to glow when the sun hits them, dancing on wiry stems in the slightest breeze. From the red fields of remembrance in Europe to the culinary seeds on your morning bagel, poppies are as versatile as they are stunning.
🔍 How to Identify
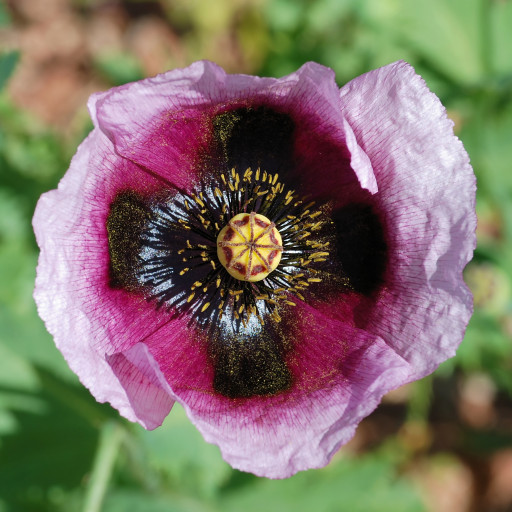
- 🌸 The Petals: Usually four to six incredibly delicate, crinkled petals that look like colorful silk or crepe paper.
- 🌿 The Foliage: Most species feature silver-green, deeply lobed leaves that are often covered in fine, bristly hairs.
- 🏺 The Seed Pod: After the petals fall, they leave behind a distinct, crown-topped capsule that resembles a tiny ceramic jar or a pepper shaker.
🏡 In Your Garden
- 🌱 The Taproot Trap: Poppies are notorious for having long, sensitive taproots. This means they absolutely hate being moved once they’ve started growing—it’s best to sow them exactly where you want them to stay.
- ☀️ Sun Seekers: These plants are true sun-worshippers. To prevent them from getting "floppy" or reaching for the light, place them in the brightest spot in your garden with well-draining soil.
- 🌬️ Self-Seeding Wonders: If you leave the dried seed pods on the plant, they will naturally "shatter" and scatter thousands of tiny seeds, ensuring a beautiful, spontaneous return the following spring.
⚠️ Safety & Toxicity
- 🐾 Mildly Toxic: Most species of Papaver contain alkaloids that can be toxic if ingested in large quantities.
- 🐱 Pet Warning: They are generally considered toxic to dogs, cats, and horses. Ingestion can cause sedation, digestive upset, or lack of appetite, so keep them away from curious nibblers.
✨ Fun Fact
Poppy seeds are incredibly resilient; they can lie dormant in the soil for 80 years or more, waiting for the ground to be disturbed and the light to hit them before they finally decide to sprout! This is why they famously bloomed across the battlefields of World War I.

Detailed Care Instructions
| Humidity | Normal |
| Lighting | Full Sun |
| Toxicity | Poisonous |
| Difficulty | Medium |
| Hibernation | Cold Period |
| Temperature | 8°C - 18°C |
| Hardiness Zones | 5 - 8 |
To grow a Papaver (Poppy) plant, follow these steps:
- Choose the right variety: There are various species of Papaver plants, such as Papaver somniferum (Opium poppy) known for its distinctive seed pods, or Papaver orientale (Oriental poppy) appreciated for its beautiful flowers. Choose the variety according to your preferences and climate.
- Select the planting location: Papaver plants prefer well-drained soil and full sunlight. Make sure the selected area gets at least 6-8 hours of direct sunlight daily.
- Prepare the soil: Papaver plants can tolerate a wide range of soil types but prefer soil that is slightly acidic to neutral (pH 6.1-7.5). Loosen the soil and remove any weeds or debris. Add organic matter, such as compost or well-rotted manure, to provide necessary nutrients.
- Sow the seeds: Papaver plants can be grown from seeds. Scatter the seeds on the prepared soil surface, lightly press them into the soil, and cover them with a thin layer of soil. Choose a time when frost is no longer a threat, typically in early spring or early fall.
- Water properly: Keep the soil consistently moist but not waterlogged. Water the plant whenever the top inch of soil feels dry. Avoid overwatering, as excessive moisture may cause root rot.
- Maintain temperature and humidity: Papaver plants prefer cool to moderate temperatures (around 60-75°F or 15-24°C). They do best in areas where there is a significant temperature change between day and night. Maintain moderate humidity levels, as high humidity can lead to fungal diseases.
- Support the plant: Some Papaver varieties may require support due to their height and heavy flowers. Use stakes or plant supports to prevent them from bending or breaking.
- Control pests and diseases: Watch out for pests like aphids or slugs, which can damage the plants. Remove any affected leaves or use organic insecticides if necessary. Proper air circulation and well-drained soil can prevent fungal diseases.
- Deadhead and prune: Once the flowers start to fade, remove them to encourage more blooming. After flowering, you can prune the plant back to ground level to promote new growth and maintain its shape.
- Harvest seeds (optional): If you are growing Papaver somniferum, you can harvest the seeds once the seed pods turn brown and begin to dry out. Cut the pods carefully and collect the seeds. Allow them to dry completely before storing them in a cool, dry place.
Remember to consult local gardening guidelines and restrictions regarding the growth and cultivation of Papaver plants, especially if you are considering growing Papaver somniferum.

Place in a bright room that is sun drenched almost all day. Or directly in a south-facing window.

To water this plant, you should ensure that the soil is thoroughly moistened, but not waterlogged. It is best to water slowly and deeply, allowing the water to fully penetrate the soil. Avoid watering the foliage, as this can promote disease. Water the plant regularly, especially during hot and dry weather, but be careful not to overwater, as this can lead to root rot. It is important to allow the soil to dry out slightly between watering to prevent waterlogging. Additionally, it is important to use well-draining soil and to ensure that the plant has adequate drainage.
To fertilize your Papaver plant, follow these instructions:
- Choose a balanced liquid fertilizer with a ratio of equal NPK (nitrogen, phosphorus, and potassium) percentages, such as 10-10-10 or 20-20-20.
- Dilute the fertilizer according to the package instructions, usually mixing it with water.
- Apply the fertilizer during the plant's active growing period, which is usually in spring or early summer.
- Water the soil around the base of the plant before applying the fertilizer to prevent burning the roots.
- Pour the diluted fertilizer evenly over the soil surface, avoiding direct contact with plant leaves or stems.
- Use enough fertilizer to moisten the soil but avoid oversaturation or runoff.
- Repeat the fertilization process every four to six weeks throughout the growing season.
- Always follow the specific instructions provided by the fertilizer manufacturer for your specific Papaver plant variety.
- Monitor the plant for any signs of nutrient deficiency or excess, such as yellowing leaves or stunted growth, and adjust the fertilizer dosage accordingly.
- Remember to wear gloves and follow safety precautions while handling and storing fertilizers.
When planting Papaver plant, it is important to use well-draining soil that has a pH range of 6.0 to 7.5. The best soil type for this plant is loamy soil which contains a mixture of sand, silt, and clay soil in equal proportions. This type of soil provides the right balance of drainage and water retention. Moreover, it should be enriched with organic matter to improve the texture and nutrient content of the soil. This could be achieved by mixing compost or well-rotted manure into the soil before planting. Additionally, the soil should not be compacted, as it can restrict the growth and development of the plant. It should be kept moist but not waterlogged to avoid root rot. Regularly adding a layer of mulch around the plant helps conserve moisture in the soil and suppress weed growth.
Propagation of the Papaver plant can be achieved through various methods. One common method is by collecting seeds from mature plants. To do this, you should allow the seed pods to fully ripen and dry on the plant. Once the pods have dried, gently shake or tap them to release the small black or brown seeds. These can then be collected and stored in a cool, dry place until ready for sowing.
Another method of propagation is by division. This is typically done in early spring or autumn when the plant is dormant. Carefully dig up the parent plant, being careful not to damage the roots. Then, using a sharp, clean knife or garden shears, divide the clump into smaller sections, ensuring each division has roots and shoots. Replant the divisions immediately in prepared soil, making sure to water them well.
Additionally, Papaver plants can be propagated through root cuttings. In this method, you should dig up the parent plant during its dormant period, usually in late autumn or early spring. Look for thick, healthy roots and cut them into several 2-inch sections. Ensure each section has at least one bud. Plant these sections vertically in containers filled with well-draining soil, burying them about an inch deep. Keep the soil slightly moist and place the containers in a warm, bright location.
Lastly, Papaver plants can also be propagated through stem cuttings. Select healthy stems from the parent plant, making sure they are semi-hardwood and have several nodes. Cut the stem into 4-6 inch sections, ensuring each cutting has at least two nodes. Remove any lower leaves and dip the cut end in rooting hormone. Plant the cuttings in containers filled with moist, well-draining soil, burying them about halfway. Place the containers in a warm, bright location and keep the soil consistently moist.
Regardless of the method chosen, it is essential to provide the newly propagated Papaver plants with proper care. This includes keeping them adequately watered, providing a suitable growing medium, and ensuring they receive the appropriate amount of sunlight. With patience and proper care, you can successfully propagate Papaver plants and enjoy their beautiful blooms in your garden.


