Plant Overview
Often called the "Clock Flower" because of its intricate, radial design, Passiflora is a tropical wonder that looks more like a piece of jewelry than a living plant. Named by 16th-century Spanish missionaries who saw the complex flower parts as symbols of the Passion of Christ, these fast-growing vines are beloved for their exotic beauty and their ability to transform a plain fence into a wall of neon color.
🔍 How to Identify
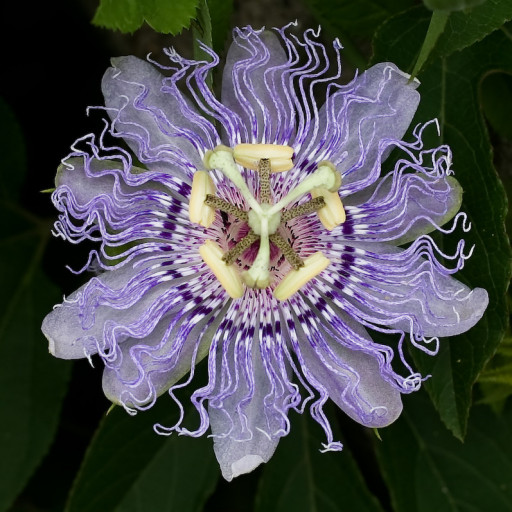
- 🌸 The Corona: The most striking feature is the "corona," a fringe of hair-like filaments that sits between the petals and the central reproductive organs.
- 🌿 Lobed Leaves: Most species feature glossy, deep-green leaves that are typically divided into three to five distinct finger-like lobes.
- ➰ Coiling Tendrils: These vines use thin, spring-like tendrils that emerge from the leaf axils to grip and climb anything in their path with surprising speed.
🏡 In Your Garden
- 🧗 The Need for Support: Because they are vigorous climbers, they require a sturdy trellis or chain-link fence. Without vertical support, they will quickly sprawl across the ground and may overwhelm smaller, slower-growing plants.
- 🦋 Pollinator Paradise: They are the primary host plant for several butterfly species, including the Gulf Fritillary. Don't be alarmed if you see orange caterpillars munching on the leaves—they are a sign of a healthy, biodiverse garden!
- ☀️ Sun-Driven Blooms: While the vine grows in shade, the spectacular flowers only appear in abundance if the plant receives plenty of direct sunlight.
⚠️ Safety & Toxicity
- 🐾 Toxic to Pets: Most parts of the Passiflora plant (leaves, stems, and roots) contain cyanogenic glycosides. If ingested in large quantities by dogs, cats, or horses, it can cause vomiting, drooling, or lethargy.
- 🍽️ Fruit Nuance: While many species (like Passiflora edulis) produce the famous edible passion fruit, others produce fruit that is tasteless or mildly toxic if eaten before it is fully ripe. Always verify the specific species before tasting.
✨ Fun Fact
The Passiflora has a "smart" defense system. Some species have evolved tiny yellow bumps on their leaves that look exactly like butterfly eggs. This tricks real butterflies into thinking the plant is already "occupied," so they fly away to lay their eggs elsewhere!

Detailed Care Instructions
Most species of passionflower are easy to grow—so easy, in fact, that they're sometimes considered aggressive growers if left to their own devices.
How fast do passionflowers grow?
Passionflowers are vigorous growing vines, but the flowers stay open for only a day, so you will likely get only a handful of blooms at a time.
Can passionflower grow indoors?
You can grow passionflower indoors as a houseplant, but don't expect fruiting. The plant prefers lots of light and indoor temperatures between 55 and 65 degrees Fahrenheit. Your plant may need a small trellis for support.
| Humidity | Normal |
| Lighting | Full Sun |
| Difficulty | Medium |
| Hibernation | Cold Period |
| Temperature | 20°C - 28°C |
| Hardiness Zones | 10 - 12 |
To grow Passiflora, commonly known as passionflower, follow these steps:
- Choose a suitable location: Select a spot with full sunlight or partial shade. Passiflora prefers well-draining soil and a warm climate.
- Prepare the soil: Amend the soil with organic matter like compost to improve drainage and fertility. Passiflora prefers slightly acidic soil with a pH range of 6.0-6.5.
- Planting: Dig a hole slightly larger than the root ball of the Passiflora plant. Place the plant in the hole and fill it with soil, gently firming it around the roots. Water thoroughly after planting.
- Watering: Water the Passiflora plant regularly to keep the soil moist but not waterlogged. It is crucial to maintain consistent moisture, especially during dry periods.
- Mulching: Apply a layer of organic mulch, like wood chips or straw, around the base of the plant. Mulch helps retain moisture, regulate soil temperature, and suppress weed growth.
- Fertilizing: Feed Passiflora with a balanced, slow-release fertilizer in spring and mid-summer. Follow the package instructions for dosage and application methods.
- Pruning: Passiflora benefits from pruning to control its size and shape. Prune lightly after flowering, removing dead or damaged branches.
- Trellising: Passiflora is a vine and benefits from a support structure like a trellis, fence, or pergola. Train the vines to climb the structure and provide support as needed.
- Pests and diseases: Monitor the plant for common pests like aphids or spider mites. Treat infestations promptly with appropriate organic or chemical controls. Passiflora is generally resistant to diseases but may be susceptible to root rot in excessively wet conditions.
- Harvesting: If you are growing Passiflora for its fruit, wait until the fruits are fully ripe and slightly wrinkled before harvesting. The fruit will usually drop naturally when it is ready.
Remember, Passiflora is a vigorous grower, so it is essential to provide ample space and support for the plant to flourish.

Place in a bright room that is sun drenched almost all day. Or directly in a south-facing window.

To water this plant, it is important to keep the soil evenly moist, but not overly saturated. This can be achieved by checking the soil moisture regularly and adjusting the watering frequency accordingly. When watering, be sure to water deeply to encourage deeper root growth. It is also recommended to avoid getting water on the leaves as this can lead to fungal issues. Consider using a watering can or drip irrigation system to direct water to the soil rather than the foliage. Be sure to allow any excess water to drain away to prevent waterlogging the roots.
To fertilize this plant, use a balanced fertilizer with equal amounts of nitrogen, phosphorus, and potassium. Apply the fertilizer every two to three weeks during the growing season, which is typically from spring to fall. Dilute the fertilizer according to the package instructions and apply it to the soil around the base of the plant, being careful not to get it on the foliage or stem. Water the plant well after fertilizing. Avoid overfertilizing, as this can lead to excessive growth and weaker stems.
The ideal soil for Passiflora plants would be well-draining, fertile, and rich in organic matter. It should be slightly acidic to neutral in pH, with a range of 6.0 to 7.0. The soil should be able to hold water but not become waterlogged, as excess water can lead to root rot. A mix of peat moss, perlite, and sand can be used to create a well-draining soil. It is also important to ensure that the soil is free of pests and diseases before planting.
To propagate this plant, begin by taking a stem cutting that is around 6 inches long. Make sure the cutting has at least two sets of leaves on it. Remove the leaves from the bottom half of the stem and dip the cut end into a rooting hormone powder. Place the cutting into a pot filled with soilless potting mix and cover it with a plastic bag to create a greenhouse-like atmosphere. Keep the soil moist and place the pot in a bright, but indirect light area. Within a few weeks, roots should begin to form and new growth should appear. Once the new plant is established, it can be transplanted into its permanent location.


