Plant Overview
Often called Emory’s Rock Daisy, this resilient desert native is a master of survival in the harshest environments of the Southwestern United States and Mexico. While it looks like a delicate wildflower found in a meadow, it actually prefers the rugged life, frequently tucking itself into the cracks of sun-baked canyon walls and volcanic rock. Its cheerful white and yellow blooms provide a startling, beautiful contrast against the stark, arid landscapes it calls home.
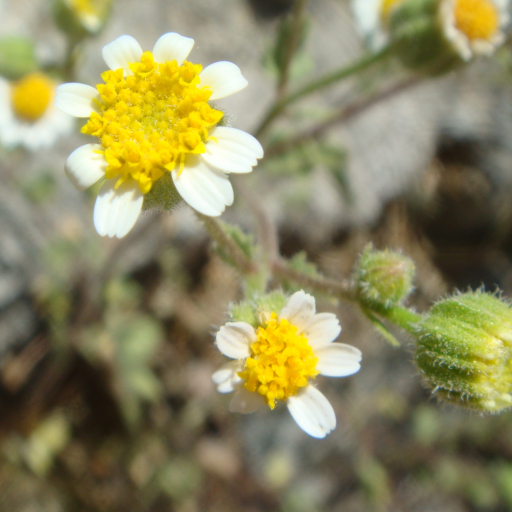
🔍 How to Identify
- 🌼 The Flowers: Small, daisy-like flower heads featuring bright white outer petals (ray florets) surrounding a dense, golden-yellow center (disc florets).
- 🍃 The Foliage: The leaves are broad, often heart-shaped or deeply lobed with "toothed" edges. They have a grayish-green hue and a slightly fuzzy or glandular texture that helps the plant retain moisture.
- 🌱 Growth Habit: It typically grows as a branching annual herb, forming low mounds or sprawling clusters that rarely exceed a foot in height.
🏡 In Your Garden
- 🏜️ The "Rock" in Rock Daisy: This plant thrives in "lean" conditions. If you are growing it in a desert or rock garden, avoid rich potting soil. It requires excellent drainage and actually prefers gritty, mineral-heavy earth that mimics its native cliffside habitats.
- 💧 Life Cycle Nuance: As an annual, Emory’s Rock Daisy puts all its energy into one spectacular blooming season before setting seed and fading. To encourage a longer display, deadhead the spent flowers, but leave a few at the end of the season if you want them to self-sow and return next year.
⚠️ Safety & Toxicity
- ✅ General Safety: Perityle emoryi is not considered highly toxic to humans or common household pets.
- 🧤 Skin Sensitivity: Some individuals may find the glandular hairs on the stems and leaves slightly irritating to the skin. If you have sensitive skin, it is a good idea to wear gloves when pruning or handling the plant for extended periods.
✨ Fun Fact
This plant was named in honor of Major General William Hemsley Emory, a 19th-century surveyor who led the monumental task of mapping the United States-Mexico border and documented hundreds of "new" desert species along the way!

Detailed Care Instructions
To grow Perityle Emoryi, also known as rock daisy, follow these steps:
- Obtain seeds or seedlings: Look for a reputable nursery or seed supplier that carries Perityle Emoryi plants. You can also try to collect seeds from wild plants if permitted by local regulations.
- Select a suitable location: Perityle Emoryi is native to arid regions, so it requires a well-draining soil and plenty of sunlight. Choose a spot in your garden or container that receives full sun for most of the day.
- Prepare the soil: Ensure the soil is loose and sandy, as this plant thrives in well-draining soil. If your soil is heavy or clay-like, amend it by adding sand, gravel, or organic matter to improve drainage.
- Plant the seeds or seedlings: If starting from seeds, sow them directly into the prepared soil in early spring, as Perityle Emoryi is an annual plant. Gently press the seeds into the soil but do not cover them, as they need light to germinate. Alternatively, if using seedlings, transplant them into the prepared soil, ensuring they are planted at the same depth as they were in their pots.
- Water appropriately: Keep the soil slightly moist after planting until the seeds germinate or the seedlings establish. Once established, only water when the soil becomes dry, as Perityle Emoryi is drought-tolerant. Overwatering can cause root rot.
- Mulch: Apply a layer of organic mulch, such as wood chips or straw, around the plants to help retain moisture and suppress weed growth.
- Prune if needed: Perityle Emoryi generally doesn't require much pruning. However, if the plants become leggy or sprawl, you can trim them back lightly to promote compact growth.
- Monitor for pests and diseases: While Perityle Emoryi is relatively pest and disease-resistant, keep an eye out for common garden pests like aphids or spider mites. If any issues arise, treat them with appropriate organic insecticides or pesticides.
- Harvesting and propagation: Perityle Emoryi produces daisy-like flowers with yellow petals and a black center. Enjoy their beauty, and consider collecting seeds from the flowers for propagation in the following year.
Remember to check the specific requirements for Perityle Emoryi in your region, as considerations may vary depending on your climate and soil conditions.

Place in a bright room that is sun drenched almost all day. Or directly in a south-facing window.

Perityle Emoryi plant should be watered regularly, especially during the growing season. The soil should be moist but not waterlogged. It is important to avoid overwatering as this can lead to root rot. A good way to gauge when to water is to stick your finger into the soil, and if it feels dry to the touch, then it’s time to water. It’s also important to water at the base of the plant, avoiding getting the leaves wet, as this can promote fungal growth. Additionally, it’s recommended to use room temperature water as cold water can shock the plant and hot water can harm the roots.
To fertilize this plant, apply a balanced fertilizer with equal amounts of nitrogen, phosphorus, and potassium once a month during the growing season. Avoid over-fertilization and never exceed the recommended dosage, as this can burn the plant's roots. Water the plant after fertilizing to help distribute the nutrients throughout the soil.
Perityle emoryi is a species of plant that requires a well-draining soil that is not overly rich in nutrients. The ideal soil for this plant should be a mix of sandy loam and coarse sand, with a pH level of 6.5 to 7.5. Avoid using heavy clay soils or soils that are constantly moist, as this can lead to root rot and other diseases. Additionally, adding perlite or vermiculite to the soil can improve drainage and prevent waterlogging. It is important to note that this plant is native to a specific region and may have specific soil requirements depending on the location of its natural habitat. For this reason, it is always best to research local soil conditions and consult with a horticulturist or nursery professional for specific soil recommendations.
To propagate this plant, start by taking a cutting from a healthy, mature Perityle Emoryi plant. Choose a stem that is at least 4 inches long with several sets of leaves and cut it just below a node. Remove the lower leaves and any flowers or buds from the cutting.
Next, prepare a container with well-draining soil. The soil should be moist but not soaking wet. Using a pencil or a stick, create a hole in the soil and insert the cutting into the hole. Firmly press the soil around the cutting to secure it in place.
Place the container in a bright but indirect light and keep the soil moist. Mist the cutting with water every few days to keep it hydrated. It may take several weeks for roots to form and for the cutting to establish itself.
Once the cutting has developed a good root system and has begun producing new growth, it can be transplanted into a larger pot or planted outdoors in suitable soil and climate conditions.


