Plant Overview
Commonly known as Jerusalem Sage, Phlomis is a genus of sturdy perennials and shrubs that look like they stepped out of a Mediterranean dream. Despite the name, they aren't true sages (Salvia), though they share the same family tree. They are beloved by gardeners for their "architectural" look—tall, upright stems topped with unique stacked tiers of flowers that look like miniature pagodas or golden pom-poms.
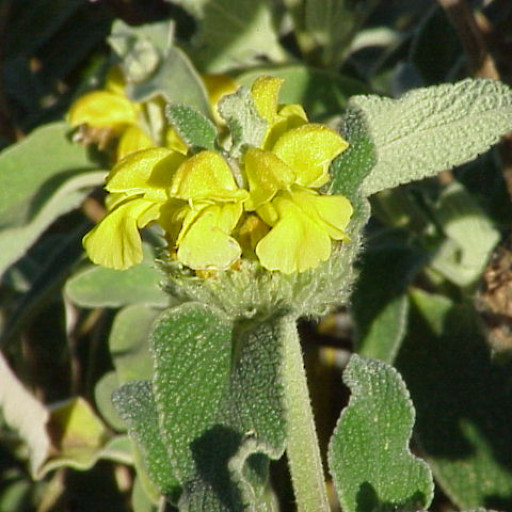
🔍 How to Identify
- 🍂 Fuzzy Foliage: The leaves are typically heart-shaped or lance-like and covered in a dense layer of fine, silvery-grey hairs. This "felted" texture feels soft to the touch and helps the plant retain moisture.
- 🏰 Stacked Blooms: The flowers grow in "verticillasters," which are dense circular clusters that wrap around the stem. Usually appearing in shades of butter-yellow, dusky pink, or lilac, these clusters are spaced out along the stalk like beads on a string.
- 📐 Square Stems: True to their membership in the mint family (Lamiaceae), Phlomis plants feature rigid, four-angled stems that are exceptionally strong and wind-resistant.
🏡 In Your Garden
- ☀️ Drought Warrior: This plant is an expert at surviving on "neglect." Those silvery leaf hairs reflect sunlight and trap humidity, making Phlomis one of the best choices for xeriscaping or gravel gardens.
- 🌬️ Structural Integrity: Unlike many perennials that flop over in the rain, Phlomis holds its shape all year. Even after the flowers fade, the dried seed heads remain upright and provide a beautiful silhouette against the winter sky.
- 🧪 Soil Preference: They are not picky about nutrients but are terrified of "wet feet." They require very sharp drainage; in heavy clay soil, they are prone to root rot during wet winters.
⚠️ Safety & Toxicity
- ✅ Non-Toxic: Phlomis is generally considered safe and non-toxic for humans, dogs, and cats. It is a "friendly" addition to family gardens.
- 🧤 Minor Irritation: While not poisonous, the tiny hairs on the leaves can sometimes act as a mechanical irritant. If you have very sensitive skin, you might experience a slight itch after a heavy pruning session, so gloves are a good idea.
✨ Fun Fact
In ancient times, the soft, woolly leaves of certain species were dried and used as wicks for oil lamps. This earned the plant the historical nickname "Lampwick Plant." Even today, the dried seed heads are a favorite for florists because they look like sculptural art in dried arrangements.

Detailed Care Instructions
To grow a Phlomis plant, follow these steps:
- Choose a suitable location: Phlomis plants thrive in full sun to partial shade. Ensure the chosen location has well-draining soil.
- Prepare the soil: Phlomis plants prefer slightly alkaline to neutral soil. If your soil is acidic, amend it by adding lime to raise the pH level. Also, ensure the soil is well-draining by incorporating organic matter such as compost.
- Planting: Dig a hole that is slightly larger than the plant's root ball. Place the plant in the hole, ensuring that the top of the root ball is level with or slightly above the soil surface. Fill the hole with soil and gently firm it around the plant.
- Watering: Water the plant thoroughly after planting to settle the soil. Afterward, water deeply but infrequently, allowing the soil to dry out between waterings. This helps encourage root growth.
- Mulching: Apply a layer of organic mulch, such as bark chips or straw, around the base of the plant. This helps insulate the soil, conserve moisture, and suppress weeds.
- Pruning: Trim back the plant in late winter or early spring to remove any dead or damaged growth. Additionally, you can shape the plant to maintain its desired form.
- Fertilizing: Phlomis plants generally do not require heavy fertilization. However, you can apply a balanced slow-release fertilizer in spring to promote healthy growth.
- Protection: If you live in an area with harsh winters, consider protecting the plant by covering it with a layer of mulch or burlap during the colder months.
By following these steps and providing proper care, your Phlomis plant should grow successfully.

Place in a bright room that is sun drenched almost all day. Or directly in a south-facing window.

Phlomis is a type of plant that requires proper watering to thrive. When watering Phlomis, it is important to avoid overwatering as it can lead to root rot and other diseases. It is recommended to water the plant deeply once a week, allowing the soil to dry out between watering. The best time to water Phlomis is in the morning or late afternoon, as this will allow the plant to absorb the water before the heat of the day. When watering, it is best to avoid getting the leaves wet as this can cause fungal diseases. Additionally, it is important to water at the base of the plant rather than overhead. In general, watering should be adjusted based on your specific location, climate, and soil conditions.
To provide proper fertilizing instructions for a Phlomis plant, follow these steps:
- Choose a general-purpose or slow-release balanced fertilizer with an N-P-K ratio of around 10-10-10 or 14-14-14. Avoid high-nitrogen fertilizers, as they can lead to excessive leaf growth and weak stems.
- Start fertilizing in early spring, just as the plant begins to show new growth. Phlomis plants are typically hardy and don't require heavy feeding, so a single application at the beginning of the growing season should be sufficient.
- Follow the fertilizer manufacturer's instructions for the appropriate dosage based on the size and age of your Phlomis plant. Generally, sprinkle the fertilizer evenly around the base of the plant, keeping it away from the stem.
- Gently work the fertilizer into the top layer of soil using a hand cultivator or rake. Be cautious not to damage the plant's roots.
- Water the plant thoroughly after fertilizing to ensure the nutrients penetrate the soil and reach the root zone.
- Monitor the plant's growth and health throughout the growing season. If you observe signs of weak growth or nutrient deficiency, you can apply a liquid or water-soluble fertilizer as a foliar feed, following the package instructions for mixing ratios and application methods.
- Avoid over-fertilizing, as this can cause nutrient buildup and harm the plant. It's better to under-fertilize and observe the plant's response before applying additional nutrients.
Remember, each Phlomis species or cultivar may have specific nutrient requirements, so it is always best to consult a horticulturist or the plant's specific care guidelines for more accurate fertilization instructions.
Phlomis plants require a well-draining soil that is rich in organic matter. The soil should be slightly acidic to neutral, with a pH range of 6.0 to 7.0. It is important to avoid using heavy or clay soils, as these can hold too much moisture and lead to root rot. A sandy loam soil with good drainage is ideal for Phlomis plants. It is recommended to amend the soil with compost or aged manure to improve fertility and soil structure. A top dressing of mulch can also help to retain soil moisture and regulate soil temperature.
To propagate Phlomis plants, you can use a variety of methods such as division, stem cuttings, or sowing seeds. Here is a step-by-step guide on each method:
- Division:
- Choose a mature Phlomis plant that has strong and healthy growth.
- In early spring or fall, carefully dig up the entire plant.
- Gently separate the root clumps into smaller sections, ensuring each section has its own set of stems and healthy roots.
- Plant these divisions in well-draining soil, ensuring they are at the same depth as they were before.
- Water them adequately and continue to provide proper care until they establish themselves.
- Choose a mature Phlomis plant that has strong and healthy growth.
- Stem cuttings:
- In late spring or early summer, select a healthy Phlomis stem that is approximately 4-6 inches long.
- Using clean and sharp pruning shears or a knife, make a clean cut just below a leaf node.
- Remove the lower leaves, leaving only a few leaves at the top.
- Dip the cut end in rooting hormone powder to encourage root development (optional).
- Plant the cutting in a well-draining mix of soil and perlite, vermiculite, or sand.
- Place a clear plastic bag or a plastic dome over the cutting to create a mini greenhouse effect and retain moisture.
- Keep the cutting in a warm, indirect light location.
- Mist the cutting regularly to maintain humidity.
- After a few weeks, gently tug the cutting to check for resistance, indicating that roots have formed.
- Once the cutting has developed roots, carefully transplant it to a larger pot or directly into the garden.
- In late spring or early summer, select a healthy Phlomis stem that is approximately 4-6 inches long.
- Sowing seeds:
- Collect mature seedheads from existing Phlomis plants in late summer or early autumn.
- Allow the seedheads to dry completely.
- Gently rub the seedheads between your fingers to release the small seeds.
- Prepare a seed tray or small pots with a light, well-draining soil mix.
- Sprinkle the seeds evenly on the soil surface and lightly press them down.
- Cover the seeds with a thin layer of soil or vermiculite.
- Moisten the soil and ensure it remains consistently moist but not waterlogged.
- Place the tray or pots in a warm location with indirect light.
- Keep the soil moist until the seeds germinate, which usually takes 2-4 weeks.
- Once the seedlings have developed a few sets of true leaves, they can be transplanted into individual containers or directly into the garden.
Remember to provide proper care and monitoring for the propagated Phlomis plants, including regular watering, suitable sunlight exposure, and protection from extreme weather conditions.
- Collect mature seedheads from existing Phlomis plants in late summer or early autumn.


