Plant Overview
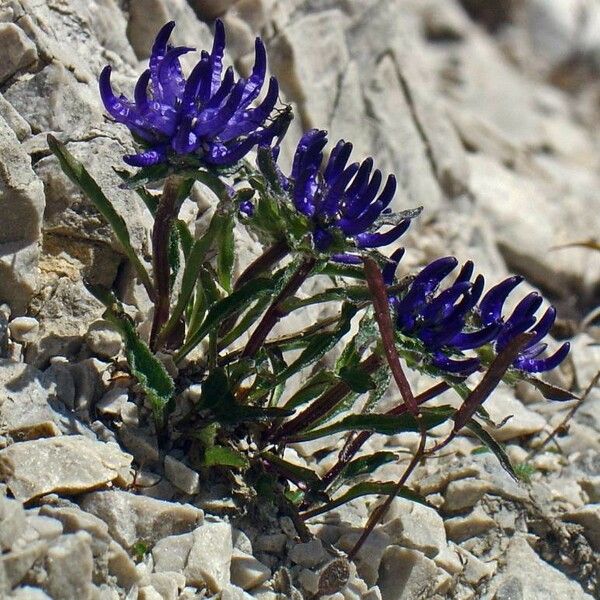
Commonly known as the Globular Rampion, Phyteuma hemisphaericum is a charming alpine treasure that looks like it belongs in a botanical illustration of the high Alps. Found clinging to rocky crevices in the Pyrenees and the Alps, this resilient perennial is famous for its unique, spherical flower heads that resemble tiny, blue pincushions. It is a favorite among rock garden enthusiasts who want to bring a piece of the high-altitude wilderness into their own backyard.
🔍 How to Identify
- 🌸 The Flower Head: The most striking feature is the "globe"—a dense, rounded cluster of tiny, curved tubular flowers, usually in shades of deep sky blue to violet.
- 🍃 Grass-like Foliage: Unlike many of its broader-leafed cousins, this species has very narrow, linear leaves that form a tufted, grassy mound at the base.
- 📏 Compact Stature: It is a diminutive plant, typically reaching only 4 to 12 inches in height, with smooth, leafless stems that hold the blue orbs high above the foliage.
🏡 In Your Garden
- 🏔️ The Alpine Ethos: Because it originates from high-altitude slopes, it thrives in "scree" conditions. This means it requires gritty, well-draining soil—if its roots sit in soggy earth for too long, the plant will quickly rot.
- ☀️ Cool Sun Lovers: While it loves bright light, it is not a fan of sweltering summer humidity. In warmer climates, it performs best in a spot that receives morning sun but stays shielded from the punishing afternoon heat.
- 🪨 Rock Garden Star: It is the perfect candidate for crevices between stones or in trough gardens, where its taproot can find a cool, deep space to anchor itself.
⚠️ Safety & Toxicity
- ✅ Low Risk: Phyteuma hemisphaericum is generally considered non-toxic to humans and common household pets.
- 🐾 Pet Friendly: While not intended for consumption, there are no known records of this plant causing distress to cats or dogs if they happen to take a curious nibble. However, as with any ornamental plant, it’s best to discourage pets from grazing.
✨ Fun Fact
The genus name Phyteuma comes from the Greek word "phyteuo," which means "to plant" or "to beget," but it was historically used by ancient Greeks to refer to a variety of different plants thought to have aphrodisiac properties!

Detailed Care Instructions
Phyteuma hemisphaericum, commonly known as the half-sphere bellflower, is a perennial plant that is appreciated for its unique, bell-shaped flowers and attractive foliage. Here are some tips for successfully growing this plant:
Growing Conditions:
- Location: Choose a spot that receives full sun to partial shade. Phyteuma hemisphaericum thrives best with at least 6 hours of sunlight daily.
- Soil: This plant prefers well-draining, sandy or loamy soil. The soil should be slightly acidic to neutral (pH 6.0-7.0). Adding organic matter, such as compost, can improve soil structure and fertility.
Planting:
- Propagation: You can propagate Phyteuma hemisphaericum from seeds or by division of established plants. If starting from seeds, sow them in late winter to early spring indoors or outdoors in a prepared seedbed after the last frost.
- Spacing: When planting, space the plants about 12 to 18 inches apart to allow for growth and air circulation.
Care:
- Watering: Water the plant regularly, especially during dry periods. However, avoid waterlogging. The soil should be kept consistently moist but not soggy.
- Fertilizing: Apply a balanced, slow-release fertilizer in early spring to promote healthy growth. Too much fertilizer can lead to excessive foliage and fewer flowers.
- Mulching: Apply a layer of mulch to help retain soil moisture, suppress weeds, and keep the root zone cool.
Maintenance:
- Deadheading: Remove spent flowers to encourage prolonged blooming and prevent the plant from going to seed too early.
- Pruning: In late fall or early spring, you can cut back the foliage to promote healthy new growth.
- Pests/Diseases: Keep an eye out for common garden pests such as aphids or slugs. Treat infestations promptly with appropriate measures.
Winter Care:
In colder climates, provide some winter protection, such as a layer of mulch, to insulate the roots against frost.
Conclusion:
With the right care and conditions, Phyteuma hemisphaericum can thrive and produce beautiful blooms. Always be attentive to its specific needs, and you'll enjoy this charming perennial in your garden.

Place in a bright room that is sun drenched almost all day. Or directly in a south-facing window.

To water this plant, one should first check the moisture level of the soil by inserting a finger into the top inch of soil. If the soil feels dry to the touch, it is time to water. When watering, it is important to avoid getting water on the leaves or flowers to prevent damage or disease. Instead, aim to water the soil around the base of the plant until the water begins to drain out the bottom of the pot or soil. It is also important to not over-water this plant, as it prefers well-draining soil and may be susceptible to root rot. Therefore, it is recommended to wait until the soil has dried out slightly before watering again. It is also beneficial to provide this plant with a consistent watering schedule, as irregular watering can lead to stress and affect its overall health and growth.
To fertilize Phyteuma hemisphaericum effectively, follow these guidelines:
- Timing: Begin fertilizing in early spring as the plant starts to emerge and continue through the growing season, typically until late summer or early fall. Avoid fertilizing in the winter months when the plant is dormant.
- Type of Fertilizer: Use a balanced, slow-release fertilizer with an N-P-K ratio of around 10-10-10 or a similar formulation. Organic options such as compost or well-rotted manure can also be beneficial.
- Application Rate: Follow the manufacturer's instructions on the fertilizer package for application rates. Generally, applying about 1 tablespoon of granular fertilizer per square foot of soil is a good starting point.
- Method of Application: Disperse the fertilizer evenly over the soil surface around the base of the plant, avoiding direct contact with the stems to prevent burning. Lightly work the fertilizer into the top layer of soil for better absorption.
- Watering: After applying fertilizer, water the plant thoroughly to help dissolve the nutrients and promote uptake by the roots.
- Frequency: If using a liquid fertilizer, dilute it as per instructions and apply every 4 to 6 weeks during the growing season. If you're using slow-release granules, one application in early spring may suffice for the growing season.
- Observation: Monitor the plant for signs of nutrient deficiency, such as yellowing leaves or poor growth, and adjust your fertilization approach as needed.
By adhering to these instructions, you can promote healthy growth and flourishing of Phyteuma hemisphaericum.
Phyteuma Hemisphaericum is a species of plant that requires a specific type of soil in order to thrive. It is recommended to use a well-draining soil that is rich in organic matter and has a slightly acidic pH level. This type of soil will provide the necessary nutrients and moisture retention that the plant needs to grow healthy and strong. Additionally, it is important to avoid soils that are heavy in clay or have excessive amounts of sand, as these can negatively impact the root system and overall growth of the plant. It is also important to avoid soil that has been treated with chemical fertilizers or pesticides, as these can harm the plant and affect its ability to produce flowers. Overall, using high-quality, nutrient-rich soil is essential for the successful growth and development of Phyteuma Hemisphaericum.
Propagation of Phyteuma hemisphaericum can be achieved through a few methods: seed propagation and division. Here's a detailed guide for both methods:
Seed Propagation
- Seed Collection:
- Gather seeds after the flowers have dried on the plant. This usually occurs in late summer to early autumn. Ensure the seeds are fully matured.
- Gather seeds after the flowers have dried on the plant. This usually occurs in late summer to early autumn. Ensure the seeds are fully matured.
- Seed Preparation:
- Clean the seeds to remove any debris or chaff. If necessary, store them in a cool, dry place until you are ready to plant.
- Clean the seeds to remove any debris or chaff. If necessary, store them in a cool, dry place until you are ready to plant.
- Sowing Seeds:
- Fill seed trays or pots with a well-draining seed starting mix.
- Sow the seeds on the surface of the soil and lightly cover them with a thin layer of soil (approximately 1/8 inch deep).
- Fill seed trays or pots with a well-draining seed starting mix.
- Watering:
- Moisten the soil gently using a spray bottle or watering can with a fine spout to avoid displacing the seeds.
- Moisten the soil gently using a spray bottle or watering can with a fine spout to avoid displacing the seeds.
- Germination Conditions:
- Place the trays or pots in a location with bright, indirect light.
- Maintain a temperature of around 18-20°C (65-68°F).
- Keep the soil consistently moist but not soggy.
- Place the trays or pots in a location with bright, indirect light.
- Germination Time:
- Germination can take several weeks to a few months, depending on environmental conditions.
- Germination can take several weeks to a few months, depending on environmental conditions.
- Transplanting:
- Once the seedlings have developed a few true leaves, transplant them into larger pots or directly into the garden if the conditions are suitable.
Dividing Established Plants
- Once the seedlings have developed a few true leaves, transplant them into larger pots or directly into the garden if the conditions are suitable.
- Timing:
- The best time to divide the plant is in early spring or autumn when the plant is not actively flowering.
- The best time to divide the plant is in early spring or autumn when the plant is not actively flowering.
- Preparation:
- Water the plant a day or two before dividing to help minimize stress.
- Water the plant a day or two before dividing to help minimize stress.
- Digging Up the Plant:
- Carefully dig around the base of the plant with a spade or garden fork, lifting it out of the ground while being cautious not to damage the root system.
- Carefully dig around the base of the plant with a spade or garden fork, lifting it out of the ground while being cautious not to damage the root system.
- Dividing the Plant:
- Use a sharp knife or garden spade to cut the root ball into sections. Ensure each division has a good portion of healthy roots and shoots.
- Use a sharp knife or garden spade to cut the root ball into sections. Ensure each division has a good portion of healthy roots and shoots.
- Replanting:
- Prepare the planting site by loosening the soil and adding organic compost if necessary. Plant the divisions at the same depth they were previously growing.
- Prepare the planting site by loosening the soil and adding organic compost if necessary. Plant the divisions at the same depth they were previously growing.
- Watering:
- Water the newly planted divisions thoroughly to help them settle in. Keep the soil moist until they establish roots and show new growth.
Care After Propagation
- Water the newly planted divisions thoroughly to help them settle in. Keep the soil moist until they establish roots and show new growth.
- After propagation by either method, provide appropriate care including:
- Adequate sunlight: Place in a location that receives partial sun or dappled shade.
- Good drainage: Ensure that the soil drains well to prevent root rot.
- Fertilization: Apply a balanced, slow-release fertilizer in the spring to promote healthy growth.
Monitoring the plants for pests or diseases and adjusting care as needed will help ensure successful establishment, whether from seed or division.
- Adequate sunlight: Place in a location that receives partial sun or dappled shade.


