Plant Overview
Known as the "Blue Torch Cactus" or the "Tree Cactus," Pilosocereus is the undisputed showstopper of the desert world. With its shimmering turquoise-blue skin and patches of soft, white "wool," it looks more like a modern art sculpture than a living plant. Native to the hot, sun-drenched regions of Brazil and Mexico, these cacti are prized for their neon-bright columns that add a futuristic, ethereal pop to any xeriscape or sunny windowsill.
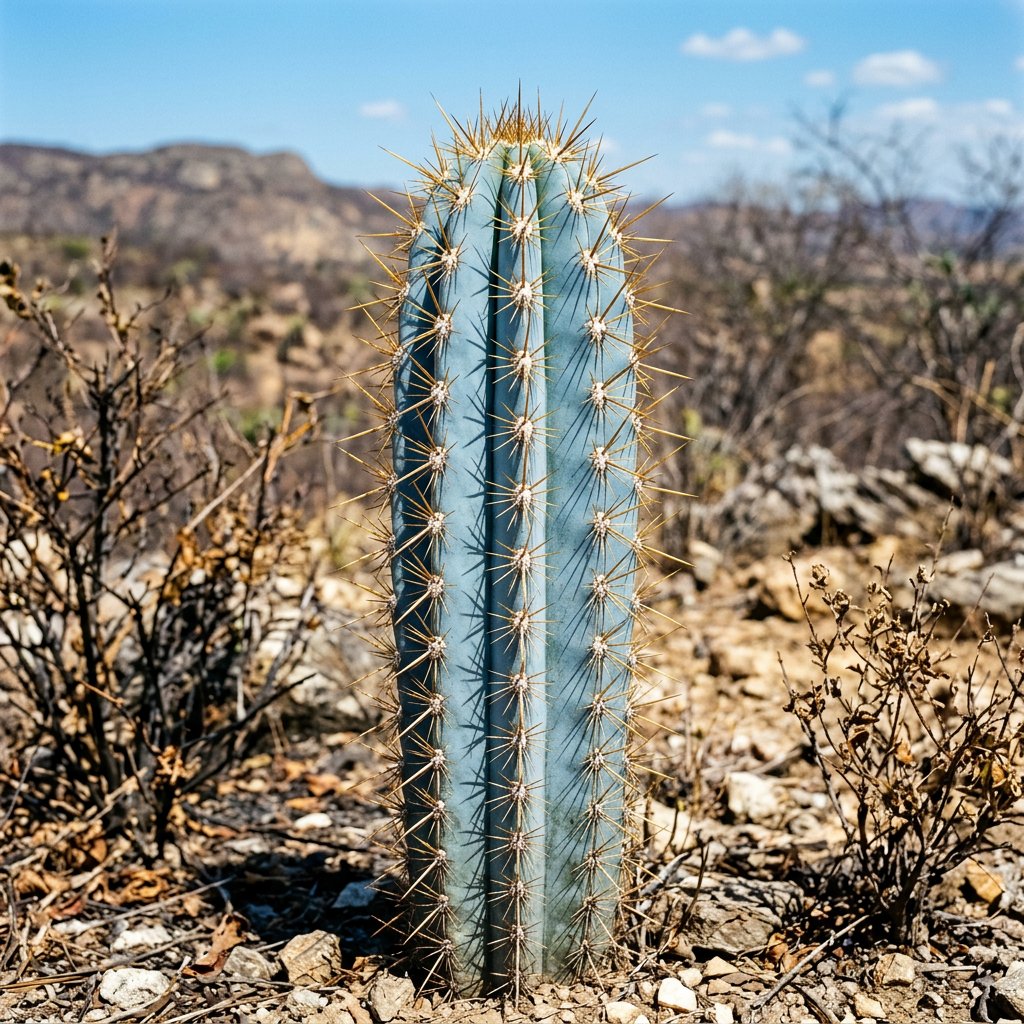
🔍 How to Identify
- 🌵 The Blue "Bloom": The most striking feature is the glaucous (waxy) coating on the stems, which gives the plant its signature sky-blue or turquoise color.
- 🧶 Woolly Tufts: Many species develop a "pseudocephalium"—tufts of white, hair-like wool along the ribs or at the crown where flowers eventually emerge.
- 📐 Columnar Ribs: They grow in tall, upright pillars with deep vertical ribs, often lined with golden or dark brown spines that contrast sharply against the blue skin.
🏡 In Your Garden
- ☀️ Sun as Sunscreen: That beautiful blue color is actually a form of natural sunblock. To keep your Pilosocereus looking vibrant, it needs intense light; in low light, the new growth will turn a dull green as it loses its protective waxy coating.
- 💧 Winter Rest: Unlike tropical plants, this cactus enters a deep dormancy in winter. It prefers to stay almost entirely dry during the cold months to prevent root rot, as its metabolism slows to a crawl.
- 🪴 Drainage is King: Because they are native to rocky, arid environments, they hate "wet feet." Use a gritty cactus mix and terracotta pots to ensure the roots can breathe and dry out quickly after watering.
⚠️ Safety & Toxicity
- 🌵 Physical Hazard: While Pilosocereus is not chemically toxic or poisonous to humans or pets, its spines are very sharp and can cause painful puncture wounds or skin irritation.
- 🐾 Placement Matters: Keep this plant out of "traffic zones" where curious pets or toddlers might accidentally bump into it. If a spine gets stuck in the skin, use tweezers and wash the area thoroughly to prevent minor infection.
✨ Fun Fact
In the wild, many Pilosocereus species are "bat-pollinated." Their large, tubular flowers open only at night and emit a strong, slightly fermented scent specifically designed to attract bats roaming the midnight desert!

Detailed Care Instructions
| Humidity | Dry |
| Lighting | Full Sun |
| Difficulty | Easy |
| Temperature | 12°C - 30°C |
| Hardiness Zones | 9B - 10B |
To grow a Pilosocereus plant, follow these steps:
- Choose a suitable location: Pilosocereus plants prefer bright, indirect sunlight. Choose a spot near a window or in a well-lit area of your home.
- Prepare the soil: Pilosocereus plants need well-draining soil. Use a potting mix specifically formulated for cacti and succulents, or prepare your own by combining equal parts of potting soil, sand, and perlite.
- Select a container: Choose a pot with drainage holes to ensure excess water can escape. The container should be slightly larger than the plant's root ball.
- Planting: Carefully remove the Pilosocereus plant from its nursery pot and gently loosen the roots. Place it in the prepared container, ensuring the plant is at the same depth as it was in its previous pot. Fill in the gaps with the potting mix, patting it down lightly to secure the plant.
- Watering: Water the plant thoroughly until excess water drains out of the pot's drainage holes. Allow the soil to dry out completely between waterings, as Pilosocereus plants are drought-tolerant and can rot if overwatered. In winter, reduce watering frequency.
- Fertilizing: During the growing season (typically spring and summer), you can fertilize the Pilosocereus plant with a balanced, water-soluble succulent fertilizer. Follow the instructions on the product packaging for proper application.
- Temperature and humidity: Pilosocereus plants thrive in temperatures between 60-80°F (15-27°C). They can tolerate higher temperatures if provided with sufficient air circulation. They are not fussy about humidity levels and can adapt to different conditions.
- Pruning: Although not necessary, you can prune your Pilosocereus plant to control its size or remove dead or damaged parts. Use clean, sharp pruning shears and make clean cuts just above a node or joint.
- Propagation: Pilosocereus plants can be propagated from stem cuttings. Allow the cut end of the stem to dry out and callus for a few days before planting it in well-draining soil. Keep the soil slightly moist until new roots form.
- Monitoring for pests and diseases: Keep an eye out for common cactus pests like mealybugs or scale insects. Regularly check the plant for any signs of disease or fungal issues. If pests or diseases are detected, treat them promptly with appropriate organic or chemical controls.
Remember to research the specific species of Pilosocereus you have to ensure you are providing the right care and growing conditions for that particular variety.

Place in a bright room that is sun drenched almost all day. Or directly in a south-facing window.

To water this particular plant, you should first ensure that the soil is dry before each watering. It is important not to overwater, as standing water can quickly cause damage to the roots. When watering, aim to provide a deep and thorough watering, allowing the water to soak deep into the soil. After watering, allow the soil to completely dry out before watering again. This plant also benefits from occasional misting to maintain a higher level of humidity around the plant.
To fertilize this cactus plant, mix a balanced fertilizer with equal amounts of nitrogen, phosphorus, and potassium. Apply the fertilizer once in the early spring and once in the mid-summer, using a granular slow-release fertilizer or a liquid fertilizer diluted to half-strength. Be sure to water the plant thoroughly before and after fertilizing, but do not overwater as cactus plants prefer well-draining soil. Always follow the recommended dosage on the fertilizer packaging and avoid fertilizing during periods of dormancy.
The soil recommended for growing the Pilosocereus plant should be well-draining and loose, without too much clay content. The soil should be acidic in nature, with a pH range of 5.5 to 6.5. Organic matter such as compost or peat moss should be added to the soil mix to improve the texture and fertility. The soil should be able to retain moisture to support the growth and development of the plant while at the same time preventing waterlogging, which can lead to root rot and other issues. In summary, the ideal soil for Pilosocereus should be well-draining, loose, slightly acidic, and enriched with organic matter.
To propagate this plant, you will need to take a cutting from the parent plant. Choose a stem that is healthy and has no signs of damage or disease. Use a sharp, clean knife or pruning shears to make a clean cut at a 45-degree angle.
Allow the cutting to dry out for a few days to reduce the risk of rot. Once it has dried, you can dip the cut end in rooting hormone to encourage root growth.
Prepare a well-draining potting mix and plant the cutting in a small container. Water the soil lightly, and keep the soil moist but not waterlogged.
Place the potted cutting in a bright, warm location out of direct sunlight. Cover the pot with a plastic bag to help create a humid environment around the cutting.
After a few weeks, check the cutting for signs of root growth. If the cutting has rooted, you can begin to decrease the amount of humidity around the cutting by removing the plastic bag gradually.
Once the cutting has established roots and has started to grow, it can be transplanted to a larger pot or planted in the ground.
Common pests of the tree cactus include Scale insect, mealybugs, spider mites, thrips. Make a habit of checking your tree cactus frequently for pests so that any infestations can be caught and managed early.


