Plant Overview
Often referred to as the Sea Saffron or Northern Yellow Boxwood, this resilient evergreen is a coastal champion found across the tropical shores of Southeast Asia and Northern Australia. It is a slow-growing, sturdy tree known for its ability to thrive where the land meets the salt spray of the ocean. In traditional landscapes, it is admired for its dense, leathery canopy that provides deep shade and a touch of golden-green luster.
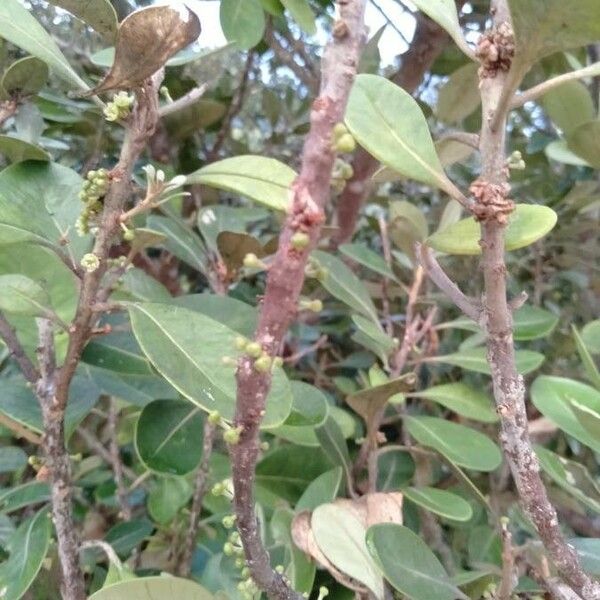
🔍 How to Identify
- 🍃 The Leaves: Glossy, spoon-shaped (obovate) leaves that are deep green on top, often featuring a surprisingly soft, rusty or golden-brown velvety underside.
- 🌼 The Blooms: Tiny, inconspicuous greenish-white flowers that grow in small clusters along the twigs, emitting a subtle, sweet fragrance.
- 🍒 The Fruit: Small, rounded berries that transition from a bright green to a deep, dark purple or black as they ripen.
🏡 In Your Garden
- 🌊 Coastal Specialist: This plant is incredibly salt-tolerant, making it an ideal choice for beachfront properties or windy coastal gardens where other trees might wither.
- 🌱 Slow and Steady: Because it is a slow grower, it requires patience. It develops a very deep taproot, meaning it hates being moved once established, so choose its forever-home carefully!
⚠️ Safety & Toxicity
- 🛡️ Low Risk: Planchonella obovata is generally considered non-toxic to humans and most animals.
- 💧 Milky Sap: Like many members of the Sapotaceae family, the stems contain a milky latex sap. While not poisonous, this sap can be a mild skin irritant for people with sensitive skin or latex allergies.
✨ Fun Fact
The wood of the Sea Saffron is so incredibly dense and fine-grained that it was historically used for woodblock printing and carving intricate tool handles, earning it the "Boxwood" nickname.

Detailed Care Instructions
Growing Planchonella obovata, a tropical plant known for its attractive foliage and edible fruits, can be a rewarding experience. Here are the steps to successfully grow and care for this plant:
1. Selection of Seeds or Seedlings
- Seeds: Obtain fresh seeds from a reliable source. Older seeds may have a lower germination rate.
- Seedlings: If possible, purchase young plants from a nursery.
2. Soil Preparation
- Planchonella obovata prefers well-draining soil.
- Amend clay or compact soils with organic matter like compost to improve drainage.
3. Germinating Seeds
- Scarification: To improve germination rates, scarify the seeds lightly by nicking the seed coat with a sharp knife or rubbing them with sandpaper.
- Soak seeds in warm water overnight before planting.
- Plant seeds about 1-2 cm deep in seed-starting mix.
- Keep the soil consistently moist but not waterlogged.
- Place in a warm, well-lit area. Germination can take several weeks to a few months.
4. Transplanting Seedlings
- Once seedlings have a few sets of true leaves, transplant them into larger pots or directly into the ground.
- Choose a location with full sun to partial shade.
- Space plants according to their mature size to allow good air circulation.
5. Watering
- Keep the soil evenly moist, especially during the plant's growing phase.
- Reduce watering in the winter months when the plant’s growth may slow down.
6. Fertilization
- Fertilize with a balanced, slow-release fertilizer in the early spring and mid-summer.
- Avoid over-fertilization, which can lead to excessive growth and weak structure.
7. Pruning
- Prune young plants to encourage a strong framework.
- Remove any dead or damaged branches regularly.
- Pruning can also help maintain the desired shape and encourage bushier growth.
8. Pest and Disease Management
- Keep an eye out for common pests such as aphids, scale, and spider mites.
- Use insecticidal soap or neem oil for pest control if needed.
- Ensure good air circulation and avoid overwatering to prevent fungal diseases.
9. Mulching
- Apply a layer of organic mulch around the base of the plant to conserve moisture, regulate soil temperature, and reduce weeds.
10. Protecting from Extreme Weather
- If you live in cooler climates, consider growing Planchonella obovata in a container that can be moved indoors during cold weather.
- Protect young plants from strong winds and harsh sunlight until they are well-established.
11. Harvesting
- If grown for its fruit, wait until the fruit is fully ripe and starts to soften before harvesting.
- Harvesting times may vary depending on your local climate and growing conditions.
By following these steps and providing the plant with the right conditions, you can successfully grow and enjoy Planchonella obovata in your garden or home. Happy gardening!

Place in a bright room that is sun drenched almost all day. Or directly in a south-facing window.

To properly water this particular plant, it is best to observe the soil moisture level before watering. One can stick their finger into the soil to a depth of one inch to determine if the soil is dry or moist. When the soil is dry, it is time to water the plant. Watering should be done slowly and thoroughly until water runs out the drainage holes at the bottom of the pot. It is important not to let the plant sit in standing water as this may lead to root rot. Overwatering should also be avoided. Depending on the temperature and humidity of the environment, this plant may require watering once or twice a week. It is recommended to adjust watering according to the plant's needs.
Here are the fertilizing instructions for Planchonella obovata:
- Fertilizer Type:
- Use a balanced, slow-release fertilizer with an NPK (nitrogen-phosphorus-potassium) ratio of approximately 10-10-10 or 14-14-14.
- An organic alternative, such as compost or well-rotted manure, can also be beneficial.
- Use a balanced, slow-release fertilizer with an NPK (nitrogen-phosphorus-potassium) ratio of approximately 10-10-10 or 14-14-14.
- Timing:
- Fertilize in the early spring, just as new growth starts to appear.
- A second application may be made in mid-summer if the plant seems to need it, but avoid late-season fertilization which might stimulate new growth susceptible to frost.
- Fertilize in the early spring, just as new growth starts to appear.
- Amount:
- Follow the manufacturer’s instructions on the packaging for the correct amount. Generally, a few tablespoons of slow-release granules are sufficient for smaller plants, while larger plants or those in the ground may require more.
- If using compost or manure, spread a 1-2 inch layer around the base of the plant, staying a few inches away from the stem to prevent rot.
- Follow the manufacturer’s instructions on the packaging for the correct amount. Generally, a few tablespoons of slow-release granules are sufficient for smaller plants, while larger plants or those in the ground may require more.
- Application:
- For potted plants, sprinkle the fertilizer evenly over the soil surface, then gently work it into the top layer of soil. Water the plant thoroughly afterwards to help disperse the fertilizer.
- For ground-planted specimens, scatter the granules evenly around the root zone (the area under the canopy of the plant) and lightly rake them into the soil. Water well after application.
- For potted plants, sprinkle the fertilizer evenly over the soil surface, then gently work it into the top layer of soil. Water the plant thoroughly afterwards to help disperse the fertilizer.
- Frequency:
- Slow-release fertilizers typically last for several months, so reapplication should not be necessary more than twice a year.
- If you’re using a liquid or more quick-release fertilizer, you may need to fertilize every 4-6 weeks during the growing season.
- Slow-release fertilizers typically last for several months, so reapplication should not be necessary more than twice a year.
- Watering:
- Ensure the plant is watered regularly and thoroughly, especially after applying fertilizer, to help nutrients penetrate the soil and reach the root system.
- Avoid over-watering, as this can lead to root rot.
- Ensure the plant is watered regularly and thoroughly, especially after applying fertilizer, to help nutrients penetrate the soil and reach the root system.
- Monitoring:
- Observe the plant’s growth and appearance. Yellowing leaves might indicate a nutrient deficiency, while overly lush, green growth could indicate over-fertilization.
- Adjust fertilizing practices based on the plant's response.
By following these guidelines, you can help ensure that your Planchonella obovata stays healthy and thrives in its growing environment.
- Observe the plant’s growth and appearance. Yellowing leaves might indicate a nutrient deficiency, while overly lush, green growth could indicate over-fertilization.
The Planchonella Obovata plant requires a well-draining soil mix that is rich in nutrients and organic matter. It is important to avoid heavy, clay soils as these can lead to root rot and other issues.
A good soil mix for this plant may include a blend of peat moss, perlite or vermiculite, and a quality potting mix or compost. This will provide adequate drainage while also retaining moisture and nutrients for the plant.
It is also important to ensure that the soil pH is slightly acidic, with a range of 5.5 to 6.5 being ideal. This can be achieved by adding organic matter such as compost or pine needles to the soil mix.
Overall, a well-draining soil mix that is rich in nutrients, organic matter, and slightly acidic pH is essential for the Planchonella Obovata plant to thrive.
Planchonella obovata can be propagated both through seeds and cuttings. Here's a detailed guide on how to propagate this plant:
Propagating from Seeds
- Seed Collection:
- Collect the ripe fruits from a mature plant.
- Extract the seeds from the fruit pulp and wash off any remaining fruit residue.
- Collect the ripe fruits from a mature plant.
- Seed Treatment:
- Soak the seeds in water for about 24 hours to help soften the seed coat.
- In some cases, scarification (scratching or nicking the seed coat) can improve germination rates.
- Soak the seeds in water for about 24 hours to help soften the seed coat.
- Sowing:
- Fill a seed tray or pots with a well-draining seed-starting mix.
- Sow the seeds about 1-2 cm deep in the soil.
- Space the seeds adequately to allow for root growth.
- Fill a seed tray or pots with a well-draining seed-starting mix.
- Germination Conditions:
- Place the trays/pots in a warm, shaded area with indirect sunlight.
- Maintain consistent moisture but avoid waterlogging. Using a misting spray can help in maintaining humidity.
- Germination can take several weeks to a few months.
- Place the trays/pots in a warm, shaded area with indirect sunlight.
- Transplanting:
- Once the seedlings have developed a few true leaves and are strong enough to handle, they can be transplanted to individual pots or a prepared garden bed with well-draining soil.
Propagating from Cuttings
- Once the seedlings have developed a few true leaves and are strong enough to handle, they can be transplanted to individual pots or a prepared garden bed with well-draining soil.
- Selecting Cuttings:
- Choose healthy, semi-hardwood stems from a mature plant.
- Cut sections about 10-15 cm in length using a sterilized, sharp knife or pruning shears.
- Remove any lower leaves, leaving a few leaves at the top.
- Choose healthy, semi-hardwood stems from a mature plant.
- Preparing Cuttings:
- Optionally dip the cut end of the stem in rooting hormone to encourage root development.
- Prepare a pot with a well-draining rooting medium, such as a mix of perlite and peat moss, or sand and compost.
- Optionally dip the cut end of the stem in rooting hormone to encourage root development.
- Planting Cuttings:
- Insert the cut end of the stem into the rooting medium, burying about one-third of its length.
- Firm the medium around the cutting to ensure good contact.
- Insert the cut end of the stem into the rooting medium, burying about one-third of its length.
- Rooting Conditions:
- Place the cuttings in a warm, humid environment with bright but indirect light.
- Keep the medium consistently moist but not soggy. Covering the pot with a plastic bag or using a propagator can help maintain humidity.
- Place the cuttings in a warm, humid environment with bright but indirect light.
- Caring for Rooted Cuttings:
- Check for root development after a few weeks by gently tugging on the cuttings. Resistance usually indicates root growth.
- Once roots are well-established, the cuttings can be transplanted into larger pots or directly into the garden.
- Check for root development after a few weeks by gently tugging on the cuttings. Resistance usually indicates root growth.
- Aftercare:
- Gradually acclimate the new plants to outdoor conditions if they were started indoors.
- Ensure they have well-draining soil, adequate space for growth, and consistent moisture.
Both propagation methods can be successful, but individual success rates can vary based on environmental conditions and care practices. Patience and careful attention to each step will enhance the chances of success in propagating Planchonella obovata.
- Gradually acclimate the new plants to outdoor conditions if they were started indoors.


