Plant Overview
Often called the Bulbous Bluegrass, this unusual little grass is a master of survival in harsh, unpredictable environments. Unlike its cousin, the lush Kentucky Bluegrass, Poa bulbosa has evolved a clever shortcut for reproduction: it produces tiny, pre-sprouted "bulblets" right on its stems instead of traditional seeds. It is often the first grass to turn green in the spring and the first to "disappear" when the summer heat arrives.
🔍 How to Identify
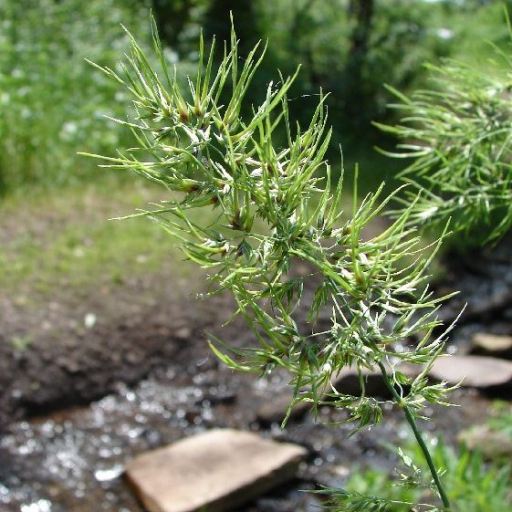
- 🌾 The "Flower" Heads: Instead of light, feathery seeds, look for dense, greenish-purple clusters of tiny teardrop-shaped bulbs (bulbils) that look like miniature onions hanging from the tips.
- 🧅 Swollen Base: If you pull a small clump, you’ll notice the base of the stems are distinctly thickened and bulb-like, which helps the plant store energy during its dormant phase.
- 🛶 Leaf Tips: The leaves are narrow and bluish-green with the classic "boat-shaped" tips—a signature trait of the Poa genus that looks like the prow of a tiny canoe.
🏡 In Your Garden
- 🏃 The Disappearing Act: This grass is a "cool-season" specialist. It thrives in the chilly, wet months of early spring but will turn brown and go completely dormant as soon as temperatures rise. Don't be fooled—it isn't dead; it’s just sleeping underground until the rains return.
- 🚜 Opportunistic Grower: You’ll most likely find it in gravelly paths, neglected lawn edges, or rocky slopes. Because it reproduces via clones (those little bulbils), it can spread rapidly through a garden if the soil is frequently disturbed or moved.
⚠️ Safety & Toxicity
- ✅ Non-Toxic: Poa bulbosa is generally considered safe and non-toxic for humans, dogs, and cats.
- 🐾 Pasture Use: It is safe for livestock to graze on, though it isn't as nutrient-dense as other pasture grasses. Its main "danger" is to your landscaping, as it can be quite a persistent "weed" in manicured turf.
✨ Fun Fact
The little bulbs on the flower head are actually "viviparous," meaning the plant gives birth to "live" offspring. These bulbils can start growing roots almost the moment they hit the ground, skipping the fragile seed-germination stage entirely to get a head start on their neighbors!

Detailed Care Instructions
To grow Poa bulbosa plants, follow these steps:
- Obtain seeds or bulbs: Poa bulbosa can be propagated from seeds or bulbs. Seeds can be collected from mature plants or purchased from a reputable seed supplier. Bulbs can be purchased from a garden center or online.
- Choose the right location: Poa bulbosa thrives in full sun to partial shade. Select a spot in your garden or outdoor space that receives at least 6 hours of direct sunlight per day. Ensure the soil is well-draining, as these plants do not tolerate excessive moisture.
- Prepare the soil: Before planting, prepare the soil by loosening it using a garden fork or tiller. Remove any existing weeds, rocks, or debris to create a clean growing space for the Poa bulbosa plants.
- Plant the seeds or bulbs: If using seeds, scatter them evenly over the prepared soil, and lightly press them into the soil surface. If using bulbs, dig holes or furrows about 2-3 inches deep and place the bulbs in the holes, covering them with soil.
- Water regularly: Keep the soil moist during the germination period, which usually takes about 2-4 weeks. Water the plants regularly, aiming for a consistent level of moisture. However, be cautious not to overwater, as excessive moisture can lead to root rot.
- Control weeds: Maintain a weed-free environment around the Poa bulbosa plants, as weeds can compete for nutrients and space. Hand-pull any weeds that emerge near the plants, being careful not to disturb the shallow roots.
- Fertilize appropriately: Poa bulbosa plants generally do not require heavy fertilization. However, you can apply a balanced, slow-release fertilizer once or twice a year to promote healthy growth. Follow the packaging instructions for dosage and application guidelines.
- Prune if needed: If the Poa bulbosa plants become excessively tall or develop dead or discolored foliage, you can prune them back to maintain their appearance. Use clean and sharp garden shears to remove any unwanted growth.
- Monitor for pests and diseases: Check the plants regularly for signs of pests or diseases, such as aphids, rust, or leaf spots. If you notice any issues, treat them with appropriate organic or chemical controls as needed.
Remember that Poa bulbosa is considered invasive in some regions, so be cautious about planting it in areas where it could spread and crowd out native plant species.

Place in a bright room that is sun drenched almost all day. Or directly in a south-facing window.

To properly hydrate this particular plant, it is recommended to use a watering can or similar apparatus and pour water directly onto the soil surrounding the roots. Be sure to monitor the moisture levels and adjust the amount of water as needed based on the plant's specific needs and environmental conditions. It is also important to avoid over-watering, as this can lead to root rot and other issues. Additionally, the plant may benefit from occasional misting or humidifying to promote optimal growth and health.
To fertilize this type of plant, apply a slow-release fertilizer in early spring at a rate of 1 pound per 100 square feet. Do not exceed recommended rates and application frequency. Water the area immediately after applying the fertilizer to help it soak into the soil and provide nutrients to the plant's roots. Repeat the application once every six months, following the same guidelines.
The ideal soil for growing this particular plant should have a well-balanced mix of organic matter, minerals, and nutrients. It should have good drainage to prevent waterlogging, but still be able to retain enough moisture to keep the plant hydrated. The pH level of the soil should be between 5.5 and 7.5, which is slightly acidic to neutral. It is also important that the soil is not too compacted, as this can inhibit the growth of the plant's roots. A light, sandy loam or loamy soil would work well for this plant.
Propagation of this plant can easily be achieved through the use of its bulbs. These bulbs can be separated and planted in a suitable soil mix, preferably in a sunny location, where they will readily take root and begin to grow. The bulbs should be set in the soil at a depth of around one inch, and watered regularly to ensure proper growth. Once established, the plant can be divided further and transplanted to other locations as needed. Care should be taken to ensure that the bulbs are not allowed to dry out, as this can impede growth and overall health.


