Plant Overview
Often called the Illawarra Plum or Brown Pine, this ancient Australian native is a living link to the prehistoric supercontinent of Gondwana. Unlike most pines, it doesn’t produce woody cones, but instead grows a bizarre, grape-like "fruit" that has been a staple "bush tucker" for Indigenous Australians for millennia. It is a slow-growing, stately evergreen that adds a touch of primeval elegance to any landscape or large container.
🔍 How to Identify
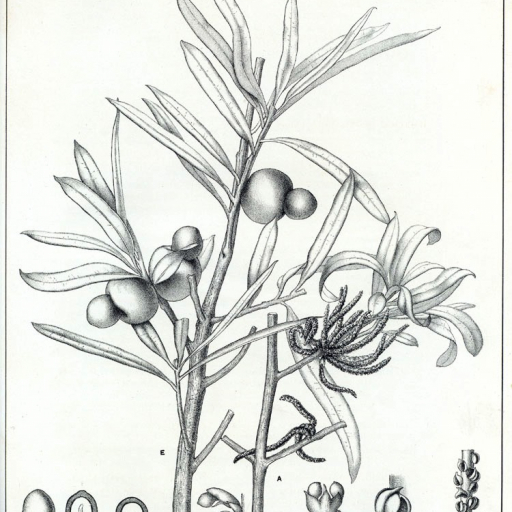
- 🍃 The Foliage: Features long, narrow, and leathery leaves that are dark glossy green. They look more like a typical broad-leaf plant than a traditional needle-like pine.
- 🍇 The "Plum": The most striking feature is the two-part fruit. It consists of a hard, green seed sitting atop a fleshy, deep-purple or black swollen stalk (the receptacle) that looks like a berry.
- 🌲 Growth Habit: In the wild, it can become a towering giant, but in a garden setting, it typically maintains a neat, columnar shape with fibrous, brownish-grey bark.
🏡 In Your Garden
- 🌱 Versatile Planting: Because it responds so well to pruning, it is a favorite for tall screens, formal hedges, or even as a unique indoor specimen when young. It is exceptionally "tough," tolerating salt spray in coastal gardens and resisting most common pests.
- 💧 Establishment Phase: While it is drought-tolerant once mature, it has a sensitive root system when young. It dislikes being moved once planted, so choose its "forever home" carefully to avoid transplant shock.
⚠️ Safety & Toxicity
- ✅ Generally Safe: The fleshy purple part of the "fruit" is edible and highly prized for its plum-like flavor with a hint of pine.
- 🚫 The Seed: While the fleshy stalk is delicious, the hard green seed attached to the end should not be eaten. It is best to keep these away from small children and curious pets to avoid any digestive upset or choking hazards.
✨ Fun Fact
The Illawarra Plum is packed with more antioxidants than blueberries! In modern Australian cuisine, the fleshy stalks are often used to make gourmet sauces and jams that pair perfectly with game meats or cheeses.

Detailed Care Instructions
| Humidity | Normal |
| Lighting | Full Sun |
| Difficulty | Medium |
| Hibernation | Cold Period |
| Hardiness Zones | 9 - 11 |
To grow a Podocarpus Elatus plant, also known as the plum pine or brown pine, you can follow these steps:
- Choose a suitable location: Podocarpus Elatus prefers a spot with full sun to partial shade. It can tolerate a wide range of soil types but prefers well-draining, slightly acidic soil.
- Propagation: There are two common methods of propagation—seed propagation and cutting propagation.
- Seed propagation: Collect seeds from ripe fruits and sow them in a well-draining potting mix. Cover the seeds lightly with soil and keep the soil consistently moist. It may take around 4-6 weeks for seeds to germinate.
- Cutting propagation: Take semi-hardwood cuttings from healthy, mature plants in late spring or early summer. Remove any leaves from the lower half of the cutting, dip the end in rooting hormone, and insert it into a container filled with a well-draining rooting medium. Keep the soil moist and place the container in a warm, bright area. Roots should start forming within a few weeks.
- Seed propagation: Collect seeds from ripe fruits and sow them in a well-draining potting mix. Cover the seeds lightly with soil and keep the soil consistently moist. It may take around 4-6 weeks for seeds to germinate.
- Planting in the garden: Once your seedlings or cuttings have become established, they can be transplanted into the ground. Dig a hole twice the size of the root ball, place the plant in the hole, and backfill with soil. Water thoroughly after planting.
- Watering: Provide regular watering, especially during the first year of growth, to help the plant establish its root system. Podocarpus Elatus prefers a moderately moist soil but can tolerate periods of drought once mature.
- Fertilizing: Apply a balanced, slow-release fertilizer in spring and mid-summer to promote healthy growth. Follow the instructions on the fertilizer label for application rates.
- Pruning: Podocarpus Elatus can be pruned to desired shape and size. It responds well to pruning and can be trimmed to form hedges or topiaries. Pruning is best done in spring or early summer before new growth appears.
- Pests and diseases: The plum pine is generally resistant to most pests and diseases. However, keep an eye out for common garden pests like aphids, scale insects, and spider mites. Treat any infestations promptly with organic or chemical insecticides.
- Winter protection: In colder regions, provide protection from frost and freezing temperatures. Mulching around the base of the plant can help insulate the roots.
By following these guidelines, you should be able to successfully grow your Podocarpus Elatus plant.

Place in a dark room with little light, like a dark bedroom or a spot far away from a window or directly in a north-facing window.

1. Determine the water requirements of the plant based on its natural habitat and growth pattern.
2. Choose a well-draining soil mix to ensure that the plant does not get waterlogged.
3. Water the plant deeply once a week, allowing the soil to dry out slightly between watering.
4. Water the plant early in the morning or late in the evening to minimize water evaporation and ensure that the plant gets sufficient water.
5. Use a watering can or hose with a fine nozzle to deliver water slowly and evenly to the base of the plant.
6. Avoid getting water on the foliage or flowers of the plant, as this can lead to fungal diseases or damage to the leaves.
7. Monitor the plant regularly for signs of over or under watering, such as wilting or yellowing leaves.
8. Adjust the watering schedule as necessary based on changes in weather, humidity, or soil conditions.
To fertilize this plant, use a balanced fertilizer with a ratio of 10-10-10. Apply the fertilizer every 2-3 months during the growing season, which is typically spring and summer. It is important to dilute the fertilizer according to the instructions on the package, and to water the plant thoroughly both before and after fertilizing to avoid damaging the roots. Avoid fertilizing during the plant's dormant period in the fall and winter.
The ideal soil for the Podocarpus Elatus plant is well-draining, slightly acidic, and rich in organic matter. It should have good water retention capacity to ensure that the roots don't dry out, but also allow excess moisture to drain away to prevent root rot. Sand or perlite can be added to improve drainage, while peat moss or compost can be used to increase organic matter content and acidity. The soil should be loose enough to allow for root development and aeration, but not too sandy or compacted. It is important to avoid using heavy, clay-like soils that retain too much water and don't allow for proper drainage. Additionally, it is recommended to use a slow-release fertilizer for optimal growth and health of the Podocarpus Elatus plant.
To propagate this plant, begin by taking cuttings from its stems in the spring or summer when the plant is actively growing. Use a sharp, sterilized tool to make a clean cut just below a node. Remove any leaves from the lower half of the cutting, leaving only a few at the top.
Prepare a propagation tray or small pot with a well-draining potting mix, and moisten the soil. Dip the end of the cutting in rooting hormone powder, tapping off any excess. Make a hole in the soil with a pencil or your finger, and insert the cutting, gently pressing the soil around it. Repeat for each cutting, spacing them at least an inch apart.
Cover the tray or pot with a clear plastic bag or dome to create a humid environment. Place it in a warm, bright location out of direct sunlight. Check the soil moisture regularly and mist the cuttings if necessary. In about 4-6 weeks, you should see new growth from the cuttings, indicating that they have rooted. When this happens, you can remove the cover and begin to acclimate the new plants to more light and less humidity. Gradually increase their exposure to outdoor conditions before transplanting them into larger pots or into the ground.