Plant Overview
Known as the Snow Pear, Pyrus nivalis is the "Silver Fox" of the orchard world. This elegant deciduous tree earned its name not from the winter cold, but from the shimmering, silvery-white down that covers its new leaves and buds in spring, making the entire canopy look like it has been dusted by a light frost. Originally from Central and Southern Europe, it is prized more for its stunning ornamental beauty than its grocery-store-style fruit.
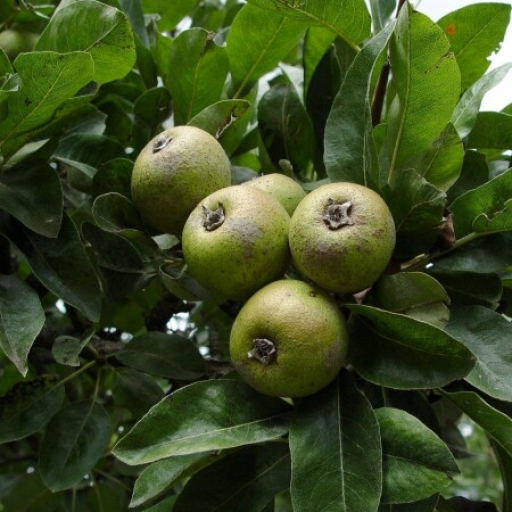
🔍 How to Identify
- ❄️ The Foliage: The most striking feature is the young leaves, which are covered in a soft, white woolly felt. As they mature, they turn a sophisticated silvery-green, eventually shifting to a vibrant yellow or red in the autumn.
- 🌸 The Blooms: In mid-spring, the tree is smothered in clusters of pure white, five-petaled flowers. Unlike some ornamental pears that have a polarizing scent, the Snow Pear is a classic herald of the new season.
- 🍐 The Fruit: It produces small, round, yellowish-green pears about 3–5 cm in diameter. They look more like giant berries or crabapples than the typical "Anjou" or "Bartlett" pear shapes.
- 🌳 The Silhouette: It typically grows into a neat, rounded, or broadly conical shape, reaching heights of 8 to 10 meters, making it an ideal "statement tree" for medium-sized gardens.
🏡 In Your Garden
- ☀️ Sun & Air: The Snow Pear is a sun-worshipper. It needs a bright, open spot to develop that iconic silvery sheen on its leaves. Good airflow is essential to prevent the foliage from staying damp, which helps it resist common pear diseases.
- 💧 Drought Resilience: Once its root system is established, Pyrus nivalis is remarkably tough. It handles dry spells much better than many other fruit trees, making it a "plant-and-thrive" choice for busy gardeners or regions with hot summers.
- 🚜 Soil Nuances: While it is adaptable, it thrives best in well-draining loamy soil. It dislikes "wet feet," so avoid planting it in a low spot where water pools after rain.
⚠️ Safety & Toxicity
- ✅ Status: Generally safe and non-toxic for humans and pets.
- 🐾 The Seeds: Like almost all members of the Rosaceae family (including apples and standard pears), the seeds contain trace amounts of amygdalin. While a few fallen fruits won't hurt your dog, it is best to prevent pets from crunching through large quantities of cores/seeds.
- 👅 The Taste Test: While the fruit is technically edible, don't expect a sweet snack! Raw Snow Pears are incredibly tart and astringent (mouth-puckering) until they are overripe or cooked.
✨ Fun Fact
The Snow Pear is a "Cider Secret." While too sour to eat off the branch, these pears are historically used to make Perry (pear cider). To make them palatable, they undergo a process called "bletting"—allowing them to sit until they are almost brown and mushy, which converts the starches into sugars!

Detailed Care Instructions
To grow Pyrus Nivalis plant, also known as the Snow Pear or Nivalis Pear, you can follow these steps:
- Climate and Soil: Pyrus Nivalis thrives in temperate climates with cold winters and moderate summers. Choose a planting spot with full sun exposure and well-draining soil. The ideal soil pH should be slightly acidic to neutral.
- Planting: Start by purchasing a healthy Pyrus Nivalis sapling from a nursery or through online sources. Dig a hole slightly larger and deeper than the root ball of the sapling. Place the sapling into the hole, ensuring that the root crown (where the roots meet the trunk) is level with or slightly above the soil surface.
- Watering: After planting, water the sapling thoroughly. Water regularly, especially during the first few months, to establish a strong root system. Provide enough water to keep the soil moist but avoid overwatering, as it can lead to root rot.
- Mulching and Fertilizing: Mulch the area around the sapling to conserve moisture, suppress weed growth, and protect the roots from extreme temperature fluctuations. Apply organic mulch like wood chips or straw around the base of the tree, keeping it a few inches away from the trunk. Fertilize the tree in early spring and late fall with a balanced fertilizer or compost to provide essential nutrients.
- Pruning: Prune the Pyrus Nivalis tree during the dormant season, typically in late winter or early spring. Remove any dead, damaged, or crossing branches to maintain good airflow and shape the tree. Regular pruning promotes healthy growth and enhances fruit production.
- Pests and Diseases: Monitor the tree for common pests and diseases such as aphids, pear psylla, fire blight, or pear scab. Treat these issues promptly using organic insecticides or disease control methods to prevent significant damage.
- Harvesting: Pyrus Nivalis fruits typically mature in late summer to early fall. Harvest the pears when they are fully ripe and have a firm but slightly yielding texture. Twist the fruit gently, and if it comes off the tree easily, it is ready for harvesting.
Remember to stay attentive to the tree's water needs, provide appropriate care, and protect it from extreme weather conditions and pests. With proper attention, your Pyrus Nivalis plant should grow and produce delicious pears for many years.

Place in a bright room that is sun drenched almost all day. Or directly in a south-facing window.

To water this plant, it is recommended to give it a thorough soaking once a week. Check the soil moisture level by inserting a finger into the soil. If it feels dry at a depth of 1-2 inches, then it is time to water. Use a watering can or hose with a gentle spray nozzle to water around the base of the plant, being careful not to get the leaves wet. Allow the water to soak in slowly, and avoid overwatering as this can lead to root rot. Adjust the watering schedule during periods of drought or excessive rainfall. Additionally, it is recommended to mulch around the base of the plant to help retain moisture and suppress weed growth.
For optimal growth, organic fertilizer should be applied during the spring season. The fertilizer should be scattered around the soil, under the plant and should be watered once a week for several weeks to ensure proper absorption. During the summer months, the soil should be periodically watered, taking care not to over-water as it may damage the plant. In the autumn months, dead leaves and branches should be cleared in order to prevent the accumulation of mildew or other fungi. It is recommended to avoid fertilizer during the winter months.
For the Pyrus Nivalis plant, it is best to use a well-draining soil that is rich in organic matter. The soil should be slightly acidic to neutral, with a pH range of 5.5-7.0. It is important to avoid using heavy or compacted soils, as this can lead to poor drainage and root rot. A blend of peat moss, sand, and vermiculite can be mixed with topsoil to create a suitable growing medium for the Pyrus Nivalis plant. Additionally, adding compost or other organic fertilizers can help to provide the plant with the necessary nutrients for optimal growth. It is also recommended to mulch around the base of the plant to retain moisture and prevent weeds.
To propagate this species of plant, the first step is to gather mature seeds from a healthy parent plant. Once collected, the seeds should be cleaned and stored in a cool, dry place until ready to be planted.
To plant the seeds, prepare a well-draining soil mix in a small container with drainage holes. Sow the seeds about 1 inch deep in the soil, and cover lightly with more soil. Water lightly and cover the container with a plastic bag or lid to create a mini greenhouse effect. Place the container in a warm, bright spot but out of direct sunlight.
After about 3-4 weeks, the seeds should start to germinate. At this stage, remove the plastic cover and provide partial shade to prevent the young seedlings from drying out. As they grow, gradually increase the amount of sunlight they receive.
Once the seedlings have developed a few sets of true leaves, they can be transplanted into larger containers or out into the garden. Take care not to damage the delicate roots during the transplant process.
Alternatively, mature plants can be propagated from cuttings. Select a healthy stem with several nodes, and make a clean, angled cut just below a node. Remove the leaves from the lower part of the stem and dip the cut end into rooting hormone powder. Plant the cutting into a well-draining soil mix and cover with a plastic bag or lid to maintain humidity. Place in a bright, warm spot but out of direct sunlight. The cutting should start to root within a few weeks.


