Plant Overview
Often called the Northern Pin Oak or Hill's Oak, this majestic tree is a true survivor of the American Midwest and Great Lakes regions. While it looks remarkably similar to its cousin, the common Pin Oak, this species is much tougher, thriving in sandy, dry soils where other oaks might wither. It is most famous for its dramatic autumn display, when the canopy transforms into a glowing torch of deep crimson and russet red.
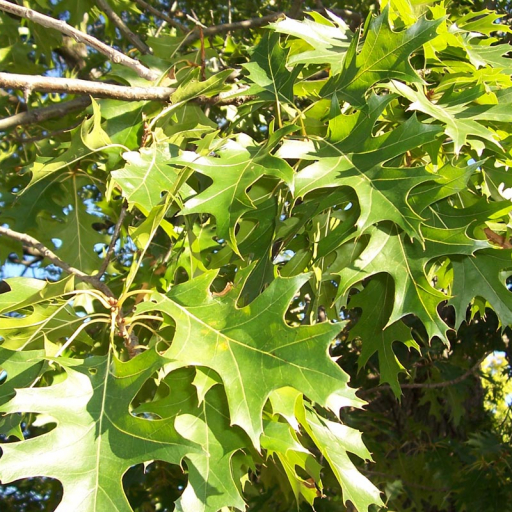
🔍 How to Identify
- 🍃 The Leaves: Deeply lobed with 5 to 7 "fingers" separated by wide, U-shaped gaps (sinuses). The tips end in sharp, hair-like bristles typical of the red oak family.
- 🌰 The Acorns: The easiest way to tell it apart! The acorns are distinctively elliptical or football-shaped, sitting in a hairy, bowl-like cup that covers nearly half of the nut.
- 🌲 The Silhouette: It features a unique branching habit where the upper branches reach for the sky, the middle branches are horizontal, and the lower branches droop elegantly toward the ground.
🏡 In Your Garden
- 🏜️ Tough as Nails: Unlike the standard Pin Oak which demands moist soil, the Northern Pin Oak is highly drought-tolerant. It is the perfect choice for "problem areas" with sandy or gravelly soil where nothing else seems to grow.
- 🦉 Wildlife Hub: This tree is a biological skyscraper. It provides critical nesting sites for owls and hawks, while its acorns are a vital winter food source for squirrels, turkeys, and blue jays.
- ✂️ Space Considerations: Because the lower branches naturally droop, it may need "limbing up" if planted near a sidewalk or driveway to ensure you have walking clearance beneath the canopy.
⚠️ Safety & Toxicity
- 🟢 Safe for Most: The Northern Pin Oak is generally non-toxic to humans; however, the acorns and leaves contain high concentrations of tannins.
- 🐕 Pet Caution: While not "poisonous" in the traditional sense, if a dog or horse consumes a large number of acorns, the tannins can cause significant stomach upset or even kidney issues.
- 🧤 Garden Safety: The pointed tips of the leaves are stiff and can be surprisingly sharp when the leaves dry out in the fall, so wear gloves during autumn raking!
✨ Fun Fact
The Northern Pin Oak is a master of "marcescence." This means that younger trees often refuse to drop their dead, brown leaves in the winter, holding onto them until the new buds push them off in the spring. This provides extra winter cover for small birds and creates a beautiful rustling sound in the wind.

Detailed Care Instructions
To grow Quercus ellipsoidalis, commonly known as Northern Pin Oak, you can follow these steps:
- Choose the right location: Quercus ellipsoidalis prefers full sun but can tolerate partial shade. Ensure that the selected location has well-draining soil to prevent waterlogging.
- Prepare the soil: Work the soil to about 12 inches deep and remove any weeds or grass. Add organic compost or aged manure to improve soil fertility and drainage.
- Planting: Dig a hole that is wide and deep enough to accommodate the plant's root ball. Gently remove the plant from its container and place it in the hole. Ensure that the top of the root ball is level with the surrounding soil. Backfill the hole with soil, firming it gently around the roots.
- Watering: Water the plant thoroughly after planting to settle the soil and help the roots establish. Keep the soil consistently moist but not waterlogged during the plant's first year. Gradually reduce watering once the plant is established, as Quercus ellipsoidalis is tolerant of drought conditions.
- Mulching: Apply a layer of organic mulch, such as wood chips or straw, around the base of the plant. Mulching helps retain soil moisture, regulate soil temperature, and prevent weed growth. Leave a gap around the trunk to avoid moisture accumulation on the bark.
- Pruning: Prune Quercus ellipsoidalis during the dormant season to remove any dead or damaged branches. Additionally, you can shape the tree as desired but avoid excessive pruning, as it may weaken the plant.
- Fertilizing: Quercus ellipsoidalis is generally low maintenance and doesn't require regular fertilization. However, if the plant shows signs of nutrient deficiency, you can apply a balanced slow-release fertilizer in early spring.
- Pest and disease control: Monitor the plant regularly for pests such as gypsy moths or oak wilt disease. Treat any infestations or diseases promptly using appropriate insecticides or fungicides. Consult a local arborist or horticulturist for specific recommendations.
- Winter care: Quercus ellipsoidalis is cold hardy but can benefit from winter protection in extremely harsh climates. Mulch the base of the tree with a thick layer of straw or wood chips to insulate the roots and prevent freezing.
- Patience: Remember that growing Quercus ellipsoidalis takes time. It is a slow-growing oak species and may take several years to reach its full potential. Be patient and provide consistent care to help it thrive.
Note: It is always recommended to consult local gardening resources or professionals for region-specific guidelines and to ensure the best chance of success when growing any plant species.

Place in a bright room that is sun drenched almost all day. Or directly in a south-facing window.

To water this plant, ensure that the soil is dry to the touch before watering. Water the plant slowly and evenly until the soil is moist, but not waterlogged. Allow the top inch of soil to dry out before the next watering to prevent overwatering. Avoid getting water on the leaves, as this can promote fungal growth. In periods of drought, it may be necessary to water the plant more frequently to prevent stress.
- Choose a balanced fertilizer with equal ratios of nitrogen, phosphorus, and potassium.
- Begin fertilizing in the early spring before new growth appears.
- Spread the fertilizer evenly around the base of the plant, avoiding the trunk.
- Water the plant deeply after fertilizing to help distribute the nutrients.
- Repeat fertilizing every 4-6 weeks throughout the growing season.
- Decrease fertilizing in late summer to avoid promoting new growth that could be damaged by winter cold.
- Use caution not to over-fertilize, which can damage the plant and harm the environment.
The best soil to use for the Quercus Ellipsoidalis plant is one that is well-draining and nutrient-rich. The pH of the soil should be slightly acidic, between 5.5 and 6.5. The plant grows best in loamy soil that is a mix of sand, silt, and clay, and that is rich in organic matter. It can tolerate slightly sandy or clay soils, but not those with a high amount of salt. The soil should be moist but not waterlogged, and should be allowed to dry out slightly between watering. It is also recommended to mulch around the base of the plant with a layer of organic matter, such as compost or leaf litter, to help retain moisture in the soil and suppress weed growth.
To propagate this plant, you will need to take a stem cutting from a healthy parent plant. Choose a stem that has at least 2-3 nodes (where leaves emerge from the stem) and is free of any diseases or pests. Using a sharp, clean pair of scissors or a knife, make a clean cut just below the lowest node on the stem.
Remove any leaves from the bottom half of the stem, leaving only a few at the top. Dip the cut end of the stem into a rooting hormone powder, which will help it develop roots more quickly.
Fill a small container with a well-draining potting mix, and make a hole in the center with a pencil or your finger. Insert the stem cutting into the hole, and gently press the soil around it to hold it in place.
Water the cutting thoroughly, and place a clear plastic bag over the top of the container to create a humid environment. This will help the cutting retain moisture and encourage root growth. Keep the container in a warm, bright location but out of direct sunlight.
Check the cutting regularly and mist the inside of the plastic bag if it appears to be drying out. After several weeks, gently tug on the stem to see if it has developed roots. Once you feel some resistance, it is ready to be transplanted into a larger pot or planted directly into the ground.


