Plant Overview
The Quesnelia Testudo, affectionately known as the Turtle Quesnelia, is a rugged yet radiant beauty hailing from the coastal rainforests of Brazil. Its name "testudo" comes from the Latin word for "turtle" or "shell," referring to the way its protective, overlapping floral bracts look like a tortoise’s shield. This plant is a favorite among collectors who want a "set-it-and-forget-it" tropical showstopper that looks like a piece of living architecture.
🔍 How to Identify
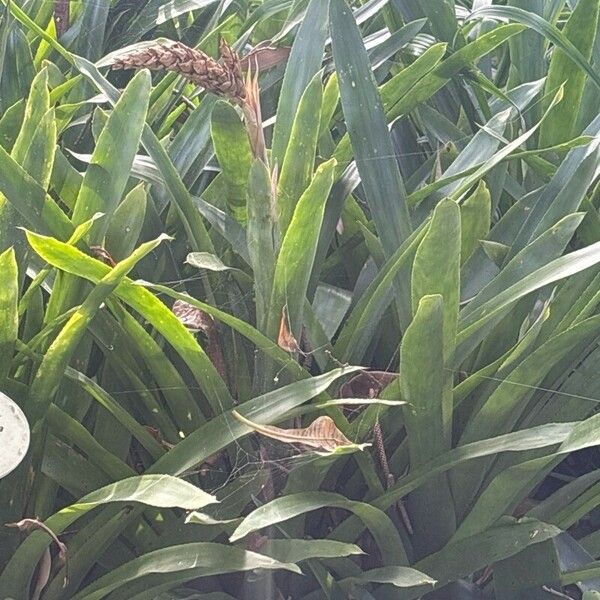
- 🐢 The Rosette: It grows in a stiff, upright vase shape with leathery, strap-like leaves that are deep emerald green.
- 🪚 The Edges: Look closely at the leaf margins—they are armed with fine, sharp "teeth" or serrations that give the plant a fierce look.
- 🔥 The "Torch": When it blooms, a thick stalk emerges from the center, crowned with a dense, cone-like head of brilliant hot-pink bracts and small, contrasting violet-blue flowers.
🏡 In Your Garden
- 💧 The Central Tank: Like many bromeliads, this plant is designed to catch rainwater. In a home setting, you should keep the central "cup" or "tank" filled with fresh water, but ensure the soil itself stays relatively dry to prevent root rot.
- ☀️ Light Nuance: While it loves bright light to bring out its colors, direct midday sun can scorch the leaves. It thrives best when it mimics its natural life under the Brazilian forest canopy—think "dappled" or "filtered" sunlight.
- 🪵 Drainage is Key: Because it often grows on rocks or trees in the wild, it hates heavy, soggy soil. Use an orchid mix or a very chunky bark-based substrate to keep the roots breathing.
⚠️ Safety & Toxicity
- 🟢 Status: Non-toxic to humans, cats, and dogs.
- ⚔️ Physical Hazard: While not poisonous, the serrated edges of the leaves are very sharp. Place it away from high-traffic areas where children or pets might accidentally brush against it, as it can cause painful skin scratches.
✨ Fun Fact
In its native Brazilian habitat, the Quesnelia Testudo is a high-end "hotel" for biodiversity. The water held in its central tank provides a miniature ecosystem for tiny tree frogs and insects, while its vibrant pink "torch" is a primary target for hungry hummingbirds!

Detailed Care Instructions
Quesnelia testudo is a type of bromeliad plant that is relatively easy to grow and care for. Here are some tips on how to grow Quesnelia testudo:
- Light: Quesnelia testudo thrives in bright, indirect light. Place the plant near a window where it can receive plenty of natural sunlight, but avoid direct sunlight which can scorch the leaves.
- Temperature: Quesnelia testudo prefers warm temperatures between 60-80°F (15-27°C). Avoid exposing the plant to temperatures below 50°F (10°C).
- Watering: Water the plant when the top inch of soil feels dry to the touch. Be sure to water the plant at the base of the leaves to prevent water from accumulating in the center rosette, which can lead to rotting.
- Humidity: Quesnelia testudo prefers high humidity levels. You can increase humidity by misting the plant regularly or placing a humidifier nearby.
- Fertilization: Fertilize Quesnelia testudo with a balanced liquid fertilizer diluted to half the recommended strength once a month during the growing season (spring and summer).
- Repotting: Repot Quesnelia testudo every 2-3 years in a well-draining potting mix. Make sure to choose a pot with drainage holes to prevent waterlogging.
- Pests and diseases: Keep an eye out for common houseplant pests like spider mites, mealybugs, and scale insects. Treat any infestations promptly with insecticidal soap or neem oil.
By following these tips, you can successfully grow and care for Quesnelia testudo plant in your home or garden.
The Quesnelia Testudo plant should be watered by thoroughly moistening the soil, allowing excess water to drain out of the bottom of the pot. It is important to water the plant when the top inch of soil feels dry to the touch, typically every 1-2 weeks depending on environmental conditions. Ensure that the plant is not sitting in standing water, as this can lead to root rot. Additionally, it is important to water the plant at the base and avoid getting water on the leaves to prevent the risk of fungal diseases. Consider using room temperature water to avoid shocking the plant's roots.
To fertilize a Quesnelia Testudo plant, use a balanced, water-soluble fertilizer with an N-P-K ratio of 10-10-10 or similar. Fertilize the plant every 2-3 months during the growing season, typically from spring to fall. Dilute the fertilizer to half-strength and apply it to the soil around the base of the plant, being careful not to get any on the leaves. Water the plant thoroughly after fertilizing to help dissolve and distribute the nutrients. Avoid over-fertilizing, as this can cause damage to the plant.
Quesnelia Testudo plants thrive in well-draining, nutrient-rich soil. A suitable soil mixture for these plants can consist of a combination of peat moss, perlite, and pine bark. This mixture provides the plant with adequate aeration, moisture retention, and essential nutrients. Additionally, adding some sand to the soil mix can help improve drainage and prevent waterlogging, which can be detrimental to the plant's health. When repotting or planting Quesnelia Testudo, ensure that the soil is slightly acidic to neutral pH level to promote healthy growth. Regularly check the soil moisture levels and water the plant only when the top inch of the soil has dried out to prevent overwatering.
To propagate Quesnelia Testudo plants, you can use division or offsets.
- Division: When the plant has outgrown its container, carefully remove it from the pot and gently separate the clumps of the plant into smaller sections using a sharp, clean knife. Each divided section should have roots attached to ensure successful propagation. Repot the divided sections into separate containers with fresh, well-draining soil.
- Offsets: Quesnelia Testudo plants typically produce offsets or "pups" around the base of the mother plant. These offsets can be carefully removed and planted in their own pots to establish new plants. To do this, gently twist or cut the offset away from the mother plant, making sure it has roots attached. Plant the offset in a small pot with well-draining soil and water it regularly to encourage root growth.
Both division and offsets propagation methods can be done during the plant's active growing season, which is typically in the spring or summer months. Provide the newly propagated plants with the same care as the parent plant, including adequate sunlight, water, and occasional fertilization to help them establish and thrive.


