Plant Overview
Often found swaying in the moist meadows and marshlands of Western North America, the Straightbeak Buttercup is a bright burst of sunshine in damp places. Known to botanists as Ranunculus orthorhynchus, its common name refers to the distinctive, spear-like "beak" found on its seeds. While it looks delicate, it is a hardy survivor that thrives in soggy soils where few other flowers can compete.
🔍 How to Identify
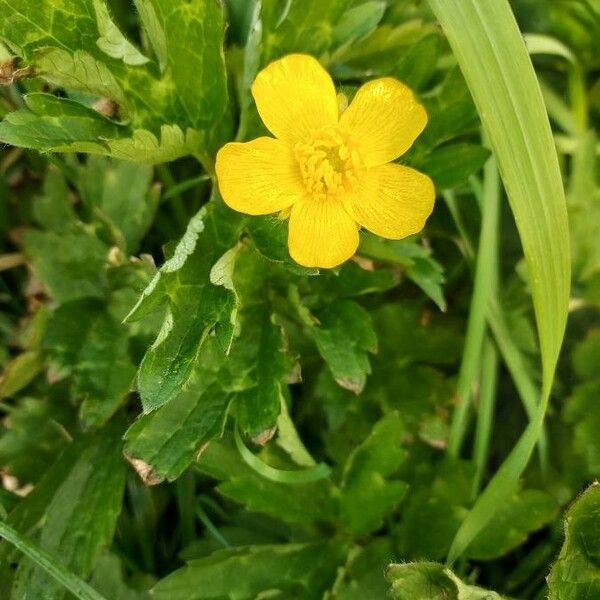
- 🌼 Glossy Petals: It features 5 to 8 brilliant yellow petals with a distinct waxy sheen. This "lacquered" look is caused by a layer of air between the skin and the pigment, which reflects light intensely.
- 🌿 Birdfoot Foliage: The leaves are deeply divided into three to five lobes, often resembling the shape of a bird's footprint. They are usually hairier than other buttercup species.
- 📍 The "Beak": Once the flower fades, it leaves behind a cluster of seeds (achenes). Each seed has a notably long, straight, and pointed tip—the "straight beak" that gives the plant its name.
🏡 In Your Garden
- 💧 Wetland Specialist: This isn't your typical flower-bed plant; it craves "wet feet." It is the perfect choice for rain gardens, the edges of ponds, or low spots in your yard that stay muddy throughout the spring.
- 🐝 Early Pollinator Support: Because it blooms early and thrives in cool, wet conditions, it provides a vital early-season nectar source for native bees and small butterflies.
⚠️ Safety & Toxicity
- 🚫 Toxic if Ingested: All parts of the plant are toxic to humans, dogs, cats, and livestock. It contains a bitter oil called protoanemonin that can cause mouth sores and digestive distress.
- 🧤 Skin Irritation: Sap from crushed leaves or stems can cause redness or even "buttercup blisters" on sensitive skin. It is wise to wear gloves if you are weeding or thinning these plants out.
✨ Fun Fact
The genus name Ranunculus is Latin for "little frog." This name was chosen by ancient botanists because these flowers are so frequently found growing in wet areas alongside frogs and tadpoles!

Detailed Care Instructions
To grow Ranunculus Orthorhynchus, follow these steps:
- Choose a suitable planting location: Ranunculus Orthorhynchus prefers full sun to partial shade. Look for a well-draining area with loamy or sandy soil.
- Prepare the soil: Before planting, loosen the soil and remove any weeds or rocks. You can also mix in some organic matter like compost or well-rotted manure to improve the soil structure.
- Planting: Plant the Ranunculus Orthorhynchus tubers in the prepared soil during the early spring or fall. Dig holes that are about 2-3 inches deep and space them about 6-8 inches apart. Place the tubers flat side down and cover them with soil, gently firming it around the tuber.
- Watering: After planting, water the tubers thoroughly to settle the soil. Keep the soil consistently moist during the growing season, but avoid overwatering, as it can lead to rotting. Water deeply when the top inch of soil feels dry.
- Fertilizing: Apply a balanced, slow-release fertilizer when the shoots emerge in the spring. Follow the package instructions for the correct dosage. Avoid overfeeding, as it can lead to excessive foliage growth instead of flowers.
- Mulching: Applying a layer of mulch around the plants can help conserve moisture, suppress weed growth, and regulate soil temperature. Use organic mulch like straw or wood chips, but keep it away from the plant's crown to prevent rot.
- Pruning: Deadhead the spent flowers regularly to encourage more blooms. Once the foliage turns yellow and dies back in the late spring or early summer, you can cut it back to the ground.
- Overwintering: In colder regions, Ranunculus Orthorhynchus may not survive the winter. To overwinter, dig up the tubers after the foliage dies back and store them in a cool, dry place until the next planting season.
- Pests and diseases: Monitor your plants regularly for signs of pests like aphids or slugs. Treat any infestations promptly with organic pest control methods. Ranunculus Orthorhynchus is generally resistant to diseases.
By following these steps, you can successfully grow Ranunculus Orthorhynchus and enjoy its beautiful blooms.

Place in a bright room that is sun drenched almost all day. Or directly in a south-facing window.

To water this plant, first make sure that the soil is dry to the touch before watering. Use a watering can or hose to gently water the soil around the base of the plant, being careful not to splash water on the leaves or flowers. Water the plant deeply, making sure that the water reaches the roots. Avoid overwatering, as this can cause root rot and other issues. Watering frequency will depend on factors such as the climate, soil type, and plant size, but generally, this plant prefers regular watering during the growing season and reduced watering during the dormant season.
To fertilize this plant, wait until it is actively growing. Apply a slow-release fertilizer that is high in nitrogen and phosphorus. Use about 1 tablespoon per square foot of growing area and gently work it into the soil around the base of the plant. Water the plant well after applying fertilizer. Repeat the fertilizer application once or twice during the growing season, following the same instructions as above. Be careful not to over-fertilize, as this can damage the plant.
Ranunculus Orthorhynchus prefers a well-draining soil that is moist but not waterlogged. It is important to use soil that is rich in organic matter and nutrients to support healthy growth and flowering. A sandy loam soil with a pH of 6.0-7.5 is ideal for this plant. Avoid using heavy clay soils or soils with poor drainage as they can suffocate the roots and lead to root rot. The plant can be grown directly in the garden or in containers with soil that meets these requirements. It is important to provide adequate water and fertilization throughout the growing season to promote healthy growth and flowering.
To propagate this plant, select healthy and mature plant specimens for cutting. Take cuttings of around 4 to 6 inches from the top of the stem using a sharp and sterile knife or pruning shears. Make sure to choose a stem that has at least one or two nodes, as these are where the roots will emerge.
Remove the lower leaves from the cutting, leaving only a few leaves at the top. Dip the end of the stem in rooting hormone powder to encourage root growth. Make a small hole in well-draining soil and plant the cutting, ensuring that the soil is moist but not waterlogged.
Place the cutting in a warm and bright location with indirect sunlight, but avoid direct sunlight which can damage the cutting. Cover the cutting with a plastic bag or container to maintain humidity levels and increase the chances of successful rooting.
Keep the soil moist and monitor the development of the cutting regularly for signs of rooting such as new growth or resistance when gently tugged. Once roots have developed, transplant the new plant to its permanent location in well-draining soil and provide adequate water and sunlight for growth and development.


