Plant Overview
Often called the Japanese Azalea or Rengetsu-tsutsuji, this deciduous shrub is a crown jewel of East Asian landscapes. Unlike its evergreen cousins, this plant puts on a dramatic seasonal performance, shedding its foliage to reveal a sculptural skeleton before erupting in a riot of fiery orange and gold each spring. It has been a staple of Japanese poetry and art for centuries, symbolizing the arrival of warmer days.
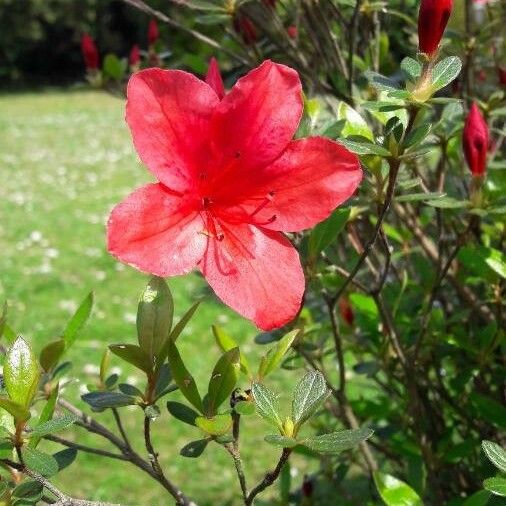
🔍 How to Identify
- 🌺 Vibrant Blooms: Large, funnel-shaped flowers that usually appear in striking shades of orange, salmon, or yellow. They often bloom in clusters of 6 to 12 before the leaves fully emerge.
- 🍃 Hairy Foliage: The oblong leaves are distinctively textured with fine, bristly hairs along the edges and surface, giving them a slightly matte, soft appearance.
- 🌿 Deciduous Habit: Unlike many common rhododendrons that stay green all year, this species loses its leaves in winter, often turning lovely shades of yellow or red before falling.
🏡 In Your Garden
- 🧪 Acidic Preferences: This plant is an "acid-lover" (ericaceous). It requires a low soil pH to thrive; if planted in alkaline soil, its leaves will turn yellow—a cry for help known as chlorosis.
- 💧 Drainage is Key: While it loves moisture, it absolutely hates "wet feet." It needs rich, organic soil that drains quickly to prevent root rot, making it perfect for raised beds or sloped woodland gardens.
- ⛅ Dappled Shade: It prefers a "Goldilocks" lighting situation. Too much sun will scorch the delicate flowers, while too much shade will result in "leggy" growth and fewer blooms.
⚠️ Safety & Toxicity
- 🚫 High Toxicity: Warning. All parts of the Rhododendron Japonicum are highly toxic if ingested by humans or animals.
- 🐾 Risk to Pets & Kids: The plant contains grayanotoxins, which can cause vomiting, heart palpitations, and respiratory issues. Keep it away from curious pets and ensure children know the flowers are "for looking, not touching." Even honey made by bees that frequent these flowers can be toxic (historically known as "Mad Honey").
✨ Fun Fact
In Japan, this plant is so beloved that it has been designated as the official "Prefectural Flower" of Gunma. It is often found growing wild on volcanic mountain slopes, creating breathtaking "burning" hillsides during its peak blooming season in May.

Detailed Care Instructions
To grow Rhododendron Japonicum successfully, follow these steps:
- Choose a suitable planting location: Rhododendron Japonicum prefers partial shade to filtered sunlight. Select a spot with well-draining, acidic soil.
- Soil preparation: Ensure the soil is loose, moist, and rich in organic matter. Amend the soil with acidic organic materials like peat moss, pine needles, or compost to create optimal growing conditions.
- Planting: Dig a hole that is twice as wide and as deep as the root ball of your Rhododendron Japonicum. Gently remove the plant from its container and place it in the hole, making sure it sits at the same level as it was in the pot. Backfill the hole with soil and lightly firm it around the base of the plant.
- Watering: Rhododendrons have shallow roots, so regular watering is essential. Keep the soil consistently moist but not waterlogged. Use a soaker hose or drip irrigation system to provide deep, thorough watering sessions rather than frequent shallow watering.
- Mulching: Apply a layer of organic mulch around the base of the plant to retain moisture, suppress weed growth, and maintain a cool root zone. Use materials like pine bark, wood chips, or pine needles, and keep the mulch about 2-3 inches away from the plant's stem to prevent moisture-related issues.
- Fertilizing: Rhododendrons benefit from regular feeding. Use a slow-release, acidic fertilizer specifically formulated for rhododendrons. Follow the package instructions for application rates and timing. Avoid over-fertilization as it can harm the plant.
- Pruning: Prune your Rhododendron Japonicum after flowering to shape the plant and remove any dead or damaged wood. Avoid excessive pruning, as it can reduce blooming potential.
- Protection: In colder climates, protect the plant during winter by covering it with burlap or providing a windbreak. This will shield it from harsh winds and extreme cold temperatures.
- Pest and disease control: Monitor your Rhododendron Japonicum for common pests like aphids, spider mites, or lace bugs. Treat any infestations promptly using suitable organic or chemical controls. Also, inspect the plant regularly for signs of diseases like powdery mildew or root rot. If detected, take appropriate actions to prevent further spread.
- Provide shade and cool roots: Ensure the plant has some shade during the hottest parts of the day, especially in regions with intense summer heat. Adding a thick layer of mulch around the plant can help keep the roots cool during warmer periods.
By following these guidelines and providing the proper care, your Rhododendron Japonicum should thrive and produce beautiful blooms.

Place in a window with dappled sun or a spot in the middle of a room. Or directly in a window facing west or east.

To properly water this plant, you should first ensure that the soil is well-draining. This can be achieved by adding organic matter such as compost or peat moss to the soil before planting. Once planted, water deeply and regularly, ensuring that the soil stays consistently moist but not waterlogged. Check the soil moisture by sticking your finger about an inch into the soil – if it feels dry, it’s time to water. Avoid letting the soil completely dry out between waterings, as this can stress the plant. In addition, avoid watering the leaves or flowers of the plant, as this can encourage disease. Instead, aim to water at the base of the plant, allowing the water to soak deeply into the soil. During periods of extreme heat or drought, the plant may need more frequent watering to stay healthy.
To fertilize this particular plant, use a slow-release acidic fertilizer in the spring, right before new growth starts. Apply the fertilizer evenly around the base of the plant, staying at least 6 inches away from the trunk. Be careful not to over-fertilize, as this can damage the plant. Water the plant after fertilizing to help the nutrients soak into the soil.
Rhododendron Japonicum plant prefers well-draining acidic soil that is rich in organic matter. A soil pH level between 4.5 and 5.5 is ideal for this plant. Heavy clay soils should be amended with peat moss, pine bark, or other acidic organic matter to improve drainage and increase organic content. Avoid using limestone, wood ash, or other alkaline soil amendments, as they can significantly raise soil pH levels and harm the plant. In addition, Rhododendron Japonicum plant is sensitive to high levels of salts, so it is recommended to use a low-salt fertilizer formulated specifically for acid-loving plants.
To propagate this plant, you will first need to collect some cuttings from a healthy plant. Make sure the cuttings are about 2-3 inches long and have at least 2-3 leaves on them.
Next, prepare a potting mix using equal parts peat moss and sand or perlite. Moisten the mix and fill a small container with it.
Remove the lower leaves from the cuttings, leaving only one or two sets of leaves at the top. Dip the cut end of each cutting into rooting hormone powder.
Make a small hole in the potting mix and insert the cutting into the hole. Gently press the mix around the base of the cutting to hold it in place.
Cover the container with a plastic bag or plastic wrap to create a humid environment. Place the container in a bright, but indirect, location. Check the container every few days to make sure the potting mix is moist.
After a few weeks, check the cuttings for any signs of new growth. Once new growth appears, you can remove the plastic covering and allow the plant to acclimate to its environment.
Once the plant has grown roots, you can transplant it into a larger container or in a suitable garden spot.


