Plant Overview
Often confused with its famous cousin, the Dog Rose, Rosa corymbifera is a wild beauty that graces rural hedgerows with delicate, clustered blooms. Known for its arching stems and incredible resilience, it is a plant that tells a story of survival and ancient lineage, often acting as the rugged ancestor to many modern garden varieties. It is frequently sought after by naturalists for its ability to thrive in harsh, uncultivated landscapes where more delicate roses would falter.
🔍 How to Identify
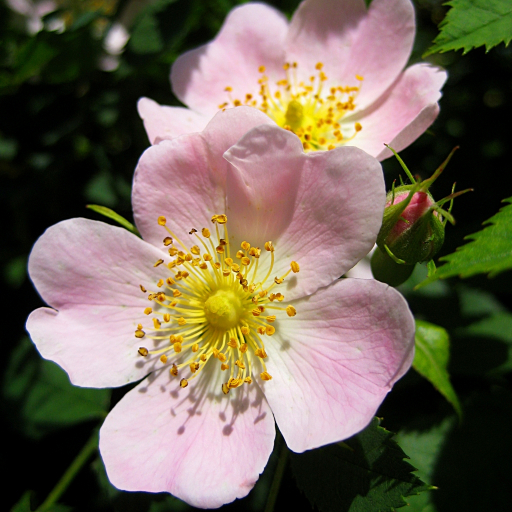
- 🌸 Cluster Blooms: The name "corymbifera" literally means "bearing corymbs." Unlike solitary roses, these flowers appear in flat-topped clusters of 3 to 15 pale pink or white blossoms.
- 🌿 Serrated Foliage: Each leaf is composed of 5 to 7 leaflets with sharply toothed edges. The undersides of the leaves are often slightly hairy, which helps distinguish it from the completely smooth leaves of the common Dog Rose.
- 🏹 Hooked Prickles: The stems are armed with stout, downward-curving thorns. These aren't just for defense; they act like grappling hooks, allowing the rose to "scramble" and climb over neighboring trees and fences.
🏡 In Your Garden
- 🌱 Rugged Adaptability: This rose is exceptionally hardy and isn't picky about soil pH. It thrives in heavy clay or chalky ground where other roses might struggle, making it an ideal choice for a "wild" garden or a security hedge.
- 🦋 Pollinator Paradise: Because the flowers are "single" (meaning they have only one row of petals), the nectar and pollen are easily accessible. It is a favorite for bumblebees and hoverflies during the early summer months.
⚠️ Safety & Toxicity
- 🛡️ Physical Hazard: The primary risk is mechanical. The hooked thorns are designed to grab and hold, so heavy-duty leather gloves are essential when pruning or moving the plant.
- 🐾 Pet & Child Safety: The plant is generally non-toxic to humans and pets. However, the red "hips" (fruits) contain tiny, irritating hairs inside. If swallowed in large quantities, these hairs can cause an "itchy bottom" or mild throat irritation.
✨ Fun Fact
- 💊 The Vitamin C Hero: During World War II, when citrus fruits were impossible to import into many parts of Europe, wild roses like Rosa corymbifera were harvested by the ton. The hips were processed into syrup to provide a vital source of Vitamin C for children and soldiers.

Detailed Care Instructions
To grow Rosa Corymbifera, also known as the Chinese rose or the Japanese rose, follow these steps:
- Location: Choose a sunny spot in your garden that receives at least 6-8 hours of direct sunlight every day. The plant can tolerate a variety of soil types but prefers well-draining soil.
- Planting: Dig a hole that is twice as wide and deep as the plant's container. Remove the plant from its container and gently loosen the roots. Place the plant in the hole and backfill with soil, ensuring that the bud union (the swollen section where the rose is grafted onto the rootstock) remains above the soil level.
- Watering: Give the newly planted rose a thorough watering immediately after planting. Water regularly during the growing season, ensuring that the soil stays consistently moist but not waterlogged. During dry periods, increase the frequency of watering.
- Mulching: Apply a layer of organic mulch around the base of the plant to help retain moisture, suppress weed growth, and regulate soil temperature. Keep the mulch a few inches away from the stems to prevent rot.
- Fertilizing: Feed the Rosa Corymbifera plant with a balanced, slow-release rose fertilizer in early spring. Follow the package instructions for application rates. Additionally, you can supplement with liquid rose fertilizer every 4-6 weeks during the growing season.
- Pruning: Prune the plant in late winter or early spring to remove dead or damaged wood. Remove any crossing branches and shape the plant as desired. Regular pruning helps maintain the health and shape of the rose.
- Pest and Disease Control: Monitor the plant regularly for common rose pests such as aphids, thrips, and spider mites. Treat any infestations promptly using organic or chemical insecticides. Additionally, be on the lookout for common rose diseases like black spot or powdery mildew. Use appropriate fungicides to manage these issues.
- Winter Care: Rosa Corymbifera is generally hardy enough to survive winter cold, especially if you live in USDA hardiness zones 5-9. However, adding a layer of mulch around the base of the plant can help protect it from severe cold and temperature fluctuations.
By following these steps, you can successfully grow Rosa Corymbifera in your garden and enjoy its beautiful blooms.

Place in a bright room that is sun drenched almost all day. Or directly in a south-facing window.

To water this particular plant, it is important to pay attention to the soil moisture level and weather conditions. The plant should be deeply watered every 7-10 days when the top 1-2 inches of soil feels dry. It is important to water the plant at the base, avoiding getting water on the leaves and flowers which can cause damage or disease. During hot and dry weather conditions, the plant may need to be watered more frequently. It is also important to ensure proper drainage to prevent waterlogging and root rot.
To fertilize this plant, apply a slow-release, balanced fertilizer in early spring as new growth appears. Follow the manufacturer's instructions for application rates and frequency. Avoid fertilizing during periods of drought or when the soil is dry. A soil test can help you determine if additional nutrients are needed. Water thoroughly after fertilizing to avoid damaging the roots.
The recommended soil for the plant in question should be a mixture of loamy soil and sand. It should be well-draining to prevent waterlogging, which can lead to root rot. The pH should be slightly acidic, around 6.0-6.5. The soil should be enriched with organic matter, such as compost or well-rotted manure, to promote healthy growth. The soil should not be too heavy, as this can impede root development and inhibit water and nutrient uptake. It should also not be too sandy, which can cause water to drain too quickly and leave the plant without enough moisture.
To propagate this plant, start by selecting a healthy and mature stem from the plant. Using a sharp and sterile pair of pruning shears, cut the stem at a 45-degree angle and remove any leaves from the lower third of the stem.
Next, prepare a rooting hormone solution according to the instructions on the packaging. Dip the cut end of the stem into the rooting hormone solution and tap it gently to remove any excess powder.
Fill a small pot with a well-draining soil mix and make a hole in the center using a pencil or your finger. Insert the stem into the hole and gently firm the soil around it.
Water the cutting thoroughly and place a clear plastic bag over the pot to create a mini greenhouse environment. Place the pot in a warm and bright location, but away from direct sunlight.
Check the soil moisture regularly and water as needed to keep it moist but not waterlogged. After a few weeks, check for signs of rooting by gently tugging on the stem. If there is resistance, roots have likely formed.
Once the cutting has developed a healthy root system, remove the plastic bag and slowly acclimate it to its new environment by gradually increasing the amount of time it spends outside of the mini greenhouse over several days. Transplant the rooted cutting into a larger pot or into the garden once it has acclimated and grown stronger.


