Plant Overview
Often called the "Chestnut Rose" or the "Burr Rose," Rosa roxburghii is a vintage horticultural gem hailing from the mountain slopes of China and Japan. Unlike the sleek, modern hybrid teas found in most florist shops, this species offers a rugged, prehistoric charm. It is beloved by collectors for its unique, spiky seed pods and its peeling, papery bark that adds winter interest to the garden.
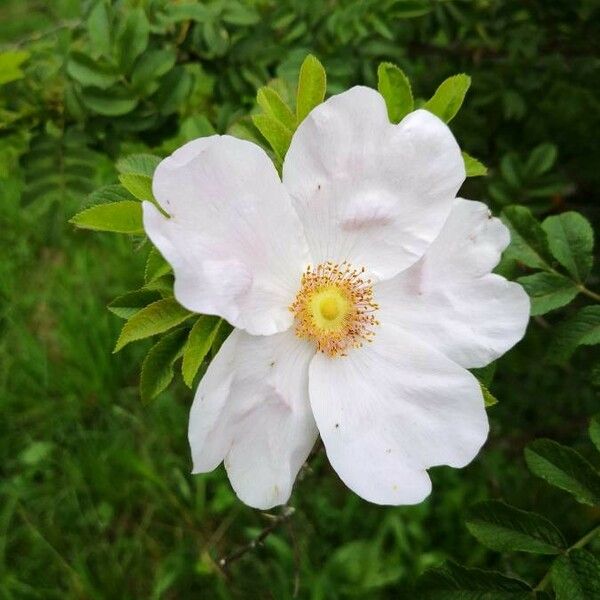
🔍 How to Identify
- 🌸 The Blooms: Features ruffled, multi-petaled (double) flowers in shades of shell-pink to deep rose. They have a light, sweet fragrance reminiscent of old-fashioned tea roses.
- 🌿 Fern-like Foliage: The leaves are unusually small and dainty, consisting of 7 to 15 tiny leaflets, giving the entire shrub a soft, feathery texture compared to the broad leaves of common roses.
- 🌰 The "Chestnut" Hips: The most striking feature is the fruit. After flowering, it produces green, globular hips covered in soft prickles, looking exactly like a chestnut burr or a tiny sea urchin.
- 🍂 Peeling Bark: On older specimens, the wood doesn't stay smooth; the bark exfoliates in thin, cinnamon-colored flakes, a rare trait in the rose family.
🏡 In Your Garden
- 🏗️ Architectural Growth: This is not a petite bedding plant. It grows into a large, arching shrub that can reach 6 to 8 feet in height. Give it plenty of "elbow room" so you can appreciate its natural, wild silhouette.
- 🛡️ Resilience is Key: One of its best traits is its natural resistance to common rose ailments like black spot and mildew. While it craves full sun, it is surprisingly tolerant of poorer soils, though it hates "wet feet" (poor drainage).
- ✂️ Pruning Nuance: Because it flowers on "old wood" (stems from previous years), avoid heavy pruning in early spring. Instead, lightly shape it after the main flush of blooms has faded.
⚠️ Safety & Toxicity
- 🟢 Non-Toxic Status: This rose is considered non-toxic to humans, dogs, and cats. In fact, the hips are often used in herbal teas.
- ⚔️ Physical Hazard: While not poisonous, the plant is "armored." Both the stems and the distinctive fruit are covered in sharp prickles. Wear heavy-duty gardening gloves when handling, and keep it away from narrow pathways where it might snag passersby.
✨ Fun Fact
- 🍊 Vitamin C Powerhouse: In its native China, the fruit of Rosa roxburghii is known as the "King of Vitamin C." Weight for weight, the hips contain roughly 50 times more Vitamin C than a typical orange!

Detailed Care Instructions
To grow Rosa roxburghii (also known as chestnut rose or burr rose), you can follow these steps:
- Choose a suitable location: Select a sunny spot in your garden with well-draining soil. Rosa roxburghii requires at least 6 hours of direct sunlight daily.
- Soil preparation: Prepare the soil by loosening it and removing any weeds or debris. You can mix in some organic matter like compost or well-rotted manure to improve soil fertility.
- Planting: Dig a hole that is slightly wider and deeper than the root ball of the rose plant. Place the plant in the hole, ensuring that the bud union (the swollen area where the rose is grafted onto the rootstock) is above the soil level.
- Watering: After planting, water the rose thoroughly to settle the soil around the roots. Then, water regularly to keep the soil moist, but not waterlogged. Deep watering once or twice a week is preferable to frequent shallow watering.
- Mulching: Apply a layer of organic mulch, such as bark chips or straw, around the base of the plant. This will help retain moisture, suppress weeds, and regulate soil temperature.
- Pruning: Rosa roxburghii generally requires minimal pruning. However, you can remove any dead or damaged wood in late winter or early spring before new growth appears. Regularly remove spent flowers to encourage more blooms.
- Fertilizing: Apply a balanced rose fertilizer in early spring and again in late spring or early summer to promote healthy growth and abundant blooms. Follow the manufacturer's instructions for application rates.
- Pest and disease control: Regularly monitor your plants for any signs of pests or diseases, such as aphids or black spot. Treat any issues promptly using appropriate organic or chemical controls.
- Support: Depending on the variety and growth habit, some Rosa roxburghii cultivars may benefit from support, such as trellises or stakes. Install these structures at the time of planting or as the need arises.
- Winter care: In colder climates, provide winter protection by applying a thick layer of mulch around the base of the plant. You can also shield the rose with a protective covering, such as burlap, during extreme cold spells.
Remember to regularly monitor your Rosa roxburghii plant for signs of stress or disease, and provide it with the necessary care and attention. With proper care, your plant should thrive and reward you with beautiful blooms.

Place in a bright room that is sun drenched almost all day. Or directly in a south-facing window.

To water this plant, you should give it a moderate amount of water once or twice a week, depending on the temperature and humidity of its environment. Make sure the soil stays moist, but not waterlogged, as this can cause root rot. It is best to water the plant at the base, rather than from above, as this can prevent fungal diseases. Additionally, you should avoid getting the foliage wet, as this can promote fungal growth and damage the leaves. It is also important to ensure that the plant has adequate drainage, as stagnant water can also lead to root rot. Finally, during the winter months, you may want to reduce the frequency of watering, as the plant will require less water when it is dormant.
To fertilize this plant, you should start by selecting a slow-release fertilizer that contains a balanced blend of macro and micro-nutrients. Ideally, this should be applied during the plant's active growing season in the Spring and Summer months. Before applying your fertilizer, carefully read the manufacturer's instructions to determine the appropriate application rate for your specific plant. Finally, be sure to water the plant thoroughly after applying the fertilizer to help it absorb the nutrients and promote healthy growth.
In order to grow Rosa Roxburghii plants, it is recommended to use a well-draining soil that contains a mix of organic matter such as compost or aged manure. The soil should have a pH level of 6.5 to 7.5, which is slightly acidic to neutral. The soil should also be rich in nutrients, particularly nitrogen, phosphorus, and potassium. It is important to ensure that the soil is not too compact, as compacted soils can lead to poor drainage and root rot. Additionally, the plant prefers soil that is moist but not overly wet. Regular watering and mulching around the base of the plant can help to maintain optimal soil moisture levels.
To propagate this plant, you will need to take stem cuttings from the parent plant. These cuttings should be taken from healthy, vigorous stems that are at least 6 inches long and have several nodes on them.
Before taking the cuttings, prepare a rooting hormone solution by mixing a powdered hormone with water according to the instructions on the package. Dip the cuttings into the solution, making sure to cover the entire cut end.
Next, prepare a potting mix by combining equal parts of perlite, vermiculite, and peat moss. Moisten the mix with water until it is damp but not wet.
Insert the cuttings into the potting mix, making sure that at least one node is in the mix and that the cut end is buried. Cover the pot with a plastic bag or place it in a clear plastic container to create a greenhouse-like environment.
Place the container in a bright, warm location, but out of direct sunlight. Keep the soil moist but not wet, and mist the cuttings with water several times a day to maintain humidity.
After a few weeks, check the cuttings for root growth by gently tugging on them. Once they have developed a good root system, they can be transplanted into individual pots or into the garden.


