Plant Overview
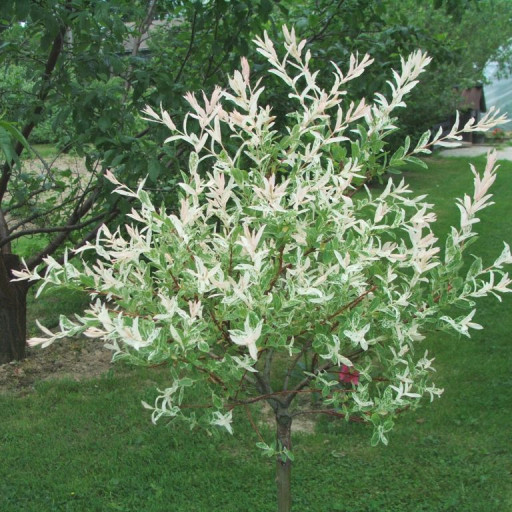
Known as the "Hakuro-Nishiki" or the Dappled Willow, this Japanese native looks like a splash of watercolor paint in the landscape. It is beloved for its "tri-color" foliage that mimics the appearance of a flowering shrub, though its beauty comes from its leaves rather than its blooms. Gardeners often call it the "Flamingo Willow" because its new spring growth emerges in a shocking, vibrant pink that fades into a creamy white marble.
🔍 How to Identify
- 🍃 Tricolor foliage: The narrow, lance-shaped leaves are the star of the show, featuring a mottled blend of bright pink, creamy white, and soft green.
- 🌿 Slender Stems: The branches are long, thin, and remarkably flexible. In the winter, after the leaves have fallen, the stems often take on a coral or reddish-orange hue.
- 🌳 Growth Habit: It typically grows as a multi-stemmed deciduous shrub, but it is frequently sold as a "standard," where it is grafted onto a straight trunk to look like a small, colorful lollipop tree.
🏡 In Your Garden
- ✂️ Pruning for Color: The signature pink and white "dapple" only appears on new growth. To keep it looking like a flamingo, you must prune it back significantly in late winter or early spring to encourage a fresh flush of colorful stems.
- 💧 Thirsty Roots: This plant is a true water lover and is perfect for those "soggy" spots in the yard where other plants might rot. It thrives near ponds or in heavy clay soils that retain moisture, as it will quickly drop its leaves if the soil dries out.
⚠️ Safety & Toxicity
- 🐾 Low Risk: The Dappled Willow is generally considered non-toxic to humans and common household pets like cats and dogs.
- 🧪 Salicin Sensitivity: Like all members of the Salix family, the plant contains salicin (the biological precursor to aspirin). While not poisonous, if a pet consumes a large amount of the bark or twigs, it may cause mild stomach upset or digestive distress.
✨ Fun Fact
[🧪] The Original Aspirin: Willow bark has been used as a pain reliever for over 2,000 years! Ancient civilizations, including the Egyptians and Greeks, chewed on willow twigs to soothe headaches and fevers long before the modern aspirin pill was ever synthesized in a lab.

Detailed Care Instructions
The Salix integra species includes one other popular cultivar in addition to the flamingo. Dappled willow (Salix integra ''Hakuro-nishiki') is a very similar plant to the flamingo. The flamingo willow is a sport of the dappled willow, achieved by propagating a genetic mutation of the dappled willow. The growth habit of the dappled willow is identical to the flamingo, but it lacks the tri-colored foliage.
Can flamingo willow be grown indoors?
Though flamingo willow can be started in containers, keeping it healthy and growing requires planting it in the outdoor soil, where it will grow to its full height and width.
How long can flamingo willow live?
With the proper care, a flamingo willow tree might live for up to 30 years.
To grow a Salix Integra plant, also known as a Dappled Willow, you can follow these steps:
- Choose a suitable location: Select an area in your garden that receives full sun to partial shade. The plant can tolerate a range of soil types but prefers moist, well-draining soil.
- Prepare the soil: Clear the area of any weeds or grass. Loosen the soil to a depth of about 12 inches using a garden fork or tiller. Mix in some compost or organic matter to improve the soil's fertility and drainage.
- Propagation: Salix Integra can be propagated through stem cuttings or by planting young saplings. If using stem cuttings, take 4-6 inch long cuttings from a healthy, established plant in early spring. Place the cuttings in a mixture of peat moss and perlite, keeping the soil moist until roots develop.
- Planting: Dig a hole in the prepared soil that is slightly wider and deeper than the root ball of the plant. Place the sapling or rooted cutting in the hole and backfill with soil, ensuring that the plant is at the same level as it was in the nursery container.
- Watering: After planting, water the Salix Integra thoroughly to settle the soil. Provide enough water to keep the soil evenly moist but not waterlogged. During the establishment period (first few months), regular watering is crucial.
- Mulching: Apply a layer of organic mulch around the base of the plant, leaving some space around the stem. The mulch helps retain moisture, suppresses weeds, and protects the roots from extreme temperatures.
- Pruning: In the early spring while the plant is still dormant, prune Salix Integra to maintain a desired shape and remove any dead or damaged branches. Regular pruning every few years will keep the plant healthy and prevent it from becoming overgrown.
- Fertilizing: Fertilization is generally not necessary for Salix Integra, as it can obtain sufficient nutrients from the soil. However, if your soil is lacking in nutrients, you can apply a balanced slow-release fertilizer in early spring.
- Pest and disease control: Salix Integra is relatively resistant to pests and diseases. However, keep an eye out for aphids, spider mites, or leaf spot diseases. In case of infestation or disease, apply appropriate organic or chemical treatments.
Overall, Salix Integra is a hardy and low-maintenance plant that should grow well with proper care and attention to its water and light requirements.

Place in a window with dappled sun or a spot in the middle of a room. Or directly in a window facing west or east.

Salix Integra, a plant commonly known by some other names, requires a good watering routine to ensure appropriate growth and vigor. Proper watering ensures that the plant receives adequate nutrients and remains healthy.
To water Salix Integra, you should first determine the plant's watering requirements. These requirements depend on the plant's age, size, and environmental conditions such as temperature, humidity, and light. Young plants need more frequent watering than mature ones and smaller plants need fewer quantities of water compared to larger plants.
The best way to water Salix Integra is through a deep watering technique. Water should be applied slowly to the soil, making sure that the moisture penetrates to the root zone. You can use a watering can, a garden hose, or a drip irrigation system to apply water. To ensure that the water gets to the plant's roots, avoid watering the leaves or other exposed parts of the plant.
Another important tip is to avoid overwatering the plant. Excessive watering can lead to waterlogging, which can cause root rot or fungal diseases. It can also cause the plant to have drooping or wilted leaves. Therefore, it is important to test the soil moisture level before watering to avoid overwatering.
In summary, watering Salix Integra requires deep watering techniques while avoiding overwatering, and considering the plant's age, size, and environmental conditions. By following these tips, you can ensure the plant remains healthy and thrives well.
To fertilize Salix Integra, apply a balanced fertilizer with equal parts nitrogen, phosphorus, and potassium in early spring. Use a slow-release fertilizer and apply it according to the manufacturer's instructions. Spread the fertilizer around the base of the plant and then water it in. Avoid fertilizing Salix Integra during the growing season as it can promote excessive growth and weaken the plant. Instead, wait until the following spring to fertilize again, if necessary.
Salix Integra is a plant that requires a specific type of soil to thrive. The soil should be a well-draining soil mix that is high in organic matter. It is important to avoid using soil that is too heavy or compacted, as this can lead to poor drainage and root rot. The ideal pH level for the soil should be between 6.0 and 7.5. Additionally, Salix Integra prefers moist soil that is consistently moist, but not waterlogged. It is important to ensure that the plant receives adequate water and is not allowed to dry out. Fertilizing with a balanced fertilizer can help promote healthy growth and prevent nutrient deficiencies.
To propagate this plant, you will need to take cuttings from the mother plant during the dormant season, which is typically in the winter. Use a sharp and clean pair of pruning shears to cut a branch that is around 6-8 inches long. Make sure to cut at a 45-degree angle and remove any leaves from the bottom 2 inches of the cutting.
Next, dip the cut end of the cutting in rooting hormone powder and place it in a pot filled with a well-draining potting mix. Make sure the cutting is planted deep enough so that at least half of it is below the soil level.
Water the cutting thoroughly and cover the pot with a plastic bag to create a humid environment. Place the pot in a brightly lit area, but not in direct sunlight. Make sure to keep the soil moist, but not waterlogged.
After a few weeks, new roots should start to form. Once the plant begins to grow and fill out the pot, you can either transplant it into a larger pot or into the ground. Make sure to keep the new plant well-watered and fertilized as it establishes itself in its new environment.
Common pests of the dappled willow include Larvae. Make a habit of checking your dappled willow frequently for pests so that any infestations can be caught and managed early.


