Plant Overview
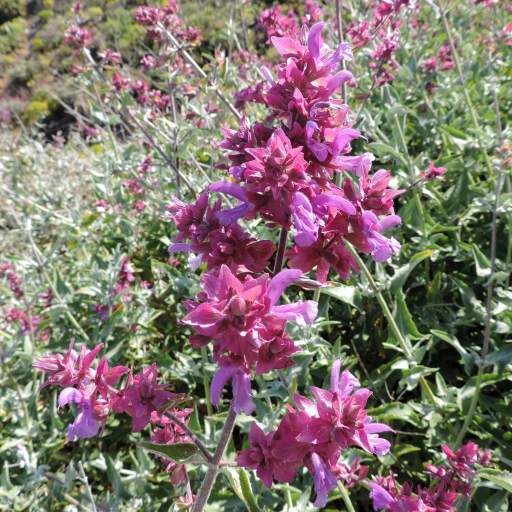
A dramatic, architectural shrub hailing from the volcanic slopes of the Canary Islands, Salvia canariensis is a showstopper for sun-drenched landscapes. Known as the "Canary Island Sage," it is beloved by gardeners for its striking contrast between shimmering silver foliage and vibrant, neon-purple blooms. It is a rugged survivor, built to handle heat and drought while looking like a soft, velvet masterpiece.
🔍 How to Identify
- 🥈 The Foliage: Large, arrow-shaped leaves that are heavily "felted" with tiny white hairs. This gives the plant a distinct silvery-grey or dusty-white appearance that feels like soft wool to the touch.
- 🟣 The Blooms: Tall, branched flower spikes topped with two-lipped magenta or violet flowers. The most striking part is the colorful, papery bracts (leaf-like structures) that surround the flowers and remain long after the petals drop.
- 📐 Growth Habit: A fast-growing, woody-based shrub that can reach heights and widths of 6 to 7 feet, creating a massive, billowing cloud of silver and purple.
🏡 In Your Garden
- ☀️ Sun & Drainage: This sage is a "sun worshiper" that thrives in poor, rocky, or sandy soils. Its biggest enemy is "wet feet"—it needs excellent drainage to prevent root rot, especially during dormant winter months.
- ✂️ Maintenance Nuance: Because it grows so vigorously, it can become "leggy" or woody over time. To keep it compact and lush, gardeners should prune it back significantly in late winter or early spring to encourage fresh, silvery growth from the base.
- 🦋 Pollinator Magnet: In a garden setting, it acts as a high-traffic hub for bees and butterflies, who are drawn to the nectar-rich flowers throughout the long blooming season.
⚠️ Safety & Toxicity
- ✅ Status: Non-toxic and generally safe.
- 🐾 Details: Unlike some ornamental plants, the Canary Island Sage is considered safe for households with pets and children. While it isn't used for cooking like common culinary sage (Salvia officinalis), it poses no significant threat if accidentally touched or nibbled.
✨ Fun Fact
The vibrant purple "flowers" you see from a distance are often not the flowers at all! The actual petals are quite delicate, but they are protected by papery, colorful bracts that hold their intense pigment for months, giving the illusion that the plant is in a state of "eternal bloom."

Detailed Care Instructions
To grow Salvia Canariensis, also known as Canary Island sage, you will need to follow these steps:
- Climate and Soil: Ensure that you live in a suitable climate for growing Salvia Canariensis. It thrives in Mediterranean or mild coastal regions with warm summers and mild winters. The plant prefers well-drained, sandy or loamy soil.
- Sowing Seeds: Start by soaking the Salvia Canariensis seeds in warm water for 24 hours to enhance germination. Then, plant the seeds in pots or seed trays filled with well-draining soil. Lightly cover the seeds with a thin layer of soil and water gently. Place the tray or pots in a warm location with indirect sunlight.
- Germination and Growth: It usually takes about two to four weeks for the seeds to germinate. During this time, ensure that the soil remains consistently moist but not waterlogged. Once the seedlings appear, provide them with plenty of sunlight. You can transfer them to individual pots when they have developed a few true leaves.
- Transplanting: When the Salvia Canariensis plants have grown a bit and the threat of frost has passed, you can transplant them to a sunny and well-drained spot in your garden. Space them about 12-18 inches apart to allow for their growth.
- Watering and Care: Ensure that you water the plants regularly, especially during the dry summer months. However, make sure not to overwater as Salvia Canariensis prefers slightly drier conditions. Mulching around the base of the plant can help retain moisture and suppress weed growth.
- Pruning and Maintenance: Prune the Salvia Canariensis plant regularly to maintain its shape and encourage bushier growth. Remove any dead or diseased branches. During winter, protect the plants from cold winds and frost by covering them with horticultural fleece or bringing them indoors if necessary.
By following these steps and providing appropriate care, you should be able to successfully grow Salvia Canariensis.
Salvia Canariensis can be watered by pouring water carefully around the base of the plant, rather than on top of the leaves. It is important not to overwater the plant, as it prefers well-draining soil and can be prone to root rot. Wait until the topsoil feels dry to the touch before watering again, and adjust the amount of water depending on the season and temperature. In the winter months, it may need less water than in the summer when temperatures are higher. Watering in the morning is best, as it allows time for any excess water to evaporate before cooler temperatures in the evening.
To fertilize this plant, you can use a balanced slow-release fertilizer in early spring before new growth starts. Alternatively, you can use a liquid fertilizer every 2-3 weeks during the growing season. Be sure to follow the manufacturer's instructions for the specific fertilizer you choose. Avoid fertilizing in the winter when the plant is dormant.
Salvia Canariensis plant thrives in a well-draining soil that is rich in organic matter. It prefers a pH range of 6.0 to 7.5, which is slightly acidic or neutral. The ideal soil for this plant is sandy loam. The plant also requires soil that is nutrient-rich and retains moisture, but at the same time does not become waterlogged. It is important to avoid using heavy soils with high clay content, as they can lead to root rot and other diseases. Adding compost, peat moss, or well-aged manure to the soil before planting can improve its texture and nutrient content. The soil should also be loosened to a depth of at least 12 inches before planting, to facilitate root growth and enhance drainage.
To propagate this particular plant, you will need to collect ripe seed pods from a mature plant. Ensure that the seed pods are dry and have turned brown before harvesting. Once you have the seed pods, gently split them open and collect the seeds, discarding any that appear damaged or discolored.
Fill a seed tray with a high-quality seed-starting mix and moisten the soil. Lightly press the collected seeds into the soil, ensuring that they are covered with a thin layer of soil. Place the seed tray in a warm, brightly lit area, but not in direct sunlight.
Keep the soil moist by misting it with water, or covering the tray with a plastic cover or dome to retain moisture. After a few weeks, the seeds will start to germinate and emerge from the soil.
Once the seedlings have grown a few leaves, you can transplant them into individual pots filled with a rich, well-draining soil mixture. Water the plants regularly and place them in a sunny location. Allow the plants to grow until they are large enough to be planted outside in the garden.