Plant Overview
Known affectionately as the Scarlet Sage or Blood Sage, Salvia coccinea is a vibrant showstopper that seems to vibrate with energy in the garden. Unlike its cousin, the common culinary sage, this variety is prized primarily for its fiery, nectar-rich blooms that act like a neon "Open" sign for local wildlife. Native to the Americas, it has earned a reputation for being one of the most reliable and heat-hardy flowers for adding a splash of crimson to sun-drenched borders.
🔍 How to Identify
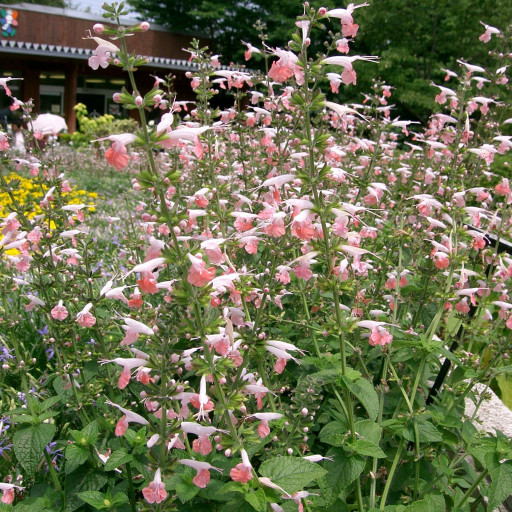
- ❤️ The Blooms: Features elongated, tubular flowers that grow in loose whorls along tall, upright spikes. While most famous in "Scarlet," you may also find cultivars in soft pink (Coral Nymph) or snowy white.
- 🍃 The Foliage: The leaves are roughly triangular or heart-shaped with "crenate" (scalloped) edges. They have a slightly fuzzy texture and, when crushed, emit a subtle, musky herbal scent.
- ⏹️ The Stem: Like almost all members of the mint family (Lamiaceae), it possesses a distinct square-shaped stem that feels sturdy to the touch.
🏡 In Your Garden
- 🦋 Wildlife Magnet: This plant is a primary fuel source for hummingbirds and butterflies. Because the flowers are tubular, they are perfectly designed for the long beaks of Ruby-throated Hummingbirds, who will often fight over "ownership" of a single patch.
- 🌱 The Great Re-seeder: While it is often grown as an annual in cooler climates, it is a prolific self-sower. Once you plant it, expect "volunteer" seedlings to pop up the following spring. It’s best to leave some space for it to wander, as it prefers to find its own favorite spots in well-drained soil.
- ☀️ Heat Endurance: Unlike many bedding plants that wilt in the afternoon sun, Salvia coccinea thrives in the heat. It is remarkably drought-tolerant once established, though a little extra water during a dry spell will keep the flower spikes coming until the first frost.
⚠️ Safety & Toxicity
- ✅ Safe for All: Salvia coccinea is generally considered non-toxic to dogs, cats, and horses. It is a very safe choice for family gardens and high-traffic areas.
- 👅 Not for the Kitchen: Although it is a true Sage, it lacks the concentrated oils that make culinary sage (Salvia officinalis) delicious. It isn't poisonous if nibbled, but it doesn't offer any culinary value and won't taste very good!
✨ Fun Fact
The species name coccinea actually means "scarlet-dyed" in Latin. In the wild, this plant is so effective at attracting pollinators that it has been known to hybridize naturally, leading to the wide variety of colors we see in nurseries today.

Detailed Care Instructions
| Color | Red |
| Soil Ph | Adaptable |
| Lighting | Full Sun |
| Soil Type | Rich, Loamy, Clay, Sandy |
| Bloom Time | Summer Through Fall |
| Plant Type | Herb |
| Mature Size | 3 Feet Tall, 3 Feet Wide |
| Native Area | Mexico, Southeastern United States |
| Sun Exposure | Full Sun, Part Sun, Shade |
| Hardiness Zones | Usda 9-10 (Perennial), To Zone 4 As An Annual |
To grow Salvia coccinea, also known as scarlet sage or Texas sage, follow these steps:
- Choose a location: Select a spot in your garden that receives full sun to partial shade. Salvia coccinea prefers well-draining soil.
- Prepare the soil: Amend the soil with organic matter, such as compost, to improve its nutrient content and drainage.
- Planting: Sow the seeds directly into the ground after the last frost date in your area. Alternatively, you can start seeds indoors about 6-8 weeks before the last frost and transplant them outdoors when the weather warms up. Plant the seeds about 1/8 inch deep and space them 12-18 inches apart.
- Watering: Keep the soil moist but not waterlogged, especially during the germination and establishment period. Water regularly, especially during dry spells.
- Fertilizing: Salvia coccinea typically doesn't require much fertilization. However, you can apply a balanced granular fertilizer or compost once or twice during the growing season to encourage healthy growth and flowering.
- Pruning: To encourage bushier growth and more flowers, you can pinch back the growing tips when the plants are about 6-8 inches tall. You can also deadhead spent flowers to prolong the blooming period.
- Pests and diseases: Salvia coccinea is relatively pest and disease resistant. However, keep an eye out for common issues like aphids or powdery mildew. If needed, treat with appropriate organic pest control methods or fungicides.
- Winter care: In areas with mild winters, Salvia coccinea may survive as a perennial. Cut back the plants after the first frost and provide a layer of mulch to protect the roots. In colder climates, treat it as an annual and replant the following spring.
By following these guidelines, you should be able to successfully grow Salvia coccinea and enjoy its beautiful scarlet flowers throughout the growing season.

Place in a bright room that is sun drenched almost all day. Or directly in a south-facing window.

To water this plant, you should first check the moisture level of the soil surrounding it. Inserting your finger into the soil up to the first knuckle is a good way to estimate whether the plant needs watering. If the soil is dry, it's time to water.
Use room temperature water and pour it directly onto the soil, avoiding getting water on the leaves. Watering the plant lightly but deeply is better than frequent shallow waterings. During hot summer months, it may be necessary to water the plant more frequently.
You should also make sure that the plant is not sitting in standing water, as this can lead to root rot. Allow the soil to dry out slightly before watering again. Finally, be sure to monitor the plant for signs of over or under-watering, such as yellowing leaves or wilting.
For best results, fertilize this plant with a balanced fertilizer every 4-6 weeks during the growing season. Be sure to follow the instructions on the fertilizer package. Avoid over-fertilizing, as this can lead to burnt or damaged foliage. Water the plant thoroughly before and after fertilizing to prevent root burn. Additionally, incorporating organic matter into the soil can improve nutrient availability for the plant.
Salvia Coccinea plant prefers to grow in soil that is well-draining, fertile, and rich in organic matter. The soil should be slightly acidic to neutral with a pH level of 6.0 to 7.0. It does not tolerate waterlogged soil and requires good air circulation around the roots. A suitable soil mix can be made by combining equal parts of garden soil, compost, and perlite or sand to improve drainage. Amend the soil with a slow-release fertilizer before planting to provide essential nutrients to the plant. Regularly check the soil moisture level and water as needed, allowing the top inch of soil to dry out before watering. Avoid over-fertilizing the plant; too much fertilizer can lead to excessive growth and fewer flowers.
To propagate this plant, select a healthy stem with leaves and cut it just below a node using sharp and sterilized gardening scissors. Remove the lower leaves from the stem, leaving only a few at the top. Dip the cut end in rooting hormone powder and plant it in a pot filled with a well-draining soil mix. Water the soil thoroughly and cover the pot with a clear plastic bag or a plastic wrap to create a humid environment. Place the pot in a bright but indirect light location and ensure that the soil stays moist but not waterlogged. Within a few weeks, new roots should start to appear. At this point, remove the plastic covering and gradually expose the plant to more light and airflow. Once the plant has established roots and has developed a few leaves, it can be transplanted to a larger pot or directly into the ground in the desired location.
Common pests of the scarlet sage include Spider mites, aphids, whiteflies. Make a habit of checking your scarlet sage frequently for pests so that any infestations can be caught and managed early.


