Plant Overview
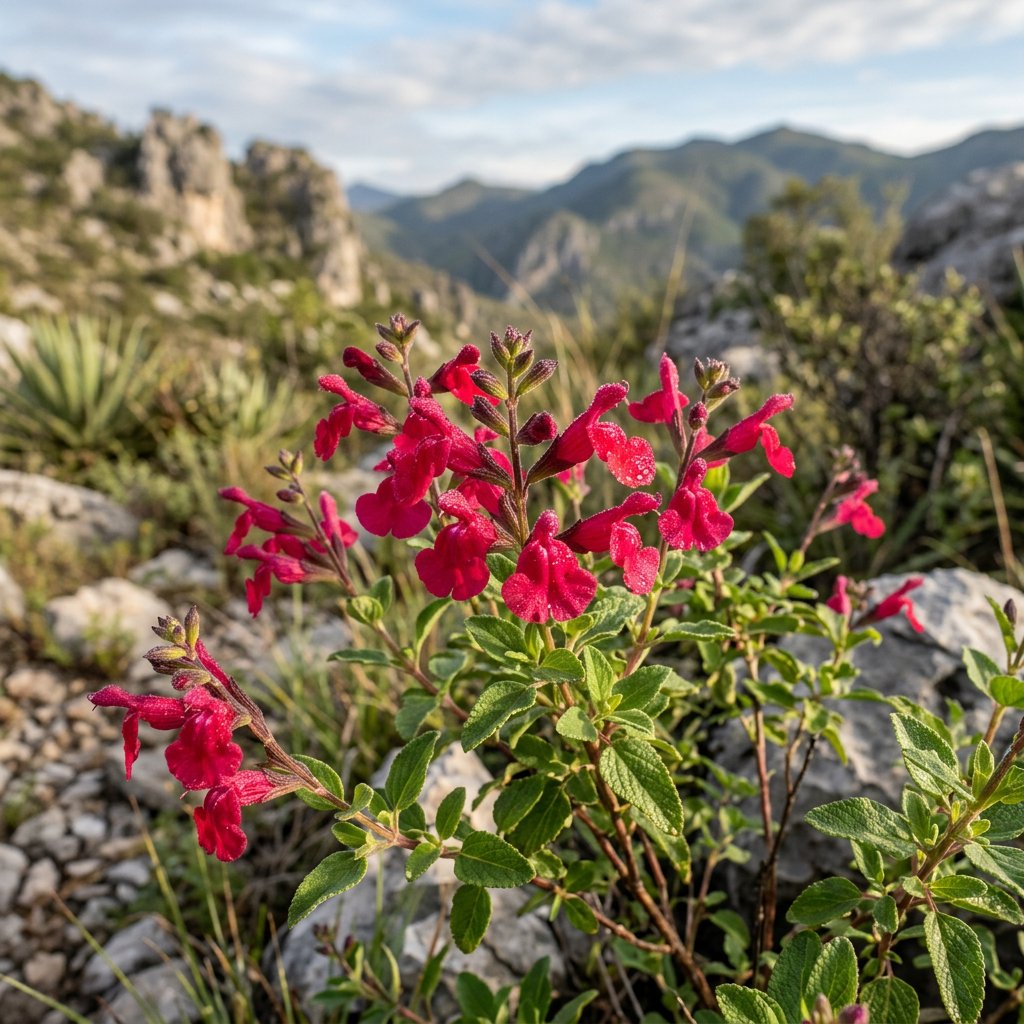
Commonly known as Blackcurrant Sage or Baby Sage, this aromatic beauty from the mountains of Mexico is a favorite among hummingbird enthusiasts. Its name microphylla translates to "small leaf," but what it lacks in leaf size, it makes up for with a stunning display of vibrant flowers and a scent that reminds many of fresh berries.
🔍 How to Identify
- 🍃 The Foliage: Small, oval-shaped leaves with lightly serrated edges. When you rub them between your fingers, they release a distinct, sweet aroma similar to blackcurrants.
- 🌸 The Bloom: Two-lipped tubular flowers that typically appear in pairs. While the wild species is a brilliant crimson, garden varieties range from deep purple to the famous bicolor "Hot Lips."
- 🌿 The Structure: A semi-evergreen subshrub that grows in a dense, rounded mound. Its stems are square—a classic "family trait" of the mint family (Lamiaceae).
🏡 In Your Garden
- ☀️ Sun-Seeker: While it is incredibly hardy, it performs best in a spot where it can soak up the sun. In very hot climates, it appreciates a little afternoon shade to keep its colors from fading.
- ✂️ Pruning Nuance: Because it has a woody base, it can become "leggy" over time. It is best to prune it back by about a third in early spring to encourage fresh, bushy growth and more flower spikes.
- 💧 Drainage is Key: This plant is drought-tolerant once established but will quickly suffer if its "feet" get wet. It thrives in gritty, well-draining soil rather than heavy clay.
⚠️ Safety & Toxicity
- ✅ Status: Generally considered non-toxic and safe.
- 🐾 Pets & Kids: It is not known to be poisonous to cats, dogs, or horses. In fact, in its native Mexico, the leaves are often used to brew a relaxing herbal tea known as Mirto de Montes.
✨ Fun Fact
The flowers of certain Salvia microphylla cultivars are "temperature sensitive." For example, the popular 'Hot Lips' variety may produce solid red or solid white flowers during extreme heat or cold, only returning to its iconic two-toned look when the weather is mild!

Detailed Care Instructions
| Color | Red |
| Soil Ph | 5.5 To 6.5 |
| Humidity | High |
| Lighting | Part Sun |
| Toxicity | Poisonous |
| Soil Type | Well-Draining |
| Bloom Time | From Mid Summer To Fall |
| Difficulty | Easy |
| Plant Type | Herbaceous Perennial |
| Hibernation | Cold Period |
| Mature Size | 3.3 To 4.3 Ft. |
| Native Area | Europe, Asia |
| Temperature | 20°C - 30°C |
| Sun Exposure | Full Sun |
| Hardiness Zones | 7-10 |
To grow Salvia Microphylla (also known as Salvia greggii), follow these steps:
- Climate and location: This plant can grow well in USDA hardiness zones 7-10. Choose a location that receives full sunlight or light shade.
- Soil preparation: Prepare well-draining soil by adding compost or organic matter to improve fertility and drainage. It should be slightly acidic to neutral (pH 6.0-7.0).
- Planting: Dig a hole twice as wide and deep as the plant's root ball. Place the plant in the hole, ensuring that the top of the root ball is level with the soil surface. Backfill the hole and gently firm the soil around the plant.
- Watering: After planting, water the soil thoroughly. Salvia Microphylla requires regular watering, especially during the first few weeks until the root system is established. Avoid overwatering as it can lead to root rot.
- Mulching: Apply a layer of mulch around the base of the plant to conserve moisture, suppress weeds, and provide insulation to the roots. Keep the mulch a few inches away from the stem to prevent rot.
- Pruning: Prune the plant in early spring to remove dead or damaged branches and encourage bushier growth. Regular deadheading (removing faded flowers) can also promote continuous blooming.
- Fertilization: Salvia Microphylla is not a heavy feeder but can benefit from a slow-release, balanced fertilizer in spring or early summer. Follow the manufacturer's instructions for the appropriate amount and application method.
- Pests and diseases: Generally, this plant is relatively pest and disease resistant. However, keep an eye out for aphids, spider mites, or powdery mildew. Regularly inspect the plant and treat as needed with organic or safe pest control methods.
- Winter care: In colder climates, Salvia Microphylla may require protection during the winter months. Mulch around the base of the plant to insulate the roots. Alternatively, you can bring potted plants indoors or into a greenhouse during frost periods.
By following these guidelines, you can successfully grow Salvia Microphylla and enjoy its beautiful blooms for years to come.

Place in a bright room that is sun drenched almost all day. Or directly in a south-facing window.

When watering this plant, it is important to allow the soil to dry out slightly between waterings. It is recommended to water deeply, but infrequently, rather than shallowly and frequently. This allows for the roots to grow deeply and become more drought tolerant. When watering, be careful not to get water on the foliage as this can lead to fungal diseases. Additionally, using a drip irrigation system or watering at the base of the plant can help prevent this issue. During periods of drought or prolonged heat, it may be necessary to water more frequently to prevent wilting or leaf drop.
To fertilize the plant, use a balanced fertilizer with equal amounts of nitrogen, phosphorus, and potassium. Apply the fertilizer during the growing season, every two weeks. Water the plant deeply before and after fertilizing to prevent fertilizer burn. Avoid over-fertilizing as it can lead to excessive growth and weak stems.
Salvia Microphylla plants prefer to grow in a well-draining soil that is rich in organic matter. The soil should have a slightly acidic to neutral pH between 6.0 and 7.5. It is recommended to mix a good quality potting mix with coarse sand or perlite to improve drainage. Additionally, incorporating a slow-release fertilizer into the soil at planting will provide the necessary nutrients for the plant to grow and thrive. It is important to avoid using soil that is heavy, compacted, or retains too much moisture as this can lead to root rot.
There are a few methods to propagate Salvia Microphylla plants, but one common way is through stem cuttings. First, select a healthy and mature stem from the plant. Using a clean and sharp pair of scissors or garden shears, cut a 4-6 inch section of the stem right below a node or where a leaf connects to the stem.
Remove any leaves or flowers from the bottom half of the stem, leaving only a few leaves at the top. This will reduce the plant's water loss and allow it to focus on developing roots. If the top leaves are large, you can also prune them in half to reduce water loss.
Dip the cut end of the stem into rooting hormone powder, which will help stimulate root growth. Then, plant the stem into a small pot filled with moist and well-draining soil. You can also use a soilless medium, such as vermiculite or perlite.
Cover the pot with a clear plastic bag or plastic wrap to create a mini greenhouse, which will help retain moisture and increase humidity around the cutting. Place the pot in a warm and bright location, but out of direct sunlight. It's important to keep the soil moist but not waterlogged during the rooting process.
After a few weeks, gently tug on the cutting to see if it has rooted. If there is resistance, then roots have developed. Remove the plastic cover and gradually acclimate the cutting to normal room conditions. Once it has established and grown to a decent size, you can transplant it to a larger pot or the garden.
Common pests of the baby sage include Spider mites, aphids, whiteflies. Make a habit of checking your baby sage frequently for pests so that any infestations can be caught and managed early.


