Plant Overview
Hailing from the rugged, sun-drenched cliffs of Sardinia, the Santolina Insularis is a Mediterranean treasure often called "Sardinian Lavender Cotton." This aromatic shrub behaves like a living piece of silver coral, coating rocky landscapes in a shimmering, frost-colored mist. It is a resilient survivor that brings the evocative, herbal scent of the Italian seaside directly into your backyard.
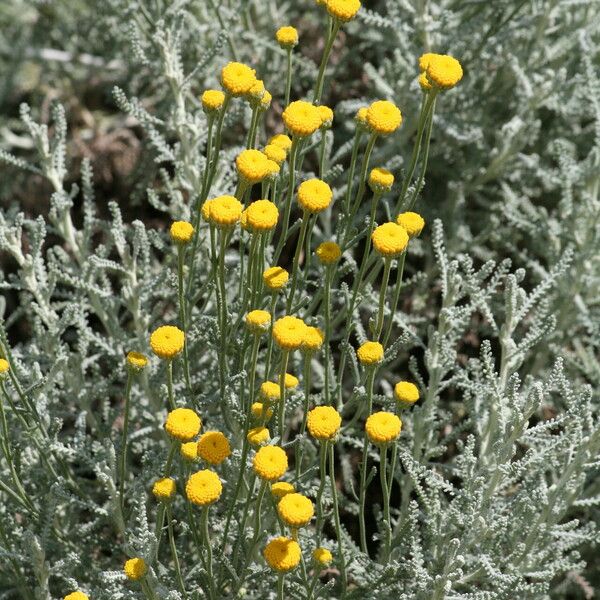
🔍 How to Identify
- 🌿 Silvery Foliage: The leaves are finely divided, almost needle-like, and covered in a dense, woolly "felt" that gives the plant its distinctive silver-grey or blue-green hue.
- 🟡 Button Blooms: In mid-summer, the plant produces long stems topped with bright yellow, button-shaped flower heads that lack traditional petals.
- Compact Habit:** It naturally forms a dense, rounded mound, typically growing no taller than 12-18 inches, looking much like a soft, dusty cushion.
🏡 In Your Garden
- 🪨 The Great Drainer: This plant is a "lithophyte" at heart, meaning it thrives in rocky, poor soil. If your garden has heavy clay, it will likely struggle; it requires sharp drainage to prevent its roots from "suffocation."
- ☀️ Sun Seeker: To maintain that brilliant silver color, it needs maximum sunlight. In the shade, the leaves will turn a dull green and the plant will lose its tight, architectural shape.
- ✂️ Post-Bloom Haircut: Once the yellow "buttons" fade, it’s best to give the plant a light shear. This prevents the center from becoming woody and leggy, keeping the mound lush and youthful.
⚠️ Safety & Toxicity
- 🟢 Generally Safe: This plant is not considered highly toxic to humans, but its potent essential oils can be an irritant to some.
- 🐾 Pet Caution: While not on the primary "deadly" lists, the concentrated oils in the foliage can cause digestive upset or skin irritation in curious cats and dogs if chewed on extensively.
- 🧤 Skin Sensitivity: Sensitive gardeners should wear gloves when pruning, as the sap and "wool" on the leaves can occasionally cause mild contact dermatitis.
✨ Fun Fact
The essential oils found in Santolina insularis are so potent that traditional Mediterranean cultures used dried bundles of the leaves as a natural moth repellent in wardrobes, much like cedar or lavender!

Detailed Care Instructions
Growing Santolina insularis, commonly known as the cotton lavender or lavender-cotton, is relatively straightforward if you provide the right conditions. Here's a step-by-step guide to help you grow this Mediterranean native plant:
1. Choosing the Right Location
- Sunlight: Santolina insularis thrives in full sun. Ensure that the plant gets at least 6-8 hours of direct sunlight daily.
- Soil: Opt for well-draining soil. This plant prefers sandy or loamy soils and can tolerate poor soil conditions. Avoid heavy clay soil unless it can be amended to improve drainage.
2. Planting
- Timing: The best time to plant Santolina insularis is in the spring after the last frost has passed or in the fall in warmer climates.
- Spacing: Allow around 12-18 inches (30-45 cm) between plants to give them room to grow.
- Planting Depth: Dig a hole that is twice as wide and as deep as the plant's root ball. Place the plant in the hole and fill it with soil, ensuring that the top of the root ball is level with the surrounding soil.
3. Watering
- Initial Watering: Water the plant thoroughly after planting to help establish its roots.
- Ongoing Watering: Santolina insularis is drought-tolerant once established. Water sparingly; overwatering can lead to root rot. Allow the soil to dry out between watering sessions.
4. Mulching
- Apply a thin layer of mulch around the base of the plant to retain moisture and suppress weeds. Do not let the mulch touch the stem, as this can lead to rot.
5. Pruning
- Regular Pruning: Prune the plant in late winter or early spring to maintain its shape and encourage new growth. Trim back about one-third of the plant.
- Deadheading: Remove spent flower heads throughout the growing season to promote continued blooming and to keep the plant looking tidy.
6. Fertilizing
- Santolina insularis doesn't require much fertilizer. Too much can lead to leggy growth. If desired, you can use a balanced, slow-release fertilizer in the spring.
7. Pests and Diseases
- This plant is generally pest-resistant but can occasionally suffer from root rot if overwatered. Ensure good drainage to minimize this risk.
8. Overwintering
- In colder climates, consider adding a layer of mulch around the base of the plant for extra insulation during winter.
- If you live in an area with harsh winters, you might consider growing Santolina insularis in a container that can be moved indoors during freezing temperatures.
9. Propagation
- Cuttings: Take softwood cuttings in late spring or early summer. Remove the leaves from the lower part of the cuttings and plant them in a well-draining medium. Keep the cuttings moist until roots develop.
- Division: Mature plants can be divided in early spring. Dig up the plant, divide it into smaller sections, and replant.
By providing the right care and conditions, you can enjoy the attractive, aromatic foliage and vibrant flowers of Santolina insularis in your garden.
Watering Santolina insularis requires understanding its native Mediterranean habitat, which is characterized by dry summers and wet winters. Here are the steps to properly water this plant:
Initial Stage (Establishment Period):
- When first planting, water thoroughly to help the roots establish.
- During the first growing season, keep the soil evenly moist but not waterlogged. This usually means watering once a week, depending on rainfall and temperature.
Mature Stage (After Establishment):
- Once established, the plant is quite drought-tolerant.
- Water less frequently, ideally only when the soil is completely dry. This might mean watering once every two to three weeks during the summer.
- Avoid overhead watering to prevent fungal diseases. Water at the base of the plant.
Seasonal Adjustments:
- During the winter months, reduce watering significantly. The plant can usually rely on natural rainfall if you live in a region with a Mediterranean climate.
- In areas with higher humidity or rainfall, ensure the soil has excellent drainage to prevent root rot.
Soil and Drainage Considerations:
- Plant in well-draining soil, preferably sandy or gravelly.
- If growing in a container, ensure the pot has drainage holes and use a mix designed for cacti or succulents.
Mulching:
- Use a layer of gravel or coarse sand around the base of the plant to retain moisture without causing excessive wetness around the roots.
By monitoring the moisture levels and mimicking its natural environment, you can ensure Santolina insularis thrives with minimal water-related issues. Adjust watering based on local climate conditions and soil type to keep the plant healthy.
To properly fertilize your Santolina insularis, follow these guidelines:
Soil Preparation: Ensure the soil is well-drained. This plant prefers poor, rocky, or sandy soils with good drainage.
Timing: Apply fertilizer in the early spring as new growth starts. You can also give a light feeding in midsummer if the plant appears to need a boost.
Type of Fertilizer: Use a balanced, slow-release granular fertilizer with an N-P-K ratio of approximately 10-10-10. This will provide equal amounts of nitrogen (N), phosphorus (P), and potassium (K), supporting overall health and growth.
Application: Scatter the fertilizer evenly over the soil surface around the plant, avoiding direct contact with the stems and leaves. Lightly work it into the top inch of soil with a rake or by hand.
Watering: After fertilizing, water the plant thoroughly to help the nutrients penetrate the soil and reach the roots.
Organic Alternatives: If you prefer organic fertilizing options, consider using well-composted manure, fish emulsion, or a balanced organic fertilizer. Apply these in the same manner as the synthetic options.
Avoid Over-Fertilizing: Too much fertilizer can cause rapid, weak growth and reduce the plant's overall hardiness. Follow the recommended dosage on the fertilizer packaging, and err on the side of using less rather than more.
Observation: Monitor the plant for signs of nutrient deficiency such as yellowing leaves or stunted growth and adjust your fertilizing schedule accordingly.
Regular and proper fertilization will help your Santolina insularis thrive, enhancing its health and vigor.
For growing Santolina insularis, the soil requirements are quite specific to ensure the plant's health and optimal growth. Here are the details about the soil to use:
Well-Draining Soil: This plant thrives in soil that allows for efficient drainage. Sandy or gravelly soils are ideal, as they prevent water from pooling around the roots, which can lead to root rot.
Soil pH: A slightly alkaline to neutral pH range of 6.6 to 8.0 is preferred. You might need to test your soil and make amendments if necessary to achieve the proper pH.
Soil Composition: A mix containing a good portion of sand, loam, and gravel works well. Organic matter should be minimal as this plant does not prefer overly rich soil.
Nutrient Level: While not overly demanding in terms of fertility, the soil should have basic nutrients to support growth, but it should not be too fertile. Over-fertilized soils can cause the plant to become leggy and weak.
Aeration: The soil should be loose and well-aerated to promote healthy root development. Compacted soil can inhibit growth and water absorption.
Amendments: Adding perlite or coarse sand can improve soil drainage and aeration, which is beneficial for this plant species.
To sum up, use a well-draining, sandy or gravelly soil with a slightly alkaline to neutral pH and low to moderate fertility for growing Santolina insularis successfully.
Propagating Santolina insularis can be achieved through both seed and vegetative methods. Here are detailed steps for each technique:
Seed Propagation:
Seed Collection:
- Collect seeds from mature plants in late summer to early autumn when the flowers have faded and the seed heads have dried.
Seed Preparation:
- Clean the seeds to remove any debris or chaff.
- Soaking the seeds in water for 24 hours before sowing can improve germination rates.
Sowing Seeds:
- Fill a seed tray with a well-draining seed compost.
- Sow the seeds on the surface of the compost and lightly cover them with a thin layer of compost or vermiculite, as the seeds need light to germinate.
- Water gently to avoid washing away seeds.
Germination Conditions:
- Place the seed tray in a location with bright, indirect light.
- Maintain a temperature of 20-25°C (68-77°F).
- Keep the soil consistently moist but not waterlogged.
Transplanting Seedlings:
- After germination, when seedlings have developed a couple of true leaves, they can be transplanted into individual pots.
- Gradually acclimatize the seedlings to outdoor conditions over a couple of weeks before planting them in their final location.
Vegetative Propagation:
Cuttings:
- Take cuttings in late spring or early summer.
- Choose healthy, non-flowering shoots and cut them into 4-6 inch (10-15 cm) sections.
- Remove the lower leaves to expose a few inches of the stem.
Preparing Cuttings:
- Dip the cut ends in a rooting hormone powder or gel to promote root development.
- Fill pots with a well-draining potting mix, such as a combination of peat and perlite or sand.
Planting Cuttings:
- Insert the cuttings into the prepared pots, ensuring at least a couple of nodes are buried in the soil.
- Water the cuttings well and cover them with a plastic bag or place them in a propagator to maintain high humidity.
Rooting and Transplanting:
- Place the pots in a warm, bright area with indirect light.
- Keep the soil moist but not waterlogged.
- Roots typically develop within 4-6 weeks.
- Once the cuttings have established a good root system, transplant them into larger pots or directly into the garden.
Layering:
Choosing a Branch:
- Select a healthy, low-growing branch in early spring or late autumn.
Preparing the Branch:
- Gently bend the branch down to the soil and remove leaves from the portion that will be in contact with the soil.
- Optional: Wound the underside of the stem lightly to encourage root growth.
Securing the Branch:
- Bury the prepared section of the branch in the soil and secure it with a U-shaped wire or a small rock.
- Ensure the tip of the branch remains exposed above the soil.
Root Development:
- Keep the soil moist around the buried section.
- After several months, roots will develop.
Transplanting:
- Once a robust root system has formed, sever the new plant from the parent and transplant it to its desired location.
By following these methods, you can effectively propagate Santolina insularis to expand your garden or share with others.


