Plant Overview
Known affectionately as the "Sweetbroom" or "Licorice Weed," this modest-looking herb hides a rich history of traditional medicine within its wiry stems. While many gardeners might mistake it for a common weed, it has been a staple in tropical apothecaries for centuries, spanning from the Amazon rainforest to the fields of India. It is a hardy survivor that thrives in sun-drenched, disturbed soils where other plants might struggle.
🔍 How to Identify
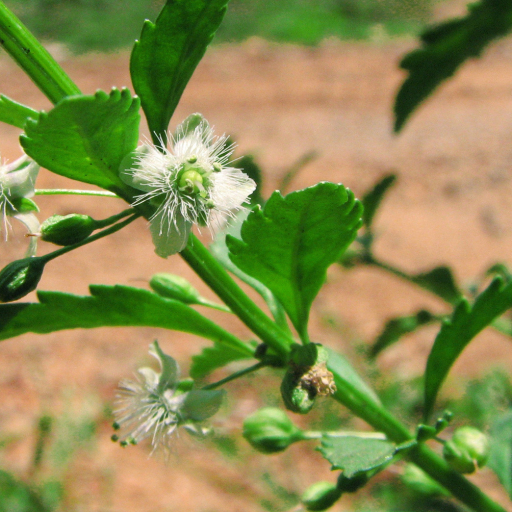
- 🌿 The Foliage: Look for small, light green leaves with serrated (toothed) edges. They typically grow in groups of three around the stem (whorled) or in opposite pairs.
- 🌸 The Flowers: Tiny, star-shaped white flowers appear tucked into the leaf joints. If you look closely, these delicate blooms have four petals and a noticeably "fuzzy" or hairy center.
- 📏 The Stiff Stems: The plant grows upright and becomes quite "woody" or wiry at the base as it matures, usually reaching a height of 1 to 3 feet.
🏡 In Your Garden
- 🏜️ Tough as Nails: Sweetbroom is a "pioneer species," meaning it is often the first to colonize poor or sandy soil. It is incredibly drought-tolerant once established and can handle a fair amount of neglect.
- 🌱 The Spreading Habit: Be mindful that this plant is a prolific seeder. One plant can quickly become many; if you are growing it for its aesthetic or herbal interest, it is best kept in a container or a dedicated patch to prevent it from taking over your lawn.
⚠️ Safety & Toxicity
- 🟢 General Status: Scoparia dulcis is generally considered non-toxic to touch and is famous for its ethnobotanical uses.
- 🐾 Pets and Kids: While not "poisonous" in the traditional sense, it should not be ingested by children or pets. The plant contains various alkaloids and bitter compounds that can cause digestive upset if eaten in large quantities.
- 💊 Medical Note: In many cultures, it is used to treat respiratory and digestive issues, but you should never consume wild-harvested Sweetbroom for medicinal purposes without consulting a professional, as it can interact with existing health conditions.
✨ Fun Fact
Despite its name "Licorice Weed" or "Sweetbroom," the plant actually tastes quite bitter! The name "Sweet" (or the Latin dulcis) likely refers to the pleasant, slightly aromatic scent the leaves release when they are crushed between your fingers.

Detailed Care Instructions
To grow Scoparia Dulcis plant, also known as sweet broomweed, follow these steps:
- Seed Germination: Start by obtaining Scoparia Dulcis seeds from a reputable source or collect them from existing plants. Soak the seeds overnight in water to soften the hard outer coat.
- Soil Preparation: Prepare a pot or planting bed with loose, well-draining soil. Amend the soil with organic matter like compost or peat moss to improve fertility and moisture retention.
- Sowing Seeds: Sow the Scoparia Dulcis seeds on the soil surface and cover them lightly with a thin layer of soil. Water gently to avoid dislodging the seeds.
- Optimal Conditions: Place the pot or planting bed in a warm, partially shaded area with temperatures around 70-85°F (21-29°C). The plant thrives in tropical and subtropical climates.
- Watering: Keep the soil slightly moist but not waterlogged. Water the plant regularly, especially during dry periods. Avoid overwatering to prevent root rot.
- Transplanting: Once the seedlings reach a few inches tall, they can be transplanted to a larger pot or the garden. Maintain a spacing of about 12 inches between plants.
- Sunlight: Scoparia Dulcis prefers partial shade to full sun. Place the plant where it receives morning sunlight or filtered light during the day.
- Fertilization: Apply a balanced, organic fertilizer every four to six weeks during the growing season to promote healthy growth.
- Pruning: Regularly trim the plant to maintain its shape and encourage more branching. Pruning also helps prevent the plant from becoming leggy.
- Pests and Diseases: Scoparia Dulcis is generally resistant to pests and diseases. However, monitor the plant for aphids or caterpillars and take appropriate measures if an infestation occurs.
- Harvesting: The plant is ready for harvest when it reaches 6-8 inches in height. Harvest the leaves, stems, and flowers as needed for medicinal or culinary uses.
Remember to research and obey any local regulations before planting Scoparia Dulcis, as it may be considered an invasive species in certain regions.

Place in a bright room that is sun drenched almost all day. Or directly in a south-facing window.

The plant with scientific name Scoparia Dulcis requires proper watering techniques to thrive. To water this plant, ensure that the soil is moist but not waterlogged. It is best to water the plant deeply and thoroughly, allowing the water to reach the roots. However, it is essential to check the soil moisture level regularly and avoid overwatering to prevent root rot.
It is recommended to water Scoparia Dulcis regularly, especially during the summer months, when the plant tends to lose more water due to high temperatures. Ensure that you water the plant early in the morning or late in the evening to avoid water evaporation.
Additionally, it is essential to use high-quality potting soil that retains moisture and has good drainage. If the soil is not well-drained, it can lead to waterlogging, which can be fatal to the plant.
Overall, proper watering techniques are crucial to the growth and health of Scoparia Dulcis. Ensure that you monitor the soil moisture level and water the plant consistently to keep it healthy and thriving.
To fertilize the Scoparia Dulcis plant, use a balanced, water-soluble fertilizer every 2-3 weeks during the growing season. Dilute the fertilizer according to the package instructions and apply it to the soil around the base of the plant, avoiding getting it on the leaves. Do not over-fertilize as this can cause damage to the plant.
Scoparia Dulcis plant thrives in well-draining soil with a slightly acidic pH level. A suitable soil blend for this plant is a mix of aged compost, perlite, vermiculite, and peat moss. The aged compost provides the necessary nutrients for the plant's growth, while perlite and vermiculite aid in drainage and aeration. Peat moss helps to retain moisture without causing waterlogging, which can be fatal to the Scoparia Dulcis plant. It is important to ensure that soil is moist but not soggy, by watering the plant when the topsoil feels dry to the touch. Additionally, fertilizing the plant with a balanced fertilizer every two weeks during the growing season can help promote its growth and health.
To propagate this plant, the first step is to obtain a healthy and mature specimen from which to take cuttings. Once you have selected a plant, look for stems that are at least 4-6 inches long, without any signs of disease or damage. Using a clean, sharp pair of pruning shears, cut the stem just below a node, where a leaf is attached.
Next, remove the leaves from the lower half of the stem to expose the nodes where roots will develop. Dip the cut end of the stem into rooting hormone powder, tapping off any excess. Then, insert the stem into a well-draining potting mix, keeping the leaves above the soil surface. Water the cutting well, and cover the pot with a clear plastic bag to create a humid environment.
Place the pot in a bright but indirect light location, and maintain consistent moisture levels. In a few weeks, the cutting should have rooted and start to grow new leaves. Once the plant has established roots and new growth, it can be carefully transplanted into a larger container or outdoors in a suitable garden bed.


