Plant Overview
Commonly known as the Heartleaf Skullcap, this native North American perennial is a hidden gem of the deciduous forest. Its name comes from the unique "skullcap" shape of its seed pods, which resemble miniature medieval helmets or caps. A member of the mint family, it brings a splash of dreamy periwinkle to shaded garden corners where other plants might struggle to thrive.
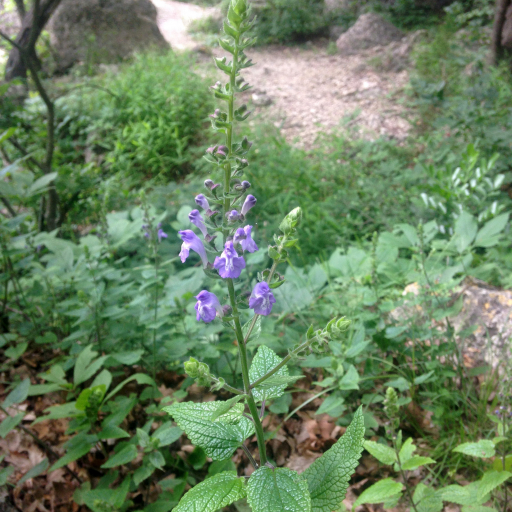
🔍 How to Identify
- 🌿 The Foliage: Look for soft, heart-shaped leaves with scalloped edges. They are deeply veined and often covered in fine, velvety hairs that give the plant a distinct silvery-green or grayish sheen.
- 🪻 The Blooms: The plant produces upright spikes of tubular, two-lipped flowers. They are typically a bicolored blue and white, appearing almost like tiny snapdragons reaching toward the canopy.
- 🦴 The "Skullcap": After flowering, the plant develops a unique seed calyx. It looks like a tiny, dish-like cap with a lid that flips open to disperse seeds, a signature trait of the Scutellaria genus.
🏡 In Your Garden
- 🌳 The Shade Specialist: Unlike many of its sun-loving mint cousins, Heartleaf Skullcap is a true woodland resident. It thrives in dappled light or full shade, making it an excellent choice for planting under large deciduous trees or in "wild" shaded borders.
- 🪵 Drought Tolerance: While it enjoys moist, well-drained soil, this species is surprisingly resilient. Its hairy leaves help it conserve moisture, allowing it to survive dry spells better than many other woodland wildflowers. It actually prefers slightly rocky or limestone-rich soil.
⚠️ Safety & Toxicity
- 🟢 General Status: Scutellaria ovata is generally considered non-toxic to humans and common household pets like cats and dogs.
- 🧴 Sticky Stems: The stems are often covered in glandular hairs that can feel slightly sticky to the touch. While not harmful, some sensitive individuals may find the texture a bit unpleasant during pruning, so garden gloves are a simple solution.
✨ Fun Fact
The specific shape of the Heartleaf Skullcap flower is a marvel of evolutionary engineering. It is perfectly designed for long-tongued bees; when a bee lands on the lower "lip" to drink nectar, the flower’s upper parts are triggered to tap the bee’s back, precisely depositing pollen where the bee can't easily groom it off!

Detailed Care Instructions
To grow Scutellaria Ovata, also known as heartleaf skullcap or hairy skullcap, you can follow these steps:
- Obtaining seeds or plants: You can purchase Scutellaria Ovata seeds from online seed suppliers or find young plants at local nurseries or botanical gardens.
- Location: Choose a suitable location for planting. Scutellaria Ovata prefers partial shade or full sun, depending on the region. Ensure that the soil is well-draining.
- Soil preparation: Prepare the soil by removing any weeds or rocks and loosening it with a garden fork or a tiller. Amend the soil with organic matter like compost to improve its fertility and drainage.
- Planting seeds: If you have seeds, sow them directly into the soil after the last frost date for your area. Lightly cover the seeds with soil and water gently. Maintain a spacing of about 18-24 inches between each seed.
- Transplanting seedlings: If you have young plants, dig a hole slightly larger than the root ball and place the plant into it. Ensure that the top of the root ball is level with or slightly above the soil surface. Backfill the hole with soil, firm it gently around the plant, and water thoroughly.
- Watering and care: Keep the soil moist during the germination period and regular watering throughout the growing season. Ensure that the plant receives about 1 inch of water per week. Mulching around the plants can help retain moisture and control weed growth.
- Fertilization: Scutellaria Ovata generally doesn't require heavy fertilization. However, you can apply a balanced, slow-release organic fertilizer in early spring to provide necessary nutrients.
- Pruning: Trim the plant to shape it and remove any dead or damaged growth. Pruning can also help promote denser growth and prevent legginess.
- Pests and diseases: Scutellaria Ovata is generally resistant to most pests and diseases. However, keep an eye out for common garden pests like aphids or spider mites. If necessary, use organic insecticidal soap or neem oil to control them.
- Propagation: You can propagate Scutellaria Ovata by collecting seeds or taking stem cuttings. Collect seeds when they are mature and sow them in appropriate conditions. For stem cuttings, take 3-4 inch long cuttings from healthy plants, dip them in rooting hormone, and place them in a well-draining potting mix.
By following these steps, you should be able to successfully grow Scutellaria Ovata and enjoy its beautiful foliage and flowers.

Place in a bright room that is sun drenched almost all day. Or directly in a south-facing window.

Scutellaria Ovata is a plant that grows well in moist soil. It is important to regularly check the soil moisture before watering to avoid over-watering. A good way to test if it needs water is to insert your finger into the soil about an inch deep. If it feels dry, it is time to water.
When watering, use a watering can or hose with a gentle flow and water the soil around the base of the plant, rather than overhead. This will help prevent the leaves from getting wet, which can lead to diseases.
Water thoroughly until the soil is moist, but not waterlogged. It is important to avoid letting the plant sit in standing water, as this can lead to root rot.
In the summer months, when temperatures are higher and the plant is growing actively, it may require more frequent watering. In the winter, however, the plant may need less water as it goes dormant.
Overall, it is important to maintain consistent moisture levels for Scutellaria Ovata to keep it healthy and thriving.
To fertilize this plant, first, choose a water-soluble fertilizer that is balanced in nitrogen, phosphorus, and potassium (NPK). Dilute the fertilizer according to the manufacturer's instructions and apply it to the soil around the base of the plant. Avoid getting the fertilizer on the leaves or stems, as this can burn the plant.
Apply the fertilizer every four to six weeks during the growing season, which is typically from spring to fall. Reduce fertilization during the winter months, as the plant will be dormant.
Regular watering and proper soil preparation will also help this plant grow strong and healthy. Ensure the soil is well-draining and rich in organic matter, and water the plant deeply and consistently, allowing the top inch of soil to dry out between watering sessions.
Scutellaria Ovata plant prefers a well-draining soil that is slightly acidic with a pH between 5.5 and 6.5. The soil should be rich in organic matter, such as compost, and should be kept moist but not waterlogged. It is also important to ensure that the soil is porous and does not become compacted, as this can hinder root growth. When potting Scutellaria Ovata, a mix of peat moss, perlite, and sand can create an ideal growing medium. Soil amendments such as bone meal or blood meal can also be added for added nutrition. Overall, it is important to choose a soil that provides good drainage, nutrient availability, and a pH range that is suitable for this plant.
Scutellaria ovata is a perennial plant that can be propagated through both seeds and cuttings.
Seed propagation:
- Collect mature seeds from the plant.
- Prepare a well-draining potting mix and moisten it.
- Sow the seeds on the surface of the soil, lightly pressing them into the mix.
- Cover the pot with a plastic or glass lid to create a humid environment for the seeds.
- Place the pot in a bright location, but avoid direct sunlight as it may overheat and damage the seeds.
- Keep the soil moist and wait for the seeds to germinate.
- Once the seedlings have developed, you can transplant them into larger containers or outdoor garden beds.
Cutting propagation:
- Choose a healthy stem from the plant and cut a piece that's around 4-6 inches long.
- Remove the leaves from the bottom 2 inches of the cutting.
- Dip the cut end into rooting hormone to stimulate root growth.
- Prepare a potting mix that's moist and well-draining.
- Make a hole in the soil and insert the cutting, gently pressing the soil around the base to support it.
- Cover the pot with a plastic bag to create a humid environment that encourages the cutting to take root.
- Place the pot in bright, indirect light.
- Check on the cutting regularly, and keep the soil moist but not overly wet.
- Once the cutting has rooted, you can transplant it into a larger pot or an outdoor garden bed.


