Plant Overview
Often called the "Potato Vine" or "Jasmine Nightshade," this vigorous climber is a romantic staple of Mediterranean-style gardens. While it looks delicate with its clouds of airy, star-shaped blossoms, it is a hardy survivor that can quickly transform a bare fence into a wall of white. Despite its common name, it isn't a true jasmine, though it offers the same elegant, cascading aesthetic for vertical spaces.
🔍 How to Identify
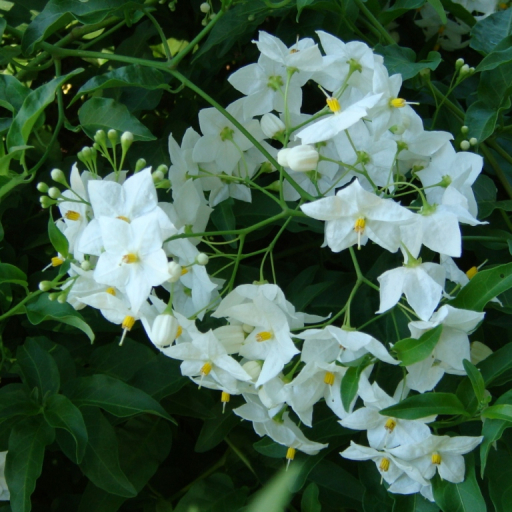
- 🌸 Starry Blossoms: Features clusters of five-petaled, star-shaped flowers that are usually pure white or tinged with pale blue, each sporting a distinct yellow "beak" (anthers) in the center.
- 🍃 Glossy Foliage: The leaves are deep green, lance-shaped, and have a smooth, waxy texture that remains lush throughout the growing season.
- 🪜 Twining Stems: Unlike vines with sticky pads or tendrils, this plant climbs by winding its supple, brownish stems around supports like wires, trellises, or railings.
🏡 In Your Garden
- 🧱 Structural Support: Because it is a "twiner," it requires a sturdy frame to climb. It’s perfect for covering pergolas or ugly chain-link fences, but it needs a little "training" with garden twine when it’s young.
- ✂️ Vigorous Growth: This plant is a fast mover! To prevent it from becoming a tangled "bird's nest," give it a heavy pruning in late winter or early spring to encourage fresh, flowering wood.
- 🌞 Sun & Drainage: It thrives in full sun but appreciates a bit of afternoon shade in scorching climates. The most important factor is well-draining soil; it dislikes sitting in stagnant water which can lead to root rot.
⚠️ Safety & Toxicity
- 🚫 Toxic Status: As a member of the Solanaceae (Nightshade) family, this plant contains solanine. It is considered toxic if ingested.
- 🐾 Pets & Kids: The small, dark berries that occasionally appear after flowering are particularly dangerous. Keep this plant away from curious pets or toddlers, as ingestion can cause vomiting, lethargy, and stomach pain.
✨ Fun Fact
- 🥔 Potato Cousins: If you look closely at the flowers of a potato or tomato plant, you’ll notice they look almost identical to the blooms on this vine. They are all close botanical relatives, though you definitely shouldn't try to eat the roots of this one!

Detailed Care Instructions
To grow Solanum jasminoides, also known as potato vine or jasmine nightshade, follow these steps:
- Choose the right location: Select a sunny spot in your garden with well-draining soil. Solanum jasminoides prefers full sun but can tolerate light shade.
- Prepare the soil: Ensure the soil is loose, fertile, and well-draining. Amend heavy clay soil with organic matter such as compost to improve drainage.
- Planting: Dig a hole that is slightly wider and deeper than the plant's root ball. Gently remove the plant from its nursery container and place it in the hole. Backfill the hole with soil, firming it gently around the roots. Make sure the plant is positioned at the same level as it was in the nursery container.
- Watering: Water the plant thoroughly after planting to settle the soil and hydrate the roots. After that, water deeply once or twice a week, allowing the top few inches of soil to dry out between waterings. Avoid overwatering as it can lead to root rot.
- Mulching: Apply a layer of mulch around the plant to retain moisture, suppress weeds, and regulate soil temperature. Pine straw, wood chips, or shredded bark make good choices for mulch.
- Fertilizing: Apply a balanced, slow-release fertilizer in spring, following the package instructions. Additionally, feeding the plant with a water-soluble fertilizer every 4-6 weeks during the growing season can encourage healthy growth and flowering.
- Pruning: Prune Solanum jasminoides to maintain its shape and encourage bushier growth. In the late winter or early spring, before new growth starts, trim back any dead, damaged, or overgrown branches. You can also prune lightly after each flowering cycle to shape the plant and promote branching.
- Support: As Solanum jasminoides grows, it may need support to climb. Provide a trellis, fence, or other structures where the vine can attach itself and grow upward.
- Pests and diseases: Keep an eye out for common pests like aphids, spider mites, and whiteflies. Treat any infestations promptly with organic or chemical insecticides, if necessary. Solanum jasminoides is generally resistant to diseases but may occasionally suffer from leaf spots or mildew in humid conditions.
- Winter care: Solanum jasminoides is not cold hardy and may need protection in regions with harsh winters. In colder climates, bring potted plants indoors and cover outdoor plants with a frost blanket or mulch to insulate the roots.
Following these care guidelines, your Solanum jasminoides plant should thrive and reward you with beautiful white, star-shaped flowers and lush foliage.

Place in a bright room that is sun drenched almost all day. Or directly in a south-facing window.

To water this plant, wait until the top two inches of soil are dry before watering thoroughly. Use room temperature water and avoid getting the foliage wet. Ensure proper drainage by emptying any excess water from the saucer or pot. Water this plant regularly during the growing season, reducing frequency in the winter months.
To properly fertilize this plant, begin by selecting a high-quality, balanced fertilizer. In the spring and summer months, apply the fertilizer every two weeks, while in the fall and winter, reduce the frequency to once every month. Be sure to follow the manufacturer's instructions for the proper amount to apply, based on the size of the plant, and avoid over-fertilizing as this can cause damage to the plant. Additionally, make sure the soil is moist before applying the fertilizer to prevent root burn.
The ideal soil for Solanum Jasminoides plant should be well-drained, fertile, and rich in organic matter. The pH should range from slightly acidic to neutral, between 6.0 to 7.0. Avoid using heavy clay soils which will not allow proper drainage, leading to root rot diseases. You can create a suitable soil mix by combining garden soil with equal parts sand, peat moss, and compost. Organic matter helps retain soil moisture while improving soil structure. Before planting, ensure that the soil is evenly moist but not waterlogged. In order to maintain soil fertility, you can top-dress the plant with additional compost or give it a liquid fertilizer monthly during its growing season.
To propagate this plant, take a cutting from a healthy and mature stem. The cutting should be at least 4 inches long and should have at least one pair of leaves on it. Remove the leaves from the bottom two nodes of the cutting.
Prepare a well-draining soil mix and make a hole in the soil using a pencil or a stick. Dip the cut end of the stem in rooting hormone, shaking off any excess and then insert it carefully into the hole. Firmly pack the soil around the stem.
Place the cutting in indirect light and keep the soil moist but not waterlogged. It is important to keep the cutting in a warm and humid environment, so covering it with a plastic bag or placing it in a propagator can be helpful.
After a few weeks, you should start to see new growth on the cutting, which is a sign that it has taken root. At this point, you can remove the plastic bag or propagator and slowly acclimate the plant to its new environment. Once the plant has established itself, it can be repotted into a larger container or planted in the ground.
Common pests of the potato vine include Spider mites, aphids, whiteflies, larvae. Make a habit of checking your potato vine frequently for pests so that any infestations can be caught and managed early.


