Plant Overview
Often called the Pacific Aster, this resilient wildflower is a staple of the West Coast’s coastal scrub and grasslands. Despite its name, it isn't from South America; it is a true-blue North American native that paints the late-summer landscape with soft shades of violet. It acts as a final "last call" for honeybees and butterflies, blooming just as other summer flowers begin to fade.
🔍 How to Identify
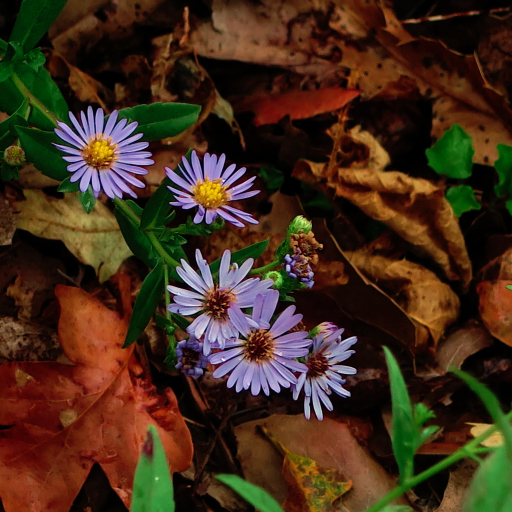
- 🌸 The Bloom: Classic daisy-like flowers with 15–40 slender "petals" (ray florets) that range from pale lavender to deep violet, surrounding a bright yellow center.
- 🍃 The Foliage: Long, narrow, lance-shaped leaves that are usually hairless but can feel slightly rough or "sandpapery" to the touch.
- 📏 Growth Habit: A herbaceous perennial that can stand anywhere from 1 to 3 feet tall, often forming dense, lush clumps via underground runners.
🏡 In Your Garden
- 🐝 Pollinator Magnet: This is one of the best plants for supporting late-season biodiversity. It provides a critical nectar source for migrating butterflies and native bees during the autumn months.
- 🌊 Coastal Warrior: Highly tolerant of salt spray and sandy soils, making it a perfect choice for seaside gardens where more delicate flowers might struggle.
- ✂️ Spreading Nature: It spreads through rhizomes (underground stems). While this makes it great for erosion control on slopes, you may want to give it plenty of room or use root barriers to keep it from "wandering" into other garden beds.
⚠️ Safety & Toxicity
- 🐾 Non-Toxic: Good news for pet owners! Symphyotrichum chilense is generally considered non-toxic to cats, dogs, and horses.
- 👶 Family Friendly: There are no known skin irritants or poisonous properties associated with this plant, making it a safe addition to a backyard where children play.
✨ Fun Fact
The yellow centers of the Pacific Aster actually change color after they have been pollinated! Once a flower has been visited by a bee and successfully fertilized, the yellow disc often turns a reddish-purple, signaling to other insects that the nectar "shop" is closed.

Detailed Care Instructions
| Humidity | Normal |
| Lighting | Full Sun |
| Difficulty | Easy |
| Hibernation | Cold Period |
| Temperature | 5°C - 15°C |
| Hardiness Zones | 1 - 4 |
To grow Symphyotrichum chilense (Chilean aster) plant, follow these steps:
- Select a suitable location: Choose a spot with full sun exposure and well-drained soil. The plant can tolerate a wide range of soil types but prefers slightly acidic to slightly alkaline soil.
- Prepare the soil: Clear the area of any weeds or debris and loosen the soil with a garden fork or tiller. Add organic matter like compost to improve soil fertility and water drainage.
- Planting: Sow the seeds or transplant young Symphyotrichum chilense plants in spring after the last frost date. Make sure to space them about 12-18 inches apart to allow proper growth and airflow.
- Watering: Keep the soil evenly moist but not waterlogged. Water the plants deeply once or twice a week, depending on the weather conditions. Avoid overhead watering as it can encourage diseases.
- Mulching: Apply a layer of organic mulch around the plants to conserve soil moisture and suppress weed growth. Leave a small gap around the stem to prevent rot.
- Fertilization: Symphyotrichum chilense generally doesn't need much fertilization if the soil is rich in organic matter. However, you can apply a balanced, slow-release fertilizer once a year in early spring if your soil lacks nutrients.
- Support: As the plants grow taller, you may need to provide support in the form of stakes or cages to prevent them from falling over.
- Pruning: After flowering, you can deadhead the plant by removing spent blooms to encourage more blooming. In late fall or early spring, cut back the plant to the ground to promote new growth.
- Pest and disease control: Monitor the plants for pests like aphids or powdery mildew. If necessary, use organic insecticides or fungicides to control the infestation.
- Winter care: In colder regions, the plant may require protection during winter. Apply a layer of mulch or straw around the base of the plant to insulate the roots from freezing temperatures.
By following these steps, you can successfully grow Symphyotrichum chilense plants and enjoy their beautiful blooms.

Place in a bright room that is sun drenched almost all day. Or directly in a south-facing window.

Symphyotrichum Chilense plant is a type of flowering plant that requires adequate watering for proper growth and development. To water this plant, you need to ensure that the soil surrounding the plant is moist to a depth of around 6 inches. This can be achieved by watering the plant deeply once or twice a week, depending on the climate and soil type.
When watering, it's essential to ensure that you don't overwater the plant as this may lead to root rot. To avoid this, you should allow the soil to dry out partially before watering again. It's also recommended that you water the plant either in the early morning or late evening to reduce water loss through evaporation.
In addition to watering, it's essential to mulch the soil around the plant to help retain moisture and prevent soil erosion. Mulching also helps to regulate soil temperature and suppress weed growth.
Overall, watering Symphyotrichum Chilense plant requires regular monitoring of soil moisture levels and adjusting the watering schedule based on the plant's needs. With proper watering and care, this plant can thrive and produce beautiful blooms.
To fertilize the Symphyotrichum Chilense plant, apply a balanced fertilizer with equal amounts of nitrogen, phosphorus, and potassium during the growing season. Use a slow-release fertilizer and apply according to package instructions. Avoid over-fertilizing as it can cause excessive growth and reduce the plant's resistance to disease. Water the plant well after fertilizing to help the nutrients reach the roots.
Symphyotrichum Chilense prefers soil that is well-draining and has a pH level of 6.5 to 7.5. It thrives in soils that are rich in organic matter, as this improves the soil's fertility and water retention. The soil should be kept moist but not waterlogged, as excessive moisture can cause root rot. Additionally, Symphyotrichum Chilense grows best in full sunlight and requires regular fertilization with a balanced fertilizer to maintain its health and vigor. It is also important to remove any dead or diseased plant material to prevent the spread of diseases or pests. Finally, Symphyotrichum Chilense should be planted at a depth that is appropriate for its root system, and should be spaced appropriately to allow for proper air circulation.
To propagate this plant, you will need to collect stem cuttings from mature, healthy plants. Select stems that are about 4-6 inches long and have several sets of leaves. Using pruning shears or a sharp knife, make a clean cut just below a node (a small bump where a leaf meets the stem). Remove any leaves from the bottom half of the stem.
Fill a small pot with moist soilless potting mix and poke a hole in the center. Dip the cut end of the stem in rooting hormone powder and tap off any excess. Place the stem into the hole and press the soil gently around it.
Water the cutting thoroughly and cover the pot with a clear plastic bag to create a humid environment. Place the pot in a bright, indirect light location but avoid direct sunlight. Check the soil moisture every few days and water as needed to keep it moist but not saturated.
After a few weeks, the cutting should begin to form roots and new growth. Once the new plant is established, you can transplant it into a larger pot or into your garden.
Common pests of the california aster include Aphids, thrips, larvae. Make a habit of checking your california aster frequently for pests so that any infestations can be caught and managed early.


