Plant Overview
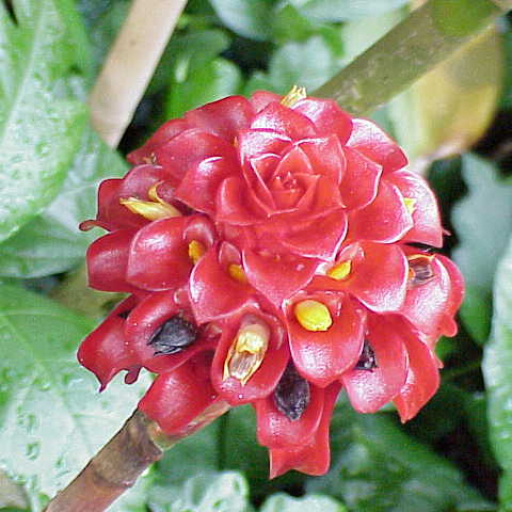
Known as the Indonesian Wax Ginger or the "Pineapple Ginger," this tropical showstopper looks like it stepped right out of a prehistoric jungle. While it isn't a true pineapple, its waxy, crimson cone-shaped bracts are a dead ringer for the tropical fruit. In its native rainforests of Indonesia and Australia, this plant serves as a vibrant beacon for nectar-seeking birds, standing tall among the dense undergrowth.
🔍 How to Identify
- 🍍 The "Pineapple" Inflorescence: The most striking feature is the bright red, waxy cone (bracts) that grows from the base of the plant or the ends of the stalks.
- 🟡 Hidden Flowers: Small, true yellow flowers shyly peek out from between the stiff red scales of the cone.
- 🌿 Spiral Foliage: The dark green, glossy leaves grow in a distinct spiral pattern around tall, arching bamboo-like canes.
- 📏 Stately Stature: It is a large grower, often reaching heights of 6 to 8 feet, creating a lush, architectural screen of greenery.
🏡 In Your Garden
- ☁️ Tropical Shade: Unlike many flowering plants, this ginger thrives in dappled light or full shade. Think of its home on the rainforest floor; direct, harsh sun will quickly scorch those beautiful waxy bracts.
- 💧 Thirsty Roots: It is a moisture-lover that hates "wet feet." You’ll want to keep the soil consistently damp but ensure it's in a rich, organic mix that drains quickly to avoid rhizome rot.
- 🌡️ Warmth is Key: This is a true tropical. It will go dormant or suffer if temperatures dip below 50°F (10°C). If you live in a cooler climate, it makes a spectacular (though large) greenhouse or conservatory specimen.
⚠️ Safety & Toxicity
- ✅ Generally Safe: The Indonesian Wax Ginger is considered non-toxic to humans and common household pets like cats and dogs.
- 🚫 Not for Eating: While it belongs to the broader ginger family (Zingiberaceae), this is an ornamental plant. It does not possess the culinary flavor of the ginger root you find in kitchens and should not be ingested.
✨ Fun Fact
The scientific name Ananassae is a direct nod to the Pineapple genus, Ananas. Evolutionarily, this plant "mimics" the look of a pineapple to attract specific pollinators like sunbirds, which are strong enough to probe the tough, waxy scales for nectar.

Detailed Care Instructions
| Humidity | Normal |
| Lighting | Full Sun |
| Difficulty | Medium |
| Hardiness Zones | 10 - 11 |
To grow Tapeinochilos Ananassae (Red Ginger) plants, follow these steps:
- Choose the right location: Select a spot in your garden that receives partial shade to full sun. Ensure the soil is well-draining and fertile.
- Prepare the soil: Red Ginger plants prefer loose, nutrient-rich soil. Add organic compost or well-rotted manure to the soil to improve its fertility.
- Planting: Dig a hole in the prepared soil that is slightly wider and deeper than the plant's container. Gently remove the plant from its container and place it in the hole, making sure that the top of the root ball is level with the soil's surface. Fill in the hole with soil and gently firm it around the plant.
- Watering: Red Ginger plants require regular watering to keep the soil consistently moist, especially during dry periods. However, ensure the soil is not waterlogged, as it can lead to root rot. Water deeply, allowing the water to penetrate the root zone.
- Mulching: Apply a layer of organic mulch around the plant, such as wood chips or bark, to help retain moisture in the soil, suppress weeds, and regulate soil temperature.
- Fertilization: Feed the Red Ginger plant monthly during the growing season with a balanced, slow-release fertilizer. Follow the instructions on the package for proper application rates.
- Pruning: Remove any dead, damaged, or yellow leaves regularly. You can also trim back older stalks if desired to encourage new growth.
- Protect from extreme temperatures: Red Ginger is typically grown in tropical or subtropical regions, so protect the plant from freezing temperatures by covering it during cold winters or moving it indoors.
- Harvesting: Harvest the Red Ginger flowers when they are fully mature and open for use in floral arrangements or as cut flowers. However, avoid harvesting too many flowers from one stem, as it can weaken the plant.
By following these guidelines, you should be able to successfully grow and enjoy your Tapeinochilos Ananassae plant.

Place in a window with dappled sun or a spot in the middle of a room. Or directly in a window facing west or east.

Tapeinochilos Ananassae plants require regular watering to thrive. It is important to ensure that the soil stays moist but not waterlogged. Overwatering can lead to root rot, while under watering can lead to the plant wilting and eventually dying.
When watering, it is best to water the soil directly and avoid getting the leaves wet. This can cause water to collect in the leaf axils, leading to fungal growth and disease. The frequency of watering will depend on the temperature and humidity in the plant's environment. During periods of high heat and low humidity, the plant may require more frequent watering.
It is also important to allow the soil to dry out slightly between waterings. This allows the roots to breathe and prevents waterlogging. One way to ensure this is to check the soil moisture level regularly by inserting a finger into the soil. If it feels dry to the touch, it is time to water.
When watering, it is best to use room temperature or tepid water. Cold water can shock the plant, while hot water can damage the roots. It is also important to avoid using water that has been treated with chemicals, such as chlorine or fluoride. These can be harmful to the plant and can build up in the soil over time.
Overall, a consistent watering schedule and proper soil moisture levels are key to keeping Tapeinochilos Ananassae plants healthy and thriving.
Firstly, prepare a well-draining soil mix with equal parts of peat moss, perlite, and coarse sand. Next, apply a balanced liquid fertilizer once every two weeks during the growing season (spring and summer) and once every month during the dormant season (fall and winter). Dilute the fertilizer to half strength to avoid over-fertilizing. Lastly, ensure that the plant is receiving adequate sunlight and water to promote healthy growth and development.
Tapeinochilos Ananassae plant requires a well-draining soil that is rich in nutrients and organic matter. The soil should have a pH level of around 6.0 to 7.0, which is slightly acidic to neutral. A good soil mix for this plant would include coconut coir, perlite, vermiculite, and aged compost or peat moss. This mixture will provide good drainage and aeration while also retaining moisture and nutrients. It is important to avoid using heavy or clay soils as they can lead to waterlogging and root rot. Additionally, the soil should be kept consistently moist, but not waterlogged. Adding a layer of mulch or leaf litter to the top of the soil can help retain moisture and provide additional organic matter as it breaks down over time.
To propagate this plant, you should first locate a healthy parent plant. Then, using a sharp, clean cutting tool, carefully take a cutting from the parent plant. Make sure the cutting is at least 4 inches long and has several leaves attached to it.
Remove the bottom leaves from the cutting, leaving only a few at the top. This will allow the cutting to focus all its energy on growing new roots. Dip the cut end of the cutting into rooting hormone to help it establish new roots.
Next, prepare a pot with well-draining soil and make a hole in the center. Place the cutting in the hole, covering the bottom part with soil. Gently tamp down the soil around the cutting to secure it in place.
Water the cutting thoroughly and keep the soil consistently moist. The newly propagated plant should be placed in a warm, bright spot, but out of direct sunlight. Humidity is important for the cutting to develop roots. You can cover the pot with plastic wrap or place it in a humidity dome to create a humid environment.
Within a few weeks, the cutting should begin to develop new leaves, indicating that it has successfully rooted. Once the plant is established, you can transplant it to a larger pot or outdoor location.


